
Role-Based Security: Add Users
This is one of a series of job aids for implementing role-based security. If you are first implementing role-based security, start with this job aid to add users, then proceed to the Create Roles job aid, and then the Assign Roles to Users job aid.
This job aid assumes that the system options and required security access has been enabled for role-based security.
More information about role-based security is found in the online help topics. Open the System Management book, then the Security book, and then the Role-Based Security book.
![]()
When setting up security on your system, keep in mind that the "User name" is the "Clerk name" in Point-of-Sale. So, if you set up a User named "Joe" and assign security, then you would enter the User name Joe in the Clerk field in the POS window.
1
Display the viewer
-
From the Browser window, do either of the following to display the Role-Based Security Assignments by User viewer (RBS) window:
-
In the Launch bar, type RBS and press Enter.
-
Use the mouse to click through the menu entries:
-
-
(Eagle SSE) System Management > Security > Set Role-Based Security
-
(Eagle E4W) System Management Menu > Security Maintenance Menu > Role-Based Security
-
-
From this window, click Misc.
-
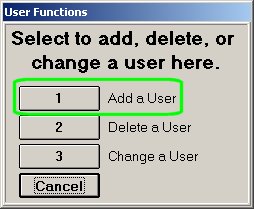
From the Miscellaneous Menu, click 2-Add/Delete/Change User.
-
From the User Functions menu, click 1-Add a User. The Add a User dialog displays.

2
Enter user info
-
Fill in the following fields:
-
User— Type a name for the user.
-
Full Name— Type the first and last name of the user.
-
(Optional) Password— Type a password for this user.
-
Check Pswd at POS— Select Y if you want POS to require the user to enter their password at POS.
-
Cash Drawer #— If the POS station has more than one cash drawer (per POS station), select 1 or 2 to indicate the cash drawer assigned to this user.
-
(Optional) Default Salesperson— Use this field if you want to link this User to a salesperson record in Salesperson File Maintenance (MSL). If you do this, then POS transactions rung by this User (User code entered in the Clerk field in POS) are reported under the salesperson code entered in this field.
-
Ignore the remaining fields in the dialog.
-
Click OK. The dialog closes and the user name you just entered displays in the viewer.
-
Repeat this process to add additional users to the system. Then refer to the Create Roles job aid to continue with implementing role-based security.
