Tax Free Holiday: Setup
Set Up Option 9700
In Options Configuration, set option 9700 "Tax Free Holiday feature available on System" to Yes. In the Options Configuration window, click ID, enter 9700, and press Enter. Set the Current Value field to Yes, and click Change.
Set Up Returns Validation
If you are not already using Returns Validation, you must set it up. This ensures that any returns that occur after the tax free holiday is over get returned at the correct, original tax code and rate. For complete setup instructions, click here.
Set Up User Codes for Tax Free Holiday
You can have up to nine categories that uniquely identify an item or group of items that are eligible for the Tax Free Holiday.
-
Decide what your categories are, and which User Code value and User Code position you will use to represent each category.
-
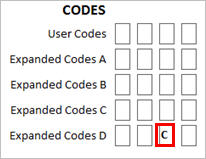
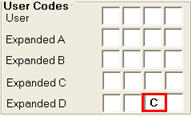
In Inventory Maintenance on the Codes tab, for each item in a category, set the User Code to the designated position/value. For example, you may decide that clothing items will have a value of C in the third position of Expanded Codes D, as shown below.
Note: You can use Item Code Update (RICU) or a Keyboard Macro to quickly change User Codes.
Set Up the Tax Free Holiday
-
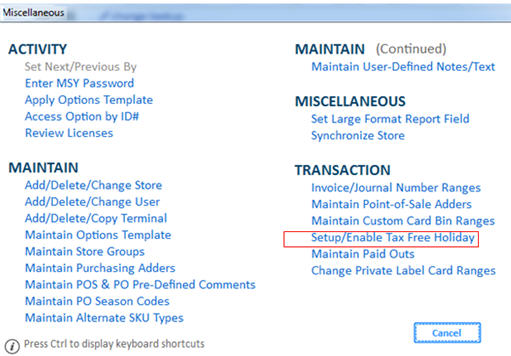
In Options Configuration, click Misc and select Set up/Enable Tax Free Holiday.
-
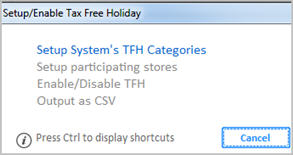
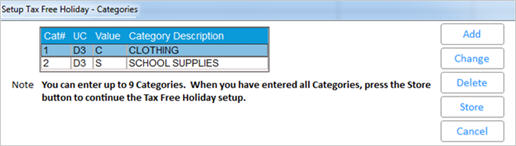
In the next dialog, select 1 – Set up System’s TFH Categories.
-
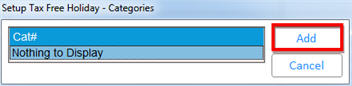
In the Categories dialog, click Add.
-
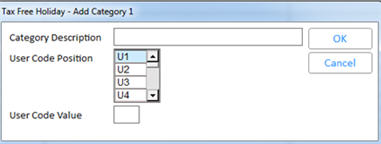
In the Add Category dialog that displays, fill in the fields. When finished, click OK.
Click any of the following for more information about that field.
-
Category DescriptionEnter up to 32 characters to identify the item or group of items. The Category Description should be a name or phrase that identifies the item or group of items with the assigned user code and user code value. For example, if the group of items you wish to include in the Tax Free Holiday is clothing, the Category Description would be "Clothing."
-
User Code PositionEnter the user code position that the item or group of items will be assigned to in Inventory Maintenance.
The user code position, and user code value, should match the items' user code and user code value that are identified under this category. For example, all items that would be classified as ‘Clothing’ for the Tax Free Holiday would have a user code value of C in the 3rd position of the Expanded D user codes in the Codes tab of Inventory Maintenance:
-
User Code ValueEnter a one-character value that will be entered in the designated User Code Position, to which the item or group of items will be assigned in Inventory Maintenance.
-
Add more categories if desired. Note: You can have up to nine categories.
-
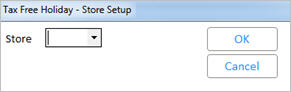
Press Store to begin the store and category setup.
-
Select the store number, store group, or "All" stores participating in this category of the Tax Free Holiday. Then click OK.
-
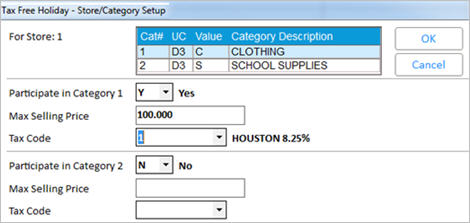
A dialog displays, showing each Store/Category Setup. Fill in the fields.
Click any of the following for more information about that field.
-
Participate in Category XWhere X is the category number, this field determines whether a specific category in a specific store participates in the Tax Free Holiday (TFH). Set this field to Yes for each of the participating categories. Leave the categories that will not be participating to N-No.
Note: In order to include a store or store group in the Tax Free Holiday, there must be at least one category participating for that store.
-
Max Selling PriceThe Maximum Selling Price for an item sold within a specific category and store to post as nontaxable. For each enabled category for a given store, you can establish a maximum selling unit price.
If the retail price is equal to or less than the Max Selling Price, the item will post as "tax free’" in POS. If the retail price is greater than the Max Selling Price, the item will post as it normally would in POS.
-
Tax CodeEnter the specific Tax Code for the participating category. Each category participating can have a different Tax Code. The Tax Code should be set up with 0.00% Tax Rate in Maintain Tax Codes (MTX) in order for the item to post as non-taxable, although you can use a Tax Code that has a tax rate, depending on the state/local Tax Free Holiday guidelines.
-
Once you have set up all of the categories that are participating in the given store’s Tax Free Holiday, click OK.
-
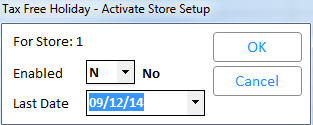
In the Activate Store Setup dialog that displays, fill in the fields.
Click either of the following for more information about that field.
-
EnabledThis field determines if the Tax Free Holiday (TFH) is active. When set to Yes, the item(s) that meet the store and category criteria post as nontaxable. When set to No, the item(s) that meet the store and category criteria post under normal conditions using the store and/or customer setup.
Typically you would set up the TFH ahead of time, setting the Enabled field to N. Then, when the TFH is due to start, go to Options Configuration, click Misc, and select option R. Then select 3-Enable/Disable TFH. Enter the Store/Store Group, click OK, and change the Enabled field to Y. Be sure to enable all relevant Stores/Store Groups.
-
Last DateThis field identifies the last day of the Tax Free Holiday (TFH). The TFH runs through the date specified in this field. Each store participating in a given TFH can establish a unique End Date for it. The following day after the Last Date, items go back to posting normally.
-
To make additions, changes, or deletions to the categories and selected stores, in Options Configuration click Misc, and select R – Setup/Enable Tax Free Holiday. Then select the appropriate button.
-
1 – Set up System’s TFH CategoriesThis takes you to the Setup Tax Free Holiday – Categories prompt, where you can Add more categories if all nine have not been used yet, and to Change and Delete existing categories.
Categories are master data, which means they can be used across all stores. Once the categories have been set up, you can add, modify or delete them by selecting this option. If a category is deleted, the category is automatically removed from the store setup as well.
-
2 – Set up participating storesThis option allows you to select a new store that will participate in the Tax Free Holiday (TFH) or to change an existing store that has already been set up.
All settings within this option are store specific, which means that the setup only applies to the store or store groups selected. You select a store, store group, or all stores, and configure each category to participate in the TFH.
-
3 – Enable/Disable TFHThis option allows you to enable or disable the Tax Free Holiday (TFH) and to modify the Last Date the TFH is to be active.
-
4 – Output as CSVThis option allows you to view the Tax Free Holiday (TFH) options as a csv file by System or by Store.
When selecting this option, you are prompted to select to view either System settings or Store settings.
If you select System settings, all of the nine categories along with their respective user code position and user code value display in a CSV (Excel or Notepad) output.
If you select Store settings, you are prompted to select the store or store group, so that the store or store group's store-specific options display in a CSV file (Excel or Notepad). A store's/store group's settings include all categories that participate or do not participate, the Max Selling Price and Tax Code for each of the categories, whether the TFH is active or not, and the last day of the TFH.
-
On the day of the Tax Free Holiday (TFH), be sure that your TFH categories are EnabledIn Options Configuration, click Misc and select option R, then select 3-Enable/Disable TFH. Enter the Store/Store Group, click OK, and change the Enabled field to Y. Be sure to enable all relevant Stores/Store Groups. . Note: The TFH automatically ends the day after the date entered in the Last Date field.