iNet Order Pro / Accounts Online:
Add Customer and Set Up Access
For iNet Order Pro or Accounts Online, use this job aid to add a customer and set up access for that customer. For each customer, complete these three tasks: 1) user name and password setup, 2) user security setup, 3) user capabilities setup.
This job aid assumes the following:
-
your system meets the general system requirements for iNet
-
the terminal setup has been completed
-
the page setup has been completed (Welcome page, Signoff page, Contact Us link)
More information about iNet can be found in the online help topics in the iNet book.
1
Set up user name and password
Set up a user name and password for each customer who will have access to iNet Order Pro or Accounts Online. Each iNet user is linked to a specific account number from Customer Maintenance (MCR).
You can have more than one user for a specific account number, with each user having a different name/password. For example, B.T. Contracting Inc. has three employees (Ben, Jason, Greg) who will use iNet. Set up each of them with three different user names and passwords, and link them all to the same account number.
-
From the Eagle Browser, click System Management Menu, Security Maintenance Menu, Terminal-Based Security.
-
Click Misc. From the Miscellaneous menu, click 7-Add/Delete/Change User.
-
From the User Function Menu, click 1-Add a User.
-
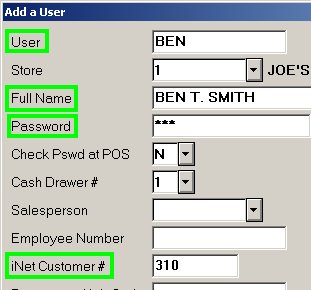
In the dialog that displays, fill in the following:
-
User – enter the User Name you want to assign to the customer (up to 10 digits, alphanumeric)
-
Store – enter 1
-
Full Name – enter the first and last name of the user
-
Password – enter a password for this customer
-
iNet Customer # – enter the account number from Customer Maintenance (MCR) that this user is associated with
-
Click OK. The Security Maintenance window displays, showing the user you just added. Continue with the next section to set up iNet user security.
2
Set up iNet user security
Create a security record for the iNet user so that access is allowed on the iNet terminal.
-
From the Security Maintenance window, at Terminal field, enter the iNet terminal number. Typically you will set this to 901.
-
Multistore users only: In the Store field, select ALL stores.
-
Click Misc. From the Miscellaneous Menu, click 6-Set All Capabilities to 'No'. A message displays that the capabilities were subtracted.
-
Click Change.
Multistore users: Click Yes to confirm that you want to change all stores.
3
(Optional) Set up user capabilities
If desired, define what the user can and can't do when he or she accesses your iNet site and the iNet Order Pro/Accounts Online applications.
-
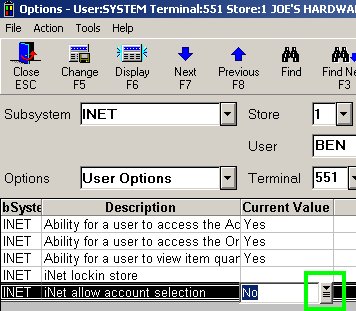
From the Eagle Browser, click System Management, Options Configuration menu, iNet Options.
-
From the Options list, select User Options. In the Store box, leave the default of 1.
-
In the Terminal box, enter the terminal number you created in Options Configuration (or Function MTR) to represent the iNet terminal. Typically the terminal number is 901.
-
In the User box, verify that the user name displays. This is the name that you set up in section 1 "Setup user name and password."
-
Click Display. The iNet options (capabilities) display in the grid. To review a definition of each option, click the Current Value field to display a down arrow. Click the arrow to display a dialog box with the definition and available settings for that option. Or, refer to the online help topics.
-
After reviewing the iNet options, set the value for each option for this user. To set the value:
-
Click the Current Value field to display a down arrow.
-
Click the arrow to display a dialog box with the definition and available settings for that option.
-
Select the value that applies to this user.
-
Click OK to close the dialog.
-
After setting all the values for this user, click Change.
-
Close the Options window.