
Creating and Maintaining Queue Schedules
Reports and other system tasks can be added to a queue to run automatically at a specific time based on the schedule you select. Use this job aid to review, create, or modify queue schedules.
When you're scheduling a queue to run, you must select a "queue schedule" that tells the system to run the queue at a specific time, day of the week, date of the month, etc. Pre-defined queue schedules are available. but you can also create and save your own schedules. The schedules you create are then available for selection, just like the pre-defined schedules.
1
Review existing queue schedules
-
From the Eagle Browser, click System Management Menu. From the list that displays, click Schedule an End-of-Day Queue (SEQ). A window displays with scheduled queues.
-
Click the Maintain Schedules link (next to the Store field). The Schedule Maintenance dialog displays with the time schedules that currently exist. Up to 999 schedules can exist per store. Schedules with (DEFAULT) in the Type column indicates a pre-defined schedule supplied by Epicor.

Field definitions
The TIME column indicates the time the queue will load. Entries in this column include
-
Shutdown— The system loads the queue during the SHUTDOWN procedure.
-
Unattended— The system loads the queue during the SHUTDOWN procedure. Or, if SHUTDOWN does not occur by 11:55 pm, the system loads the queue.
-
A specific time— The system loads the queue at the time indicated.
The remaining columns indicate the day(s) of the schedule (the day(s) the queue will run). Each schedule can only include one of the three columns.
-
Day of Week— the day(s) of the week of the schedule.
-
Day of Mo— the day(s) of the month of the schedule.
-
Month of Year— the month(s) of the year of the schedule.
-
End of Period— Indicates the end of periods(s) of the schedule.
2
Create a new queue schedule
-
From the Eagle Browser, click System Management Menu. From the list that displays, click Schedule an End-of-Day Queue (SEQ). A window displays with scheduled queues.
-
Click the Maintain Schedules link (next to the Store field). The Schedule Maintenance dialog displays.
-
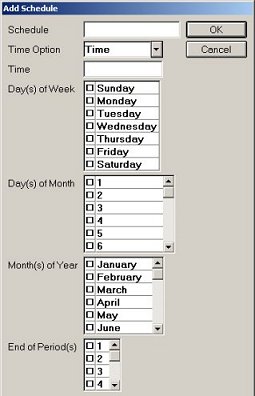
Click Add to create a new schedule. The Add Schedule dialog displays.
-
At Schedule, type a name for the schedule.
-
At Time Option, select one of the following:
-
Time— Select Time, then enter a specific time in the Time field.
-
Shutdown— The system loads the queue during the SHUTDOWN procedure.
-
Unattended— The system loads the queue during SHUTDOWN. Or, if SHUTDOWN does not occur by 11:55 pm, the system loads the queue at that time.
-
Set the schedule for the queue by using one of the following categories. Do not combine the categories. For example, if you create a schedule using Day(s) of Week, do not also use Day(s) of Month / Month(s) of Year in the same schedule.
-
Day(s) of Week— Select the day(s) of the week of the schedule.
-
Day(s) of Month / Month(s) of Year— Select the day(s) of the month and the month(s) of the year of the schedule.
-
End of Period(s)— Select the end of periods(s) of the schedule.
-
Click OK. The dialog closes and the schedule is added to the grid.
3
Modify an existing queue schedule
![]()
Schedules with (DEFAULT) in the Type column cannot be modified.
-
From the Eagle Browser, click System Management Menu. From the list that displays, click Schedule an End-of-Day Queue (SEQ).
-
Click the Maintain Schedules link (next to the Store field). The Schedule Maintenance dialog displays with the schedules that currently exist.
-
Locate the time schedule you want to modify (change or delete) and click to select and highlight it.
-
To delete the schedule, click Delete. In the "are you sure?" dialog, click Yes. A dialog displays that the schedule was deleted, click OK.
-
To change the schedule, click Change. The Change Schedule dialog displays. Make changes to the schedule, using the following fields.
Time Option— Select one of the following:
-
Time— Select Time and then enter a specific time in the Time field.
-
Shutdown— The system loads the queue during the SHUTDOWN procedure.
-
Unattended— The system loads the queue during the SHUTDOWN procedure. Or, if SHUTDOWN does not occur by 11:55 pm, then the system loads the queue at that time.
Schedule— The remaining columns indicate the day(s) of the schedule (the day(s) the queue will run). Each schedule can only include one of the following:
-
Day(s) of Week— Select the day(s) of the week of the schedule.
-
Day(s) of Month / Month(s) of Year— Select the day(s) of the month and the month(s) of the year of the schedule.
-
End of Period(s)— Select the end of periods(s) of the schedule.
-
After making your changes, click OK. A dialog displays that the change was successful, click OK.
-
To exit the Schedule Maintenance dialog, click Cancel.