
Enhanced FAX: Install and Setup
This job aid will guide you as you install and set up Enhanced FAX. After completing all the sections in this job aid in the order presented, Enhanced Fax will be available for use on your system.
![]()
A recorded training session on Enhanced Fax is available on Epicor’s website. Simply go to http://www.activant.com/eaglecustomers/education/training_index.html, click Recorded Events, and then click on the Enhanced Fax recorded session.
Enhanced FAX is a purchase option that allows you to:
-
Fax laser POS documents
-
Fax Accounts Receivable Statements and any accompanying collated invoices, all in laser format
-
Fax laser purchase orders, including the buyer's electronic signature (if you have the Buyer's Signature Capture application)
Enhanced FAX is integrated into the Document Management and Purchasing subsystems, allowing you to generate FAX output that is consistent with the output produced by other Eagle for Windows applications.
1
Requirements
Your system must meet the following requirements to use Enhanced Fax:
-
The Licensing Department has enabled "Enhanced FAX capabilities" in Options Configuration. To verify this, display the Options Configuration window. Set the Subsystem field to ALL and the Options field to MSY. Click Display. If the flag is set to N, contact your Epicor Direct sales representative at 800-538-8597. This flag must be set to Y before you install.
-
An Eagle server that uses an operating system other than ISC (ISC does not support Enhanced FAX).
-
A back office PC with Eagle for Windows installed, running Windows 2000 or XP (Windows 98 is not supported). This station must also have the Eagle Listener program installed.
-
Network POS Invoice printer (Dot Matrix or Laser).
-
Standard Eagle Fax application. To verify that Eagle Fax is installed, from the Network Access Function prompt, type PCO and press <Enter>. Look in the Software Packages section of the screen for a line that states your fax level.

If your fax level does not display, you need to install Eagle Fax. See your latest Eagle software conversion guide for the installation procedure.
-
Eagle POS for Windows.
-
Eagle Purchasing and Receiving for Windows, if you want to FAX purchase orders in laser format.
-
Document Management, if you want to FAX laser documents from Eagle POS for Windows and laser statements from the Eagle for Windows Statement Report (RSM).
-
Eagle for Windows Level 14 (or higher) software installed.
-
FAX Version 2.8 (or higher) installed (see the Level 26 Conversion Guide for the procedure).
![]()
Complete the Install procedures at each backoffice PC that has the Eagle Listener program installed. The Install includes the following sections— 2 HP Laserject III driver install, and 3 Device Configuration.
2
Install: HP Laserjet III post script cartridge v52.2 driver
Windows 7 Procedure
-
Click Start, Devices and Printers. In the window that displays, click Add a Printer.
-
Select "Add a local printer."
-
Use the existing port of LPT1. Click Next.
-
Click Windows Update to pull new drivers down so they are available in the list.
-
In the Manufacturer column, select HP. In the Printers column, select HP LaserJet III PostScript Cartridge v52.2.Then click Next.
-
Name the printer E4WFAX, and click Next.
-
Make sure “Do not share this printer” is selected, and click Next.
-
Un-select "Set as the default printer," and click Finish.
-
Right click the E4WFAX printer, and select Printing Preferences. Click Advanced on the bottom right.
-
Expand the PostScript Options and set the PostScript Output Options to Optimize for Portability. Click OK, and then click Apply.
Windows XP Procedure
-
Click Start, Settings, Printers and Faxes.
-
Click Add a Printer.
-
When the Wizard displays, click Next
-
At Select Local or Network Printer, click Local printer attached to this computer, and un-select "Automatically detect and install my Plug and Play printer." Click Next.
-
At Select a Printer Port, use LPT1 (Recommended Printer Port), and click Next.
-
At Install Printer Software, in the Manufacturer column, select HP. In the Printers column, select HP LaserJet III PostScript Cartridge v52.2.Then click Next.
-
At Printer Name, type E4WFAX, select No for the default printer, and click Next.
-
At Printer Sharing, select "Do not share this printer," and click Next .
-
At Print Test Page, select No, and click Next.
-
At the Completing Add printer Wizard, click Finish.
-
Right-click on E4WFAX in the list of printers, click Printing Preferences, and click Advanced in the right bottom of the window that displays.
-
Expand the PostScript Options, and set the PostScript Output Option to Optimize for Portability. Click OK. .
-
Click OK to exit the Printing Preferences window.
3
Install: Device configuration
-
From the PC at which you installed the HP Laserjet III Driver, open the Eagle Browser. Click Utilities (in the left pane) and click Device Configuration.
-
In the Device column, click FAX Printer to highlight it. Press Enter.
-
In the dialog, select the E4WFAX entry from the list. Click OK.
-
Click OK again to exit the FAX Printer dialog. Click Close (F2) to exit.
4
MPS Setup
-
In Network Access at the Function prompt, type MPS and press <Enter>.
-
Decide which printer number you will use as the Fax Network Printer. At Printer Number, type that number and press <Display>.
-
At Printer Type, type E and press <Change>. A message, Record changed, displays at the bottom of the screen.
-
Press <Next Screen> to display the next screen of MPS.
-
At Server IP Address, type the IP address of the PC with the Adobe PostScript driver installed. To determine the IP address, do the following:
-
From the Windows desktop, click Start and then click Run.
-
In the Run dialog, at Open, type CMD and click OK. A DOS window displays.
-
At the C:\> prompt, type IPCONFIG and press Enter. The IP address displays.
-
At Printer, type E4WFAX (same name used when installing the PostScript driver). Or, if you selected an existing Network Printer that already has a name, leave the existing name. If you use an existing Network Printer, make sure that printer’s Listener is on the same PC that has the PostScript driver installed.
-
Press <Change>. Press <End> to exit MPS.
-
Activate the Eagle Listener program. To do this:
-
From the Eagle Browser, click Utilities. Click Network Configuration.
-
Click the check box for "Is this PC a Network Printer Server?" to place a check mark in the box.
-
Click Apply. Click Start Listener.
5
Setup options and defaults
Set up the following options and defaults that control the Enhanced Fax application.
-
Open the Eagle Browser and display the Options Configuration window.
-
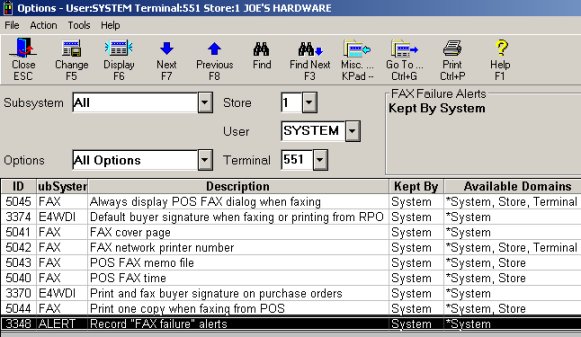
Set the Subsystem field to ALL and set the Options field to All Options. Click Display. Double-click the Description column header to display the options in alphabetical order. Review all of the following options that apply to Enhanced FAX and set the Current Value column to the desired setting for your business.
-
(ID# 5045) Always display POS FAX dialog when faxing
Y = Automatically display the Eagle for Windows POS FAX Transmission window when the user enters Eagle for Windows POS Totals. The clerk can press Enter to accept the FAX parameters and FAX the transaction or click Cancel to abort the FAX when the transaction completes.
Note: The Invoice field in Customer Maintenance (MCR), on the Misc tab, must be set to Y in order for the Eagle for Windows POS FAX Transmission window to automatically display in POS Totals.
N = Do not display the Eagle for Windows POS FAX Transmission window when the clerk enters Eagle for Windows POS Totals. The clerk can display the Eagle for Windows POS FAX Transmission window from the Totals Menu in order to modify any of the FAX information. When the Eagle for Windows POS transaction completes, the system will automatically FAX the transaction.
-
(ID# 3374) Default buyer signature when faxing or printing from RPO (Signature Capture users only)
This option determines which electronically stored buyer’s signature will print or FAX on a Laser PO if the buyer that was used on the purchase order does not have a signature on file. The value entered in this field must exist in the User Record File (MUR).
Leaving this option blank will print or Fax purchase orders with electronically stored buyer’s signatures for the buyer specified on the purchase order. If the buyer does not have an electronic signature on file, no signature is included.
Entering a user name in this option allows the system to use his/her signature in cases where there is not a signature on file for the buyer on a PO. The system will use buyer's signature for this user for purchase orders printed or faxed from the Purchase Order Format Report (RPO).
-
(ID# 5041) FAX cover page
Y = Transmit cover page. Each time a FAX is generated from POS or RPO for Windows, the system defaults the Cover Sheet option to Y. This value can be overridden in the Eagle for Windows POS FAX Transmission or RPO FAX setup window.
N = Omit cover page. Each time a FAX is generated from POS or RPO for Windows, the system defaults the Cover Sheet option to N. This value can be overridden in the Eagle for Windows POS FAX Transmission or RPO FAX setup window.
Blank = Use the value in the FAX Application Cover Page, which you specified during the FAX software installation.
-
(ID# 5042) FAX and batch invoice network printer
Enter the MPS printer number that identifies the Eagle Network printer to which Eagle for Windows POS will submit FAX requests. This is the Eagle Network printer that you set up in the previous section, MPS Setup. This printer is attached to a PC with the Eagle Listener program running and the Adobe PostScript driver installed.
Note: This option only applies to POS. Purchase Orders and A/R statements use their printer/spooler entry to process FAX requests.
-
(ID# 5048) Include store name on pre-printed laser forms for Fax
This option is relevant if all three of the following apply to you: 1) you use pre-printed invoices, 2) option #50 "Print Invoice with Store Name (Y/N/E)" is set to No, and 3) you are FAXing invoices without a logo file. Set this option to Yes so that the system includes the store name when you FAX an invoice.
-
(ID# 5043) POS FAX memo file
This option allows you to incorporate an Eagle Editor file (from Legacy) into the Eagle for Windows POS FAX Memo field. Each time the Eagle for Windows FAX Transmission window displays, the contents of the Editor file displays in the Memo field.
Leave this option blank to not have an Eagle Editor file automatically posted into the Eagle for Windows POS FAX Memo field.
-
(ID# 5040) POS FAX time
This option allows you to specify a time for POS Faxes to be transmitted on a daily basis. The FAX queue will store the requests and begin transmitting when the specified time has been reached on the Eagle server. In the POS FAX Transmission window, you can enter a new time or leave the field blank to have the FAX transmitted immediately once the POS transaction has been completed. The FAX Time field is located in the POS for Windows Fax Transmission window.
If this option is blank, POS will default to transmit transactions as soon as they are completed. However, you can still enter a FAX time for specific POS transactions.
-
(ID# 3370) Print and fax buyer signature on purchase order (Signature Capture users only)
Y = Electronically stored buyer's signature prints on laser and faxed purchase orders.
N = Do not include buyer's signature on laser and faxed purchase orders.
-
(ID# 5044) Print one copy when faxing from POS
This option only applies if you are using laser invoice printers.
Y = Eagle for Windows POS prints only one copy of the Eagle invoice if the invoice has been Faxed, regardless of how many copies are specified to print in Device Configuration.
N = Eagle for Windows POS prints the number of invoice copies specified in Device Configuration on Faxed transactions.
-
(ID# 3348) Record "FAX failure" alerts
This Alert option determines if you want the system to generate an alert if a FAX fails to transmit.
Y = An Alert will be generated each time a FAX request fails to transmit. The Alert includes the time of failure, the FAX request ID, and reason for the failure.
N = FAX Alerts for transmit failures will not be generated.
-
Click Change to save your entries.
6
Set up customer accounts
Set up the fields in Customer Maintenance (MCR) related to Enhanced FAX.
-
Display the Customer Maintenance window.
-
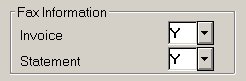
Display the customer whose defaults you want to set up. Click the Misc tab and locate the fax fields:
-
If this customer will receive faxed invoices/credits automatically, enter your options at Invoice.
-
Y = Automatically FAX this customer's invoices and credit memos from Eagle for Windows POS.
-
N = Don't automatically FAX this customer's invoices and credit memos from Eagle for Windows POS.
-
Enter your options at Statement.
-
Y = The Eagle for Windows Statement Report (RSM) will automatically FAX the A/R Statement to this customer if the Fax Statements option is set to Y (on the From/To page) in RSM.
-
N = Do not FAX A/R Statements to this customer when RSM is run, even if the Fax Statements option is set to Y (on the From/To page) in RSM.
-
Click Change to save your entries.
-
Repeat steps 2 through 6 for each customer that you will FAX to at POS or from RSM.
7
Enable Setup Complete Option
After completing all of the procedures in the previous sections, the last step before using Enhanced FAX is to enable an option to indicate that set up is complete. You must complete all the setup steps before enabling this option. Do not set this option to Yes before completing the setup steps. If you do, faxing will not work from some applications.
-
Open the Eagle Browser and display the Options Configuration window.
-
At Subsystem, select ALL. At Options, select FAX - FAX Configuration.
-
Locate the option Enhanced Fax Setup is Completed (ID# 5046). Set this field to Y.
-
Click Change.
8
Use Enhanced FAX
To learn how to use Enhanced Fax, refer to the online help topics or to the Enhanced Fax: Faxing Procedures job aid.