Use the End-of-Day Sales Totals Report (RDS) to balance cash and view daily sales information. The RDS must be run daily as part of your end-of-day queue. You can also use this report to post paidouts and special order deposits to General Ledger (if you don't use automatic passoff).
As a daily procedure, start by looking at the store summary pages of this report. If there are any problems on the summary pages, you can then research the problem using the detail pages for specific clerks or terminals.
You can run this report during the day for a specific clerk or terminal as long as you do not select Option F.
This report is divided into three sections: Department Totals, Cash Balancing Worksheet, and Final Sales Totals.
The system can store up to 75 individual department totals for a given terminal or clerk. Thus, the Department Totals page on the RDS will include up to 75 departments for a given clerk or terminal. After the first 75 department totals, any sales to an additional department for that clerk or terminal will not appear in the Department Totals section of the RDS. However, those sales are still reflected on the Cash Balancing and Transaction Totals sections for that terminal or clerk.
The Department Totals page of the RDS can print details and totals for up to 200 departments for a given store. After the first 200 department sales for that store, any sales to an additional department for that store will not appear in the Totals section of the RDS. However, those sales are still reflected on the Cash Balancing and Transaction Totals sections for that store.
If you are running the RDS for all stores, the Department Totals page can print details and totals for up to 300 departments for all stores (GRAND). After the first 300 department totals, any sales to an additional department across all stores will not appear in the GRAND Department Totals section of the RDS . However, those sales are still reflected in the Cash Balancing and Transaction Totals sections for "All" stores).
When adding the monthly RDS to an end-of-month queue, make sure to select option F (Finalize).
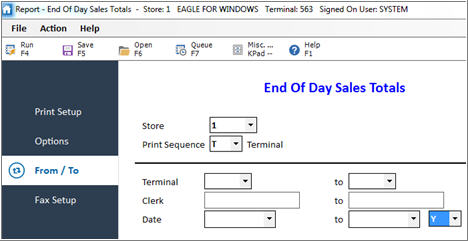
When adding the daily RDS to an end-of-day queue, do NOT select option F, and make sure to place a Y in the field next to the from/to Date fields, as shown here:
The daily RDS report will look the same as it usually does, because the system will use the RDS request date as its from/to date. However, since you are not finalizing transactions (not using option F), this means you'll be able to view previous day's transactions in Display Cash Drawer (DCD), as well as run an RDS for a previous date. Then, if at some point, you want to clear out the RDS file, you can put in a from/to Date for a previous month(s). For example, on Dec 15th, you could purge November's RDS records by running the RDS option F with a from/to date of 11/01/05 to 11/30/05.
From the Eagle Browser, click Reports, Point-of-Sale Reports, End-of-Day Sales Totals (RDS). The End-of-Day Sales Totals report window displays.
If you have set up a Default Report Profile for this report, you can simply click Run to use the defaults. Or, you can retrieve a saved report, make any necessary changes, and click Run. Otherwise, continue with the next step.
From the Print Setup page, review the default entries in the fields and make changes if needed. For a definition of each field, click here.
Click  .
Click in the box to the left of the option you want. Note: only select
Option F if you are entering this report into an end-of-day or end-of
month queue, or if instructed to do so by an Epicor representative.
.
Click in the box to the left of the option you want. Note: only select
Option F if you are entering this report into an end-of-day or end-of
month queue, or if instructed to do so by an Epicor representative.
For a definition of each option, click here.
Click  .
A page of fields displays.
.
A page of fields displays.
In the Store box, leave the default of 1 if you only have one store. Multistore: enter the store for which you are running this report.
In the Print Sequence box, select the sequence in which you want the report to print.
In the lower half of the window, fill in the desired fields to limit the information that prints.
For a definition of each field, click here.
(Optional)
Click  .
A page of fields displays. Fill in the fields if you want to fax the
report.
.
A page of fields displays. Fill in the fields if you want to fax the
report.
For a definition of each field, click here.
Click Run if you are running
this report now, or click  if you are adding this report to a queue. For more information about
creating queues, click here.
if you are adding this report to a queue. For more information about
creating queues, click here.