Set Up Network Report Printing
To set up a network report printer, you'll do the following:
-
set up the Listener program, which translates the report so Windows can interpret and print it
-
set up a printer definition in MPS (Modify Printer Status)
![]()
The Listener program must run on a PC that is connected to the network. Avoid using a POS station for Listener, use a back-office PC if available. Select a PC that will be up and operational 24 hours a day, 7 days a week.
Multistore: Set up Listener on one PC per location. This will prevent one location from disrupting report processing at all locations if the Listener PC is not available for any reason.
1
Set up Listener
-
At the PC that will run Listener, verify that Eagle for Windows software has been installed. If not, perform a normal Eagle for Windows software installation.
-
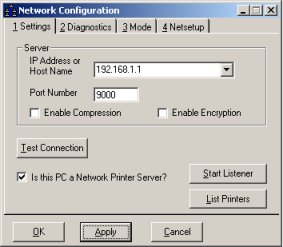
From the Eagle Browser, click Utilities (in the blue left pane of the window). From the menu that displays, click Network Configuration.
-
In the Network Configuration dialog box, click the box next to "Is this PC a Network Printer Server?" so that a checkmark displays.
-
Click Apply. Two buttons now display to the right: Start Listener and List Printers.
-
Click Start Listener, click Apply, and then click OK. The dialog box closes.
-
Verify that Listener is in your Windows taskbar.
![]()
2
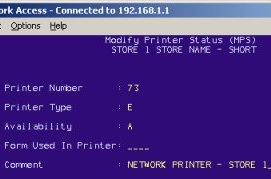
Set up MPS
-
From Network Access at the Function prompt, type MPS and press <Enter>. The Modify Printer Status screen displays.
-
At Printer Number, type the Printer Number that will identify the Eagle Network Report Printer on the network and press <Enter>.
-
At Printer Type, type E (Network Printer) and press <Enter>.
-
At Availability, type A and press <Enter>.
-
At Form Used In Printer, press <Enter> to leave it blank.
-
At Comment, type in a description that describes the printer.
-
Press <Add> to add the printer or <Change> if modifying an existing printer entry.
-
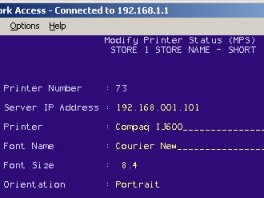
Press <Next Screen>. Another screen displays.
-
At Server IP Address, type the IP address of the PC that is running the Eagle for Windows Listener program for the printer you are adding. Press <Enter>.
-
At Printer, type the name that Windows uses to identify this printer and press <Enter>. The name must match exactly. To verify the name:
-
From your desktop, click Start, Settings, Printers.
-
Find the printer name and write it down exactly as it displays (take note of spaces, case, etc.).
-
Close the Printers window.
-
At Font Name, press <Enter> to accept Courier New. If the printer is a dot matrix printer, Font Size and Orientation are ignored. If the printer is a laser printer, enter the Font Size and Orientation. A standard setting for laser printers would be Font Size: 8.0, Orientation: Landscape. (Note: if you decide to set the orientation to Portrait, change the Font Size field to 7.0.)
-
Press <Change>. Press <End> to exit MPS.