If you have one of the Data Import and Update Tools on your system, you can add serial numbers using a CSV import file. Access to this utility is controlled by security bit 219 “View and add serial numbers.” Note that the items for which you are adding serial numbers must already exist in Inventory Maintenance, and the serial number must not already be linked to another item. If option 8990 "Require Store on Serial Number adds" is set to Yes, the import file must contain a valid store for each serial number. If option 8990 is set to No, the store field in the CSV file is optional. The system uses the current date for the serial number’s Date Added.
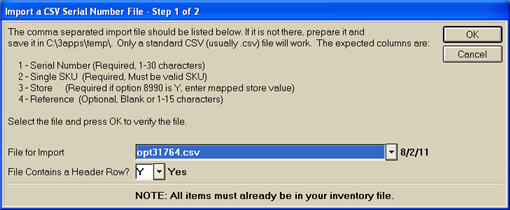
Save the CSV file in the PC's C:\3apps\temp folder. The CSV file must contain a column for serial number (1-30 characters) and SKU (SKUs must exists in Inventory Maintenance). If option 8990 is set to Y, a Store column must exist. Optionally, the file can contain a Reference column that is up to 15 characters.
From the Eagle Browser, click Data Import Menu, and select Import Serial Numbers (IMPTSER). Alternatively, you can type IMPTSER in the Launch bar, and press Enter. The Import a CSV Serial Number File dialog displays.
At File for Import, select the file from the C:\3apps\temp folder. Also answer Y or N to the question about whether the file contains a header row. Then click OK.
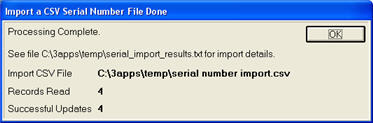
If the import is successful, the following dialog displays.
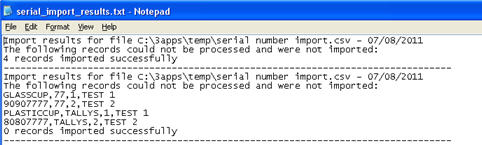
If the import had any errors, a screen displays indicating the records that were not added, with a brief description of the row number and the problem with the record.
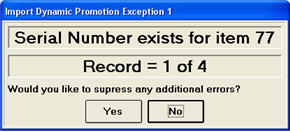
If you answer No, an error message displays for each record that failed to upload. If you answer Yes, a summary of the errors displays, as shown below.
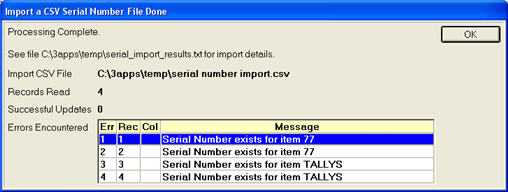
The system also generates a text file in the C:\3apps\temp folder, with details of the import.