Using the "All Types" Viewer
Use the "All Types" Viewer in POS to look up and view saved transactions. From this viewer, you can also access the POS Open Document Detail viewer (described below), in which you can view detailed information about a particular saved transaction.
Using the All Types Viewer
- Display the POS window. With your cursor In the Customer box, click MenuMisc. From the dialog box displays, under the Viewers heading, click Documentsclick View Documents. (You can also access the All Types Viewer from the Buyer's List window by clicking GoTo, then clicking View open POS documents.)
- In the All Types Viewer, use one or a combination of the following search methods:
- in the Customer box, type or select the customer you want to use, or type the document number preceded by a period— for example .12345

Another search method is by Short ID. To use this method, simply type part of the customer's account name in the Short ID field. However, do not attempt to search by Short ID and Customer at the same time; use one method or the other.
-
- in the Store box, enter a store in which to search for all saved transactions created in that store.
- in the Type box, select the type of transactions you want to display— such as special orders.
- in the SKU box, enter an SKU so you can view all transactions that contain that SKU.
- in the Cutoff Date box, select a date from which to search for all saved transactions created before that date.
- Press ENTER.
- (Optional) If you want to view only saved documents with a particular PO number, press Misc and select View Documents for this Customer PO. When prompted, enter the PO number and press Enter. The viewer is refreshed with all open Orders, Special Orders, and Estimates for that customer which have that PO number entered on them.
- Use the up or down arrow keys to highlight a transaction in the grid.
- Do one of the following:
- If you want to display the transaction on the POS screen, Press enter. The Orders Viewer closes and the saved transaction displays in POS.
- To view other columns you may want to display (email address, tax code, order number, etc.), right click any column heading and choose Select Columns to View. For more information about selecting columns, click here.
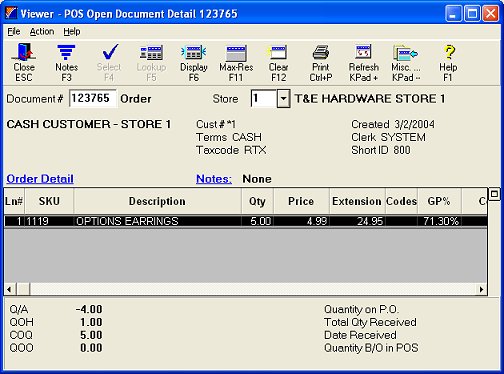
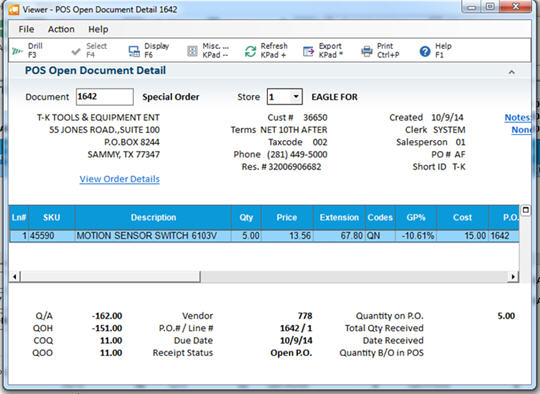
- If you want to view detail about the items on the transaction, Click Display. The POS Open Document Detail viewer displays. Highlight an item in the grid to view its PO information in the lower portion of the window (due date, quantity on PO, etc). Click Close to close the window.
Note: If you have Advanced Special Order, and you are displaying a special order, PO receipt information such as Total Qty Received and Date Received also displays in this viewer.
- (Optional) To add, view, or change notes tied to this transaction, click the Notes hyperlink in blue underlined text (
 ), and:
- If no notes exist, the word "NONE" displays to the right of the hotlink. Type the notes that you want to tie to the transaction, and click OK.
- If notes already exist, the word "YES" displays to the right of the hotlink. You can view them or modify them, as desired.
- Click Cancel (the X in the upper right corner) to close the Open Document Detail Viewer.
- Click Cancel (the X in the upper right corner) again to close the All Types Viewer.
Creating a document work-list
At times, you may find it necessary to create a work-list of documents using lookup, sort, and filter. Unfortunately, if you select a document from the list for maintenance, the settings used in the lookup are lost and you will have to create the list. Setting Option 9340 "Retain POS Order Viewer lookup and keep it visible after F4-Select" to Yes solves this problem. You may now create the list, select a document, maintain the document, and go back to the list to select the next document. Setting this option to No will close the window and clear the lookup and filters after a document is selected.
See Also:
Looking Up Transactions
Header Menu
Recalling Saved Transactions