SSUTA Tax Reporting: Destination-Based Sales Tax
This job aid describes how to set up your system to track destination-based sales tax. This is also called SSUTA – Streamlined Sales and Use Tax Agreement. Some states require that you charge sales tax based on the location at which the customer physically receives the merchandise. For example, if you deliver merchandise to a customer in another city within your state, the sales tax rate is the rate at that delivery location where the customer receives the merchandise, not the rate at the store location. When the customer purchases the merchandise while in your store, then the tax rate charged is the rate for your store location.
1
Set up tax codes by delivery city
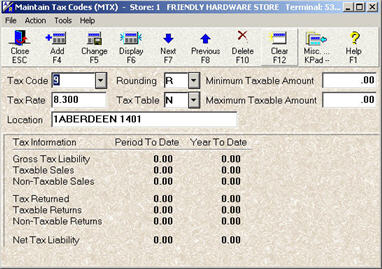
Use Maintain Tax Codes (MTX) to set up a separate tax code for each city to which you deliver in your state. Start with the cities to which you know you deliver. You can add other cities later, as needed.
-
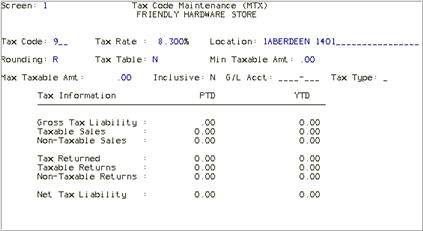
From the Eagle Browser, type MTX in the Launch bar and press Enter (Legacy users: type MTX at the Function prompt, and press Enter).
-
In the Tax Code field, enter an available number. For example, if you already have tax codes 1-8 set up, you could enter 9 in this field.
-
In the Tax Rate field, enter the tax rate of the city for which you’re creating this tax code.
-
In the Location field, enter the store number (if you only have one store, always use the number “1”), immediately followed by the name of the city, followed by a space and then the state assigned tax code.
For example, if you are setting up a tax code for store 1, for the city of Aberdeen, you would type 1Aberdeen 1401 in the Location field.
-
Press Add to add the new tax code.
-
Repeat steps 2-5 to set up a tax code for all the other cities to which you deliver.
-
Multistore users: each of your stores must have its own tax code for each delivery city. For example, if stores 2, 3, and 4 also deliver to Aberdeen, you would set up a tax code for each store, with the appropriate location such as 2Aberdeen 1401 for store 2, 3Aberdeen 1401 for store 3, 4Aberdeen 1401 for store 4, and so on.
-
If you pass off sales tax liability information to separate sales tax accounts in General Ledger, you must:
-
Set up new G/L accounts for the new tax codes you set up for SSUTA.
-
Link the accounts to the appropriate tax codes in the Set Up G/L Passoff (GLSET) window.
-
Amend your financial statements in General Ledger Layout Maintenance (GLMU) window.


2
(Optional) Set up message to indicate customer’s tax code
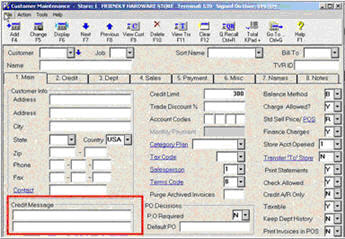
If you don’t do many deliveries, you may want to enter the applicable tax code for the customer in the Credit Message field in Customer Maintenance. This information will display on the Header screen of POS, saving the clerk time since he/she won’t have to look up the correct tax code.

3
(Optional) Eliminate customers’ default tax code
If your business doesn’t do many deliveries, skip this section.
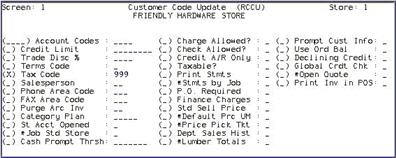
If your business does a very large amount of deliveries to other cities, you may want to use RCCU to eliminate your customers’ default tax code, so that POS clerks are forced to select a tax code for every transaction.
The day before you start using destination-based tax codes, after your nightly reports and backup have run, do the following:
-
Make sure you have a good backup. This is important because changes in RCCU are permanent and cannot be undone if you make a mistake.
-
Set up a bogus tax code in MTX. To do this, simply enter a unique number (such as 999) in the Tax Code field, and then press Add.
-
Use RCCU to link that tax code to all accounts. For more information about RCCU, see online help in Legacy or Eagle for Windows.
-
In MTX, delete the tax code you created in step 2.
-
In Customer Maintenance (MCR), display your default customer number, and change the Tax Code to the code for the local tax rate. Repeat this process for each store. If you’re not sure which account(s) is the default customer, check the “Default Customer Number” (ID# 330) in Options Configuration or in MIV screen 2.
-
Set each POS station to start on the Header screen by doing the following:
-
Set option 102 to Y in Options Configuration for each terminal.
-
At each POS terminal, from POS click Tools, Options, click the Station tab, and place a checkmark next to “Use Full Customer Header as Preferred Header” and click OK.
(Legacy users: simply set the Return to Header field in MTR to Y for each terminal).
RCCU in Legacy

4
POS Procedure
On the first day of the month that you start using destination-based tax codes, POS clerks must use the correct tax code for transactions that are delivered to a town other than the store’s location.
-
From the POS Header screen, enter the correct tax code for the delivery city. If you don’t know the tax code, simply type an equal sign (=), followed by store number, followed by the first few letters of the city. For example, if you are looking up the Bellingham tax code for store 1, type =1BE. Once the correct tax code is highlighted, press Enter to accept it.
-
If you followed the RCCU process in the previous section, then the POS clerk must select a tax code for every transaction. If the tax code is not entered, the message “Tax Code Not Found” displays when you go to the Posting screen.
-
If you did not do the RCCU process, then the POS clerk must remember to select the tax code for any POS transaction that is a delivery to another city.
-
Continue with the transaction as normal.
5
Reporting
The Location field from Tax Code Maintenance (MTX), which you set up in section 1 above, prints on the RTX report and displays in the Daily Tax Viewer (and is also exportable to Excel), thus reporting on SSUTA is simple, with no change to existing reporting procedures.