PPS/COM: Create an Auto-Transfer
If you want the system to automatically transfer all items on an order
from another branch, your PPS/COM (Pick/Pack/Ship / Customer Order Management)
work flow begins by creating an automatic transfer. Use this method when
all the items on an order are stocked in a different location. For example,
the items the customer is ordering are all stocked in your central warehouse;
therefore, you would transfer the entire order from that location. The
transfer the system automatically generates will be status "R"
(request). A "transfer notice" prints at the From-Store
to alert the store about the transfer.
Notes:
See
option 9583 "Create Sourced Transfers as Request or Complete"
if your business would prefer for automatic transfers to process the
inventory movement immediately without clerk intervention by creating
the transfers as a status of Complete.
In most cases you would create
an auto-transfer before adding any items to the order. However, if
you already created an order with items (provided you didn't line-item
source the order), you can recall it and still create an auto-transfer
(by using Menu option J, as described in the procedure below). This
scenario could occur if a clerk builds an order and later a shipping
director decides to source the order by transferring all items out
of another location.
Before
using this procedure, make sure the following options are set up in Options
Configuration:
"Allow
ability to flag orders for automatic transfer" (ID# 5108)— set to Yes
"Default
'Transfer Method' for Auto Transfers" (ID #5454)— set the default for where transferred
merchandise is delivered (ship to customer, send to selling store,
or hold for will call)
"Default
printer for Auto-Transfer documents" (ID# 5457)— indicate the printer number at
which the transfer will print at the From-Store
"Default
store for Auto-Transfer From Store" (ID# 5455)— indicate the branch that will
most commonly act as the From-Store for Auto-Transfers
Creating an Auto-Transfer
In Order Entry, from the
Header
screen, press F8-Order to start an order. Be sure to select the
appropriate customer account in the Customer field.
(Optional)
Enter any special shipping instructions in the Special Instruct field.
Any instructions you enter will print in the body of the transfer
notice, beneath the last item listed on the document.
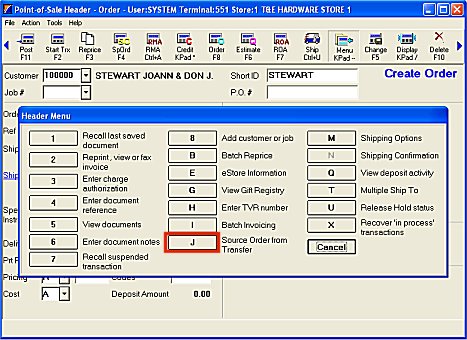
Click  (or press the dash on the keypad), then select J-Source Order from
Transfer.
(or press the dash on the keypad), then select J-Source Order from
Transfer.
In the dialog box that displays,
select the From Store and Transfer Method.
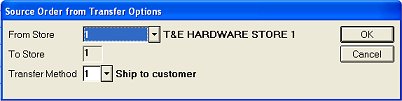
Click on the links below
for more information about these fields:
Add
items to the order as you normally would.
Since you have already indicated
that you want all items to transfer regardless of quantity available,
the system doesn't prompt you for sourcing by line-item. All items post
with quantity of 0 and show as backordered until the transfer request
is complete.
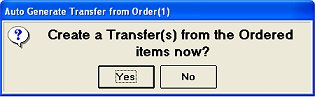
Total
the order. When the system asks if you want to create transfer
document, select Yes to create the transfer now, or No if you want
to create it at a later time.
If you answer Yes, the system
creates a transfer request that prints at the From-Store printer you indicated
in the option "Default printer for Auto-Transfer documents"
in Options Configuration, The transfer request contains the order number
as a cross-reference. The system uses the "Auto transfer customer"
that you set up for this from/to store combination (you access Auto Transfer
Customer setup by using GoTo option U in Customer Maintenance).
Submit Your Comments on
This Help Topic