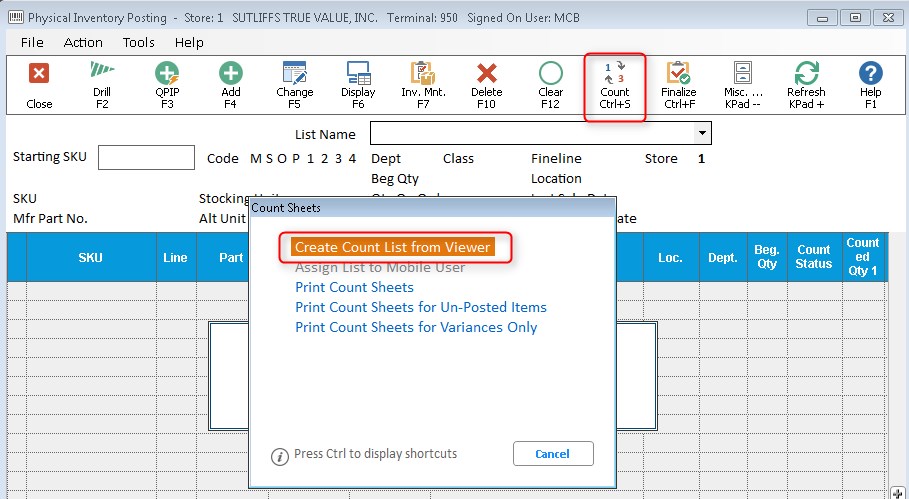
Open Physical Inventory Posting (PIP)
Click on the  button
Select "Create Count List from Viewer"
Note: The user must have security bit 1111 "Ability to access Physical Inventory Item Lists" for this method
Open Physical Inventory Posting (PIP)
Click on the
button
Select "Create Count List from Viewer"
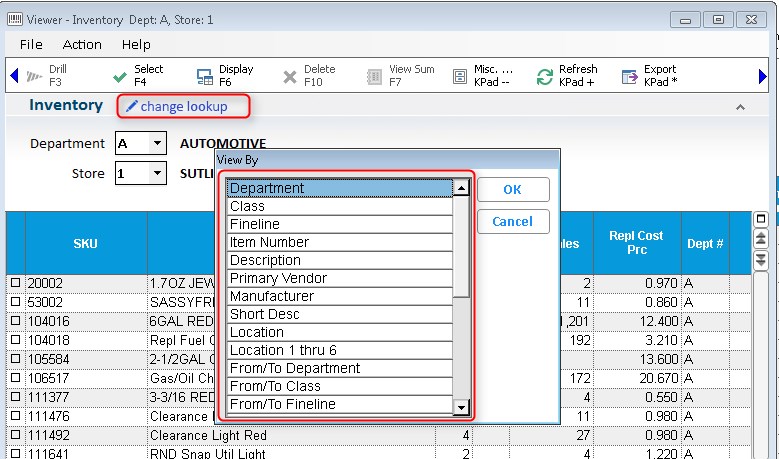
The default view can be set in Option 1623. If it is not set, the lookup defaults to Item Number. If you would like to change the lookup while viewing the grid, click the "change lookup" link and choosing the desired lookup.
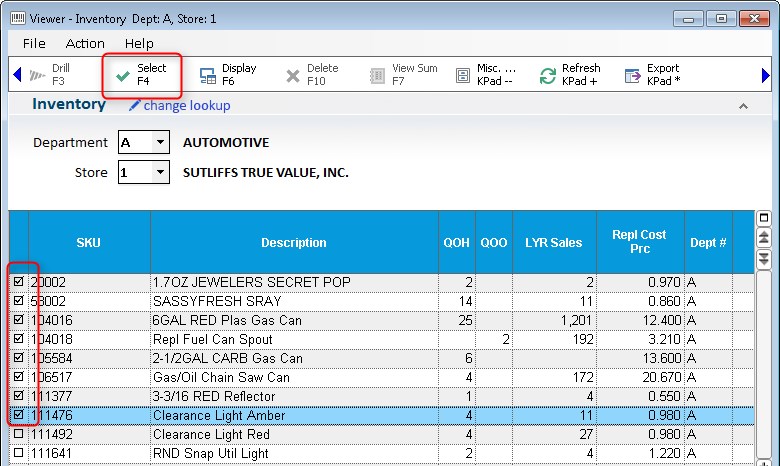
You can choose the items from the list several ways:
Click the check boxes to the left of the grid and then click <Select>.
Right click above the check boxes and click on "Load and Select All." Once you have all the items selected, click <Select>.
Filter the list down to the desired items and click <Select>, you will get the message "This row or all visible rows."
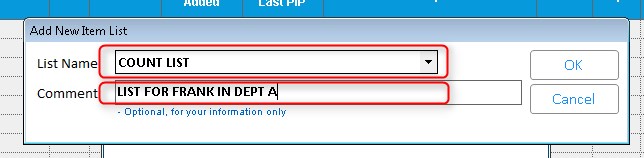
Name the List. You can also add a comment for your reference. If you want to add to an existing list, you can use the Add, or Count button to do so. Simply click the dropdown and choose the list you wish to use. Both Add and Delete can only be done before the Count Sheet is Loaded (Locked), unless the user has security bit 1116 which enables them to add or delete from a locked list.
From the Physical Inventory
Posting (PIP) screen, click
Select "Print Count Sheets" from the popup menu
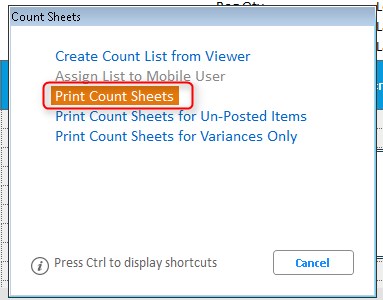
The "Physical Inventory Report" window will open and the List ID and correct print sequence is automatically brought over. If the default Count Sheet options are set (ID#1624), you will only need to fill out the Print Setup page.
Note: The order of the count sheets is the order of the items in the count list – which is the order they were in when added to the count list. If you are creating the count list from the Inventory Viewer, you will need to perform a 'Sort' in the Inventory Viewer before clicking Select.
If you are about to perform a physical inventory on all or part of your store, use the following procedure to add a range of items to the count file (PIP), and optionally print count sheets.
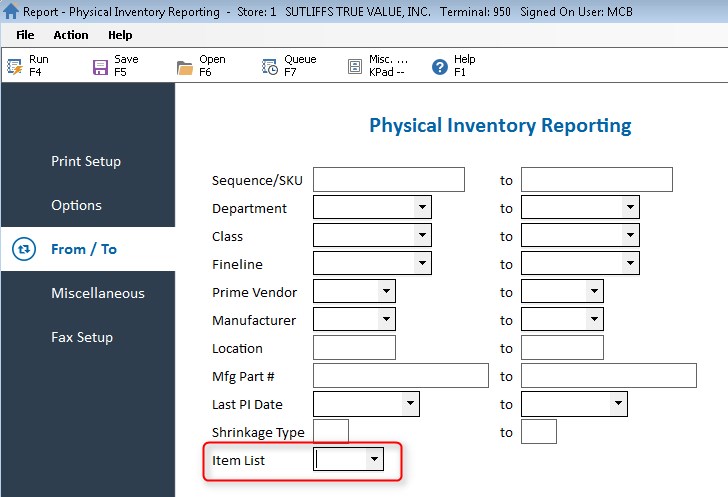
From the Eagle Browser, click Reports Menu, Inventory Reports, Physical Inventory (RPI). The Physical Inventory Reporting window displays.
From the Print page, review the default entries in the fields and make changes if needed. For a definition of each field, click here.
Click ![]() (in the left pane of the window). A page of fields displays.
(in the left pane of the window). A page of fields displays.
In the Load Options box, select L (Load Items to Count).
In the Count Sheet Options box:
If you want to print count sheets now, Epicor suggests you select S, D, M, and 3.
If you want to print count sheets later, leave this field blank. Click here for details as to why you might want to print count sheets later.
Do not select any Reconcile Options.
For a definition of each option, click here.
(Optional) Click ![]() (in the left pane of the window). A page of fields displays.
Fill in the desired fields to limit the items that print on
the report. For example, if you will only be counting items
in department 1, enter 1 in the Department From and To fields,
so that only items in department 1 will be loaded into the count file.
(in the left pane of the window). A page of fields displays.
Fill in the desired fields to limit the items that print on
the report. For example, if you will only be counting items
in department 1, enter 1 in the Department From and To fields,
so that only items in department 1 will be loaded into the count file.
If you leave the From/To fields blank, the system will load your entire inventory into the count file.
Click
![]() (in the left pane of
the window). A page of fields displays.
(in the left pane of
the window). A page of fields displays.
In the Store box, enter the store for which you are counting merchandise.
In the Print Sequence box, leave the default of 5 if you use location codes. If you don't have location codes set up in Inventory Maintenance, select another print sequence.
In the Empty Location Value box:
If you have the MPI option "Always use LOCATION codes for all Physical Inventory" set to Y, then type a location in this field. The system can't load into the count file an SKU with a blank Location field in Inventory Maintenance. By entering a value in this field, you can load and print items with a blank Location field.
If you have the MPI option "Always use LOCATION codes for all Physical Inventory" set to N, leave this field blank.
Leave the PI Date Value and User ID boxes blank.
(Optional) In the lower portion of the page, fill in the desired fields to include or exclude groups of items from loading into the count file.
For a definition of each field, click here.
Click Run.
If you printed count sheets, begin counting your merchandise when they finish printing.
If you didn't print count sheets, repeat steps 1-6 for all other ranges of items you want to add to the count file. Then print your count sheets and count your merchandise.
When you are ready to post your counts, proceed to the topic "Modifying Items in the Count File."