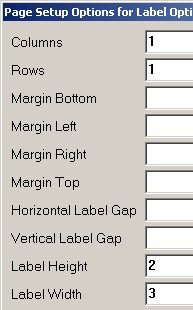
Columns – 1
Rows – 1
Label Height – 2
Label Width – 3
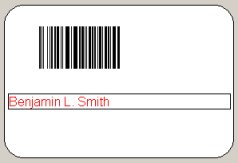
This job aid describes how to use the Label Manager application to print ID cards that can be scanned at POS. The card includes a UPC code that represents the user name and password. For the POS Signon and Manager Override screen, the card can be scanned, instead of typing the user name and password.
Note: You MUST fill out the POS Scan Card Agreement below and FAX it to Epicor before you can start using POS User Scan Cards.
Scan Card Agreement
POS Scan Cards allow you to execute a manager override using a scannable bar code version of the manager’s user name and password. When an override is called for in Windows POS, rather than keying in a manager's name and password, the manager Scan Card can be read by the scanner, allowing a quick, automatic manager override authorization. Caution must be taken to control access to managers' Scan Cards. There are opportunities for security to be breached if the Scan Card is not handled properly. In certain applications where scanning is allowed, scanning the card will display the user name and password. This information could then be used to perform unauthorized overrides. This same type of behavior can be found in any application where the bar code scanner is active. At this time there are no specific plans to change this behavior. If you would like to use the POS Scan Card, please fill out the information below, sign and fax to the Epicor Account Services Group as indicated. I have read and understand the security issues related with the use of POS Scan Cards and accept full responsibility for the use of this feature. Epicor customer # _____________________ Company name: _______________________ Phone number: ________________________ Your name: ___________________________ Title: ________________________________ Signature: ____________________________
Please print this page and FAX to: Epicor Solutions, Inc. Attn: Account Services Group Fax: 512-942-2100
Epicor Account Services: please set Option ID 2085 – Allow user/password scan card in POS = Yes. |
Important: The below steps assume that Epicor Account Services set Option 2085--"Allow user/password scan card in POS" to Yes (see the agreement in Part 1 above).
From the Eagle Browser Applications > Label Design & Printing menu, select Design Inventory Labels and then Pg Format.
On the Setup Options page, define the card options:
|
|
Leave all other fields blank. Click OK.
To define the fields that print on the card, perform the following steps:
On the Designer window (blank white label), select Add Fld and then select Format Fld to display the Parameters dialog.
From the Data Field drop-down list, select Description.
In the corresponding fields, enter the following values:
|
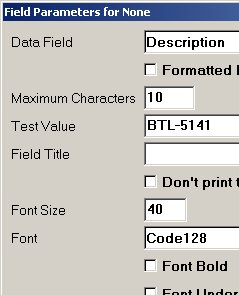 |
Leave other fields blank and click OK. Click and drag the field (barcode) to place it on the blank label.
To print the employee name on the card, select Add Fld and then select Format Fld. From the Data Field drop-down list, select None (Title as text only).
Note: If you do not want to print the name, skip to the next section.
In the corresponding fields, enter the following values:
Maximum Characters – 20
Field Title – type the employee name to print on the card
Font Size – 12
Font – Arial
Click OK. Click and drag the field to the blank label, above or below the bar code field.
Note: If
required, adjust the placement of the fields on the label. Click and drag
the field until it is in the desired location.
On the Designer window, select Print Test. At the Save prompt, type E4W POS User Scan Card for the Description. Click Save.
At the Print prompt, select the correct printer and click OK. The card prints.
From the Eagle Browser Applications > Label Design & Printing menu, select Design Inventory Labels.
On the Designer window, select Load Label. From the dialog, select E4W POS User Scan Card and click Open. The label template displays.
Double-click the bar code to display the Field Parameters dialog. At Test Value, type over the existing user/password with the new user/password. Click OK.
If the template includes the employee name field, double-click the field. At Field Title, type the new employee name and click OK.
Click Print Test. In the Save dialog, verify that the Desc field is set to E4W POS User Scan Card, click Save, and click Yes to replace. Select the printer and click OK. Repeat these steps for each card you want to print.