
Line Buster (RF Point-of-Sale)
The following procedure explains how to use Line Buster to create an order or estimate. Security bit 643 is required to access this application. Once a transaction is completed, a tag prints with a barcode that identifies the transaction. When the customer proceeds to the checkout counter with the tag, the cashier simply scans the barcode to retrieve the transaction and complete it. Note that Line Buster can only create the transaction; it can’t recall it or invoice it.
Important: Anytime the RF application refers to using the "CTL" or "CTRL" key, the Pocket PC model gun keystroke is <SHIFT><FUNC>.
1
Enter RF Order Entry and sign on
Select Point of Sale from the RF Menu.
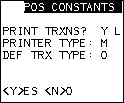
On the PO Constants screen:
At Print Trxns, type Y or N, <Enter>. Select Large or Small labels or a Receipt by typing L, S, or R, <Enter>.
At Printer Type, select the appropriate printer by typing M or Q, <Enter>.
At Def Trx Type, select Estimate or Order by typing an E or O, <Enter>.
2
Sign on and enter customer information
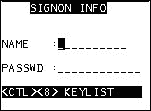
From the Signon Info screen, type your name, <Enter>, and password, <Enter>.
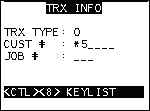
From the Trx Info screen, enter E (Estimate) or O (Order), <Enter> (this field defaults to what you entered in the PO Constants screen). Type the customer number, <Enter>, type the job number (if applicable), <Enter>.
Line Buster uses any special pricing that is associated with the customer in Customer Maintenance (MCR).
Note: From this screen, Control-8 (or Shift-Function-8 on the Pocket PC) brings up the keylist shown below:
KEYLIST
CTL 5 CLEAR HDR
CTL 6 RTRN TO HDR
FUNC 6 RTRN TO CLK
If you are using the RF printer in a wireless mode, do the following before entering the first transaction: with your cursor in the SKU field, scan the barcode label on the printer. This will link the printer and allow printing the receipt or sticker at the end of the order. You only need to do this once per RF session (not before every transaction).
3
Post items
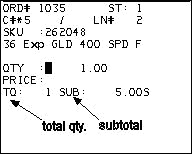
Type or scan the SKU, and enter the quantity being sold. If you are typing, press <Enter> to move from field to field.
Tips:
Instead of typing the quantity, you can press <Enter> to accept the default of 1.
You can scan multiple times to increase the quantity.
If any messages display while posting, press <Enter> to clear the message before proceeding.
<Tab> to the Price field if you want to enter a price.
Use the function keys as needed to apply a discount, void a line, etc. See the Keylist below for more information. To display the Keylist on the RF gun, press Control-8 (or Shift-Function-8 on the Pocket PC).
KEYLIST |
|
CTL 1 (DISC PCT) |
This allows you to enter a percent discount. Press Control-1 after entering the SKU, but before entering the quantity. |
CTL 2 (PREV) |
This allows you to access the Review mode to scroll backward through products already entered. To void an item, you must exit the Review mode by pressing Function-6. |
CTL 3 (NEXT) |
This allows you to access the Review mode to scroll forward through products already entered. To void an item, you must exit the Review mode by pressing Function-6. |
CTL 5 (CLEAR SCRN) |
This clears the current item if it hasn't been posted. |
CTL 9 (VOID) |
This allows you to void a particular item. Note that you can't correct an item— i.e. you can't change its quantity; instead, you must void the item and re-enter it correctly. |
FUNC 4 (TOTAL TRX) |
This totals the transaction. |
FUNC 6 (RTN TO POST) |
This returns you to the posting mode, where you can enter more items, void items, total the transaction, etc. |
FUNC 9 (CHAR LIST) |
This displays a list of special characters and their keyboard equivalents, in case you need to type a special character (i.e. an asterisk or a dash). When viewing the Character List, note that <F> means "FUNC" and <S> means "SHIFT." |
4
Finish the transaction
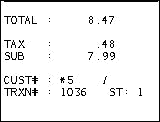
Press <Enter> twice to display the totals screen.
Note: Pressing Clear returns you to the posting screen, in case you have more items to post. You can also press Void at this point if you decide to void the transaction.
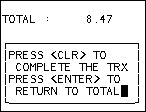
Press <Enter> again. If you want to proceed, press Clear to complete the transaction and print the tag. If you want to return to the totals screen, press <Enter>.
The customer can now proceed to checkout, where the cashier retrieves the transaction in POS/Order Entry by scanning the barcode while the cursor is in the Customer field.
5
Things to know
If you want to void a line, you must either know the line number of the item to be voided, or enter the review mode and press <Next> to obtain the line number.
You can’t sell Tally 1 or Tally 2 SKUs in RF Point-of-Sale.
If you go out of range with the RF and it "kills" the transaction, you need to go into Eagle for Windows POS/Order Entry and "release" the transaction by using Menu option X, "Recover in-process transactions."
Security in RF Point-of-Sale is limited in that there are no warning messages such as "credit limit exceeded" or "manager’s override required."