Use the following procedure to use the Temporary Serial Number feature. This process includes:
assigning temporary serial numbers
printing price labels with the temporary serial numbers
deleting temporary serial numbers and adding true serial numbers
adding user manual’s location (if applicable)
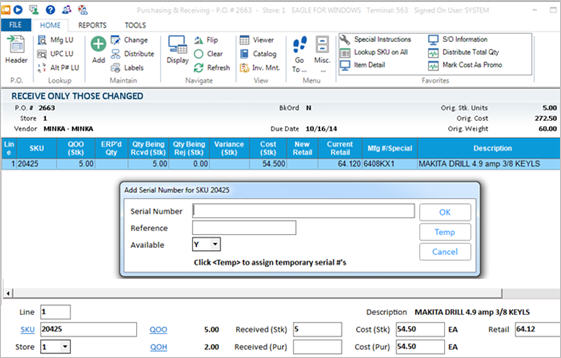
When receiving a PO in the Purchasing and Receiving window, if you have a Tally S items that requires a temporary serial number, recall the line item and manually post the received quantity (even if it's the same as the quantity you ordered). This triggers the "Add Serial Number" dialog to display.
Press<Temp> to automatically generate temporary serial numbers. The system generates a temporary serial number for each unit of the item you received. For example, if you ordered 4 units, the system would generate 4 temporary serial numbers. Click here for more information about how the system generates temporary serial numbers.
After the serial numbers are generated, the work area is cleared. Repeat steps 1 and 2 for each Tally S item received.
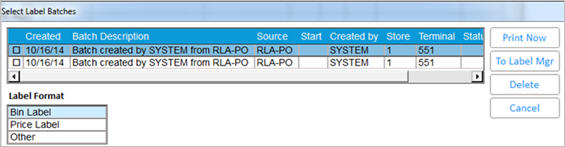
To print price labels for the temporary serial numbers, print the Price Label Printing Report (RLA) before Finalizing the PO with the Receiving Report (RRP). On the RLA Options page, do one of the following:
select Label to Use: 6 - "Windows Labels."
Choose Quantity Type A-Quantity Being Received.
On the From/To page, enter the PO number in the PO Number From and To fields.
In a moment, price labels for the items with a temporary serial number print, using the price label layout as specified in option 5812.
Select 4-Generate File for LabelWorks/Label Manager.
When you are ready to print the labels, display the Label Manager, click Import, and select the file you imported.
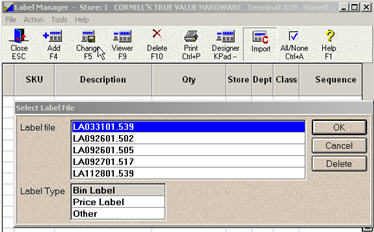
Proceed with selecting and printing the labels.
Run RRP option F to finalize the PO.
When the true serial number of an item becomes known, delete the temporary serial number from Serial Number Maintenance, and add the true serial number. If applicable, enter the user manual’s location in the Reference field.
In the Serial Number Maintenance dialog, click the <Label> button and follow the prompts to print the label.
When the item is sold at POS by scanning the label, the serial number will print as a descriptor (comment) line.