Setting Up Multiple Selling Unit (MSU) Codes
Use the following procedure to set up Multiple Selling Unit (MSU) codes.
You will then link MSU codes to items in your Inventory file that you
sell in multiple units. For example, perhaps you sell copper tubing
by the foot, by the 10-foot piece, and by the bundle (ten 10-foot lengths).
You would set up one MSU code that contains these three selling units.
Then you'd enter the MSU code on all copper tubing SKUs that are
sold in these three different selling units.
- .
- Click GoTo, then click Modify Multiple Selling
Unit Codes. The MSU Selection dialog box displays.
- Click Add. The Maintain MSU Code dialog box
displays.
- In the MSU Code box, leave the code that the system
suggests, or type a different code (any number from 1 to 9999 that
hasn't already been assigned).
- In the Description box, enter a description that
describes the code. To continue the example above, you would enter
"Copper Tubing."
- Click OK. The MSU Code Maintenance dialog box
displays.
- Click Add. The Add Selling Unit dialog box displays.
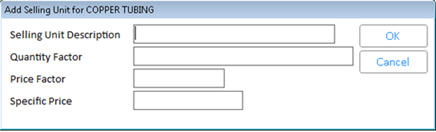
- Enter the information for the selling unit you
want to be the default unit at POS. For example, if you most
often sell copper tubing by the 10-foot piece, enter that selling
unit first.
- In the Selling Unit Description box, enter a
description of the selling unit. In this example, you'd enter
something like "1 PC (10 FT)."
- In the Quantity Factor box, enter 1, because
there is one stocking unit in this selling unit. To tie this back
to our example, there is one stocking unit (PC) in this selling unit
(PC).
- In the Price Factor field, enter 1, because
this selling unit's price will come straight from your inventory file,
without any price factor affecting it.
- Click OK. Your screen now looks like this:
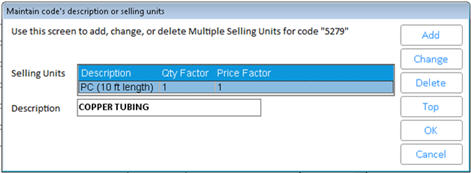
Click Add to add your next
selling unit. The MSU Sell Unit Maintenance dialog box displays again.
- In the Selling Unit Description box, enter
a description of the next selling unit. In this example, you'd
enter something like "Bundle-Ten 10-ft Pcs." Note
that the first two characters of the Selling Unit Description
must be unique for each selling unit you set up in an MSU.
- In the Quantity Factor box, enter the number
of stocking units in a selling unit. In this example, you'd
enter 10, because there are 10 pieces in the selling unit "bundle."
- Do one of the following to determine the price
of this selling unit:
- In the Price Factor box, enter the multiplier
you want the system to use to mark up or down the selling
price. In this example, you would enter 1.0 if the price of
a bundle is the same as the price of ten pieces. However,
if you give a price break on a bundle, you would enter a price
factor. For example, if you enter a price factor of
.8, the system calculates a price that is 20% less than the
price of 10 individual pieces (the system multiplies the price
of a piece by 10 because you're selling 10 pieces, then by
.8 because you're giving a price break that is .8 times the
"each" price).
- In the Specific Price box, enter the price
you want to charge for this selling unit. For example, if
you want to charge 49.99 for the bundle (ten 10-foot lengths)
of copper tubing, enter 49.99.
- Click OK. Your screen now looks like
screen A if you entered price factor, or like screen B if you
entered a specific price.
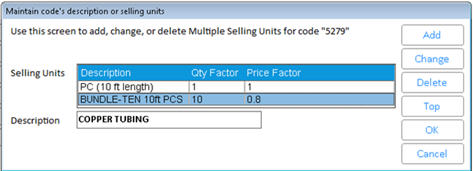
Screen
A
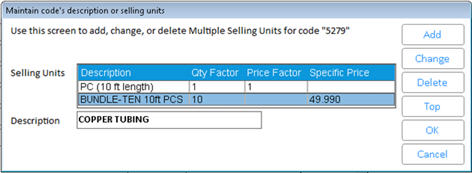
Screen
B
- Repeat step 11 for all subsequent selling units
(you can have a total of 10 per MSU code). Note that the first two
characters of a Selling Unit Description must be unique for each selling
unit you set up in an MSU. Also make sure to enter the correct Qty
Factor and Price Factor or Specific Price that corresponds to the
unit you're adding.
- To minimize keystrokes at POS, the unit of measure
most often sold should appear at the top of the list. To move a particular
unit of measure to the top of the list, click on it, and then click
"Top".
- Click OK to close the MSU Code Maintenance dialog
box.
- Click Cancel to close the MSU Selection dialog
box.
- Now you must link the MSU code you just created
to the appropriate item(s) in your inventory file. See the topic,
"Assigning MSU Codes to Items,"
for the procedure.