Use the Modify Item Promotion window to change promotions previously entered (enter additional items, delete items, change the promotion price, modify the dates, and so on).
Display the SKUs you want to modify by doing one of the following:
To display all existing promotion records on file:
Multistore: in the Store Box, enter the store for which you want to display existing records, or select All Stores.
Click Display.
To display a specific range of existing records, do one or both of the following:
Enter a value in any of the fields above the grid, and press ENTER. Only the records that meet the criteria you entered display in the grid. For example, enter a value in the Name field, and only items with that promotion name display.
Use the filter feature to limit the existing promotion records that display.
To add items to a promotion, click Add to display the Add Item Promotion dialog. Fill in the promotion information and click Add. Click Cancel after adding all items. To add a range of items to a promotion at a percentage or dollar amount off retail, click here.
To modify information for a specific item, click the field in the grid that you want to modify. Type the new information and click Change.
![]()
If you change the % off Retail field or the $ Off Retail field, the Promo Price of the item does not change unless you clear the value in the Promo Price field.
To modify information for all items in the grid, click Misc and click "Make global changes to promotions in the grid." Type the information in the field(s) that you want to change. Click OK. Click Cancel.
![]()
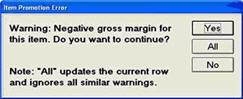
If you receive a warning message about "negative gross margin" or "promo price is greater than retail price," you can select Yes to bypass the warning, or you can select All so that additional instances of that warning within this "global change" session will not display.
To delete an item from the promotion, click the checkbox to the left of the SKUs you want to delete. This places a check mark in the box. (Note: you can also use the down-arrow key and spacebar to place or remove checkmarks.)
![]()
If check boxes don’t automatically display in the left column of the grid, simply right-click on any column heading and select "Check Boxes."
Click Delete. Click Yes.
![]()
If you manually delete an active promotion in MIP, the promotion sales up to that point are recorded in the Promo History Viewer. If the promotion to be deleted had sales that day, an RDI(F) should be run before deleting the promotion in MIP, otherwise the sales for that day are reflected in the Promo History Viewer.
Make sure you activate promotions on the appropriate day by running RUP with Option F. You may choose to run RUP in an end-of-day queue.