Dated Billing: Creating Vouchers
In the New A/P Transactions (ATMU), when entering a new Regular (R) voucher or changing a Temporary (T) voucher to an R voucher, a prompt displays, asking if you want to set up installments. The procedure below walks you through the entire process of setting up installments.
-
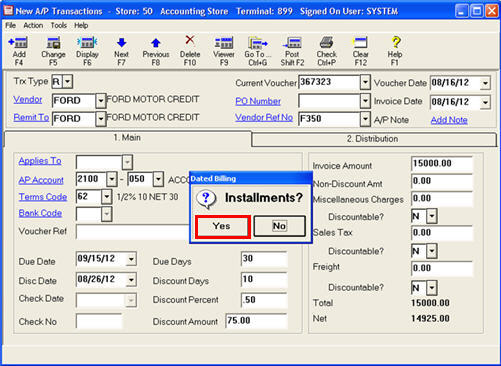
Display the New A/P Transactions window.
-
In the Trx Type box, leave the R to create a Regular voucher.
-
Fill in the fields as you would for any voucher. In the Invoice Amount field, enter the full invoice amount that you will be paying in installments.
For more information on filling in the fields in ATMU, refer to the topic "Creating A/P Transactions."
-
Click Add.
-
When the Installments prompt displays, click Yes.
-
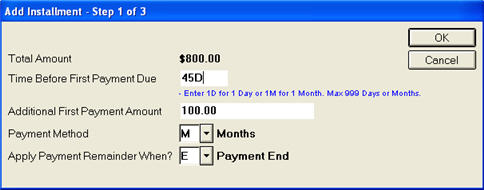
In the "Add Installment-Step 1 of 3" dialog, the Total Amount is the full invoice amount of all the installments (the amount you entered in the Invoice Amount field). Fill in the other fields as described below.
-
Time Before First Payment DueThis field allows you to specify the number of Days or Months until the first payment is due, if it is different than the due date calculated by the terms code. To enter the number as days’, type a D after the number. For example, there may be a grace period of 45 days before the first payment is due. Once the first payment has been made, the monthly installments are made on or by the 15th of every month. The voucher's terms code determines the 15th of the month payment due date, but entering 45D ’in this field means that there is a 45-day grace period from the invoice date until the first payment is due. Thereafter, each payment is due on the 15th of every month until the last payment is made.
To enter a number of months before the first payment is due, type an M after the number. For example, if the first payment is not due until 3 months from the invoice date, enter 3M in this field.
-
Additional First Payment AmountIf desired, use this field to enter an additional amount to be added to the first payment. The additional amount you enter is deducted from the total amount due.
-
Payment MethodIn this field, select M--Monthly or or A--Amount.
Select M if you want the installment schedule to be based on the number of months you enter. The system will then calculate the monthly payment amount based on the total amount due less the Additional First Payment Amount and the length of the installments.
Select A if you want the installment schedule to be based on the specific payment amount you enter. The system will then calculate the number of months you will pay an installment based on the total amount due, less the Additional First Payment Amount.
-
Apply Payment Remainder When?Use this field to determine when any remainder amount due will be paid. If you select E-Payment End, and the calculated payment amount leaves a remainder, the remainder will be added to the last payment due. If you select B-Payment Begin, and the calculated payment amount leaves a remainder, the remainder will be added to the first payment due.
-
When you have finished filling in all the fields, click OK. Another dialog displays.
-
If you entered M as the Payment Method, enter the Number of Payments, and click OK.
-
If you entered A as the Payment Method,enter the Amount Per Payment, and click OK.
-
Another dialog displays, so that you can confirm the installment schedule.
-
If you click OK, the Distribution tab of ATMU displays, where you enter the GL distributions for the voucher. For more information on the Distribution screen, refer to the topic "Creating A/P Transactions."
-
If you click Cancel, the distribution tab of the ATMU screen displays, and you enter the GL distributions for the voucher; however, the voucher becomes a regular voucher without installments.
You have now completed the process of creating the installment voucher schedule.
-
If you need to make changes to the installment schedule, display the unposted installment voucher in ATMU, click Change, and then click Yes to "Installments?" Change the desired fields in the dialogs that display. Click OK when you have finished changing the fields, and when the confirmation screen displays.
-
If you need to cancel the installment schedule, you must delete the unposted voucher, and then re-add it.