Using Category Pricing Plans (CPP)
This topic describes how to add, modify, and delete a category pricing
plan. Click one of the following to take you to the procedure steps:
Adding a Plan
- From the Customer
Maintenance window, click Go To. Click Category Pricing Plans.
- From the Category Pricing Plans window, type
a plan name (up to 10 characters) and description.
- Continue to set up the plan by selecting your
options from the lists for the remaining fields (Best Price, Trade
Discountable, Terms, Incl CPP < Non-Disc/Promo Prc). For a definition
of each field, click here.
If you want to set up custom list prices for this plan, click here
for more information.
- Click Add.
- Click the Category column, and click Add. The
New Category Record dialog box displays.
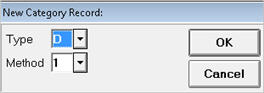
- From the drop-down lists, select a Type and
select a Method. For more information, click one or both of the following:
Type
Method
- Click OK.
- Fill in the fields in the New Category dialog.
The fields that display in the dialog depend on the Type and Method
of the category.
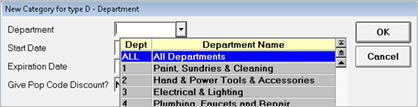
Note: If you select
"ALL Departments" as the Type, and a given department is already
on the plan, you'll be asked if you want to keep the existing record or
replace it with the new one.
- Click OK.
- Repeat steps 5
through 9 for each category you want to add to the plan.
- When you've finished
setting up the plan, assign the plan to the appropriate customer(s)
in the Customer Maintenance window, in the Category Plan field.
top
Modifying a Plan

The
Category and Type columns cannot be changed.
- From the Customer
Maintenance window, click Go To. Click Category Pricing Plans.
- From the Category
Pricing Plans window, type the plan name in the Plan box and click
Display. Or select a plan from the list.
- To add a new category
to the plan, do the following:
- Click anywhere in the Category column and
then click Add.
- From the list in the New Category Record dialog,
select a Type and select a Method. Click OK.
- Fill in the fields in the New Category dialog.
The fields that display in the dialog depend on the Type and Method
of the category. Click OK.
- To change the expiration
date for all categories in the plan, click Misc. Click Reset Expiration
Dates. Type a new date and click OK. Click Yes.
- To change a single
field for a category, click that field in the grid (such as the Method,
Percent, Price, or Expiration field). Type the new information. Click
Change.
- To delete one category
from a plan, click that category to highlight the row. Click Delete.
Click Yes.
top
Deleting a Plan
- From the Customer
Maintenance window, click Go To. Click Category Pricing Plans.
- From the Category Pricing Plans window, type
the plan name in the Plan box and click Display. Or select a plan
from the list. Then highlight the plan name by clicking to the right
of it (the plan name must be highlighted in order to delete it).
- Click Delete. Click Yes.
top

- To link the category plan to the customer, display
the customer in the Customer Maintenance window, type the plan name
in the Category Plan field, and click Change.
- When you post an item in POS with a category price,
the letter C displays on the screen to indicate that the system has
selected the category price as the best price.