Loading the Catalog Data CD
Use the following procedure to install a catalog CD onto
your Epicor Eagle™ system.

If
your server is a Hosted Server, then you do not need to load the Eagle
Catalog from the CD; the Hosting Team will take care of this automatically.
The instructions below include both how to install the
catalog now, and how to “Schedule” the installation to run during nightly
maintenance. To use the “Schedule” method, your Eagle must either be on
server level 36.1351 or higher, or patch 6945 must have been installed
on one of the following levels:
- 34.1560 through 34.1560.488 (Eagle Client software
Release 22)
- 34.2535 through 34.2535.465 (Eagle Client software
Release 22.1)
- 36.1056.031 through 36.1056.078 (Eagle Client
software Release 24)
Loading the catalog takes from 5 to 30 minutes. If you
are installing the catalog now (rather than Scheduling it to install during
maintenance), the system remains in the quiet mode during installation.
The EFM transmission that follows does not require a quiet system; however,
the EFM updates can take many hours to process.
Installing the Catalog Using the “Schedule” Method
- At the console terminal, type M and press Enter.
- At the Function prompt, type LOADCAT and press
Enter. The following screen displays.
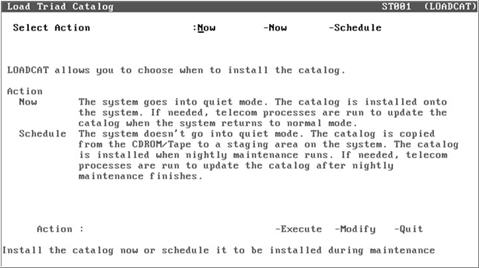
If you
do not see the screen shown above, you must skip to the section entitled
“Installing the Catalog Now” (below).
- At Select Action, type S for “Schedule.”
- At Action, type E (Execute), and press Enter.
- After a few minutes, the Load Catalog
Information from CD ROM screen displays. Enter a C to install the
catalog from a CD, and then press Enter.
- When the message “Insert CD ROM and press Run
to load a catalog” displays, insert the catalog CD into the CD drive
of the Eagle Server (typically located in the back office).
- Press Run (F3).
- Press Enter to copy the catalog.
- When the message, “Catalog copy complete” displays,
press Enter. The screen returns to the Function menu. Remove the CD
from the CD drive. The catalog will be installed during nightly maintenance,
followed by EFM to update the catalog, if needed.
- If you received an images CD, then after the
new catalog has been installed, follow the instructions for loading
the images CD. Be aware that images are installed on your PCs (or
the Network Master PC if you have a Network Master/Client setup).
Images are not installed on the Eagle Server.
Installing the Catalog Now
- At the console terminal, type M and press Enter.
- At the Function prompt, type LOADCAT and press
Enter.
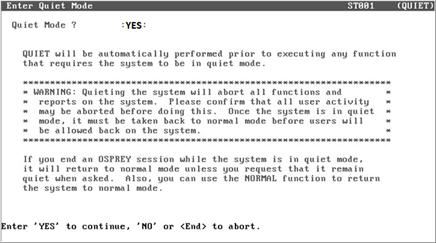
- If the following screen displays, type N for
“Now,” then at Action, type E and press Enter. If this screen does
not display, skip to the next step.
Loading the catalog CD requires a quiet system
(no other terminals active, no reports processing). The system remains
in the quiet mode for up to 20 minutes. To proceed with quieting the system
and loading the CD, go to step 5. If you do not want to load the CD at
this time, press End to abort this procedure and exit the screen.
- At Quiet Mode, type YES (upper case), and press
Enter.
- After a few minutes, the Load Catalog Information
from CD ROM screen displays. Enter a C to install the catalog from
a CD, and then press Enter.
- When the message “Insert CD ROM and press Run
to load a catalog” displays, insert the catalog CD into the CD drive
of the Eagle Server (typically located in the back office).
- Press Run (F3).
- When prompted, press Enter to copy the catalog
from the CD. This process could take anywhere from one minute to 20
minutes.
- When the installation is complete, the message
“Catalog Load Complete” displays. Press Enter to exit the screen.
- If this is the first time you are loading the
catalog data, the Help Menu window displays. Highlight Screen Help
and press Enter. Read the information and then press End.
If the Help Menu window does not display,
continue with the next step.
- Press Enter when you see the message “Type ‘Quiet’
if you do NOT want the system back in normal mode now.” This returns
the system to normal mode. When the system returns to the Function
prompt, remove the CD from the Eagle server.
- If you received an images CD, follow the instructions
for loading it. Be aware that images are installed on your PCs (or
the Network Master PC if you have a Network Master/Client setup).
Images are not installed on the Eagle Server.
- Run Electronic File Maintenance (EFM) to update
the catalog (note that most catalogs start the EFM transmission automatically).
The EFM updates do not require a quiet system; however, the EFM data
can take many hours to process.