(Catalog Import users only)
Use the Catalog Import Designer to:
Create a map file (a template, similar to a Saved View) of the fields in the data file. When mapping a file, you indicate which fields in the data file you want to import and identify what those fields are (for example, description, UPC, SKU, and so on).
Import the data file to create a custom Electronic Catalog on your Eagle system.
If you've previously used the Catalog Import Designer and saved the map file that you want to use, you can go directly to the import process. Click here to go to the help topic for that process.
For more information about the Catalog Import feature, including an overview and system requirements, refer to the help topics for Catalog Import. Click the related topics button for a list of topics.
![]()
The process to create a catalog includes the following:
5 – Save the mapping information
6 – Import the data to create the catalog
Complete the process in the order presented. The procedure steps are presented in the remainder of this topic.
Obtain a data file or data files from your vendor. The data must be in the form of a flat file and the file can be in a fixed length format or delimited format (tab, comma, or custom). You may want to ask the provider of the file how the data is arranged in the file. If it is custom delimited, you'll need to know what character is used as the delimiter. Once you have the file, place it in a folder (directory) on your PC. The location and name of the file is up to you. But you will need to know where the file is located to use the Catalog Designer window.
From the Eagle Browser, click Applications. From the list that displays, click Data Import Menu and then click Catalog Import Designer to display the Designer window.
From the Designer window toolbar, click Open to display the Open dialog. From this dialog, locate the file with the catalog data, click to highlight it, and then click Open. The Open dialog closes and you are returned to the Designer window. This is the file you will work with to map the fields. In a later step you will select the file or files you want to use to create the catalog.
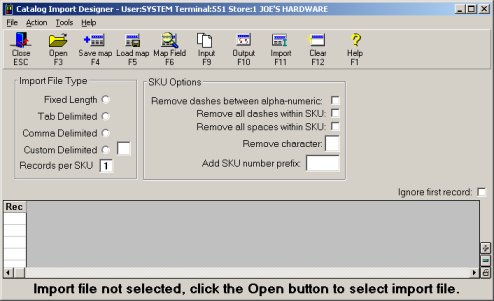
From the list under Import File Type, click to select the correct file type for the file you opened in step 2. If you select Custom Delimited, you must also enter the delimiter character in the box that displays. This is the character that divides the data fields.
If the file contains more than one record per SKU, indicate that in the Records per SKU box. The system then concatenates the data to be one record per SKU.
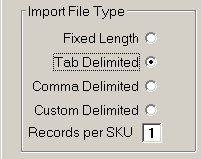
From the Designer window toolbar, click Input to display the first 10 rows of the input data in a grid format. If the 10 rows that display in the grid are not readable, you may have selected an incorrect Import File Type. Click to select a different type and then click Input.
Next you'll map the fields from the data file that will then be imported to the Eagle system to create the catalog.
In the Designer window, click Map Field to display the Map Field Attributes dialog with a list of inventory fields that you can include to create the catalog.
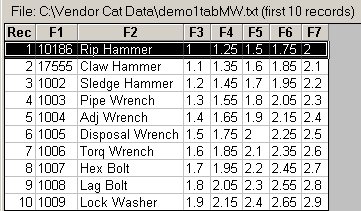
From the list, click a field to select it and then click OK. In the next Map Field Attributes dialog, fill in the fields.
Position (this field only displays for Delimited files) Type the column number for this field. For example, if you are mapping List price and that corresponds to column F7 in the 10 row grid, type 7 in this field. For delimited data files (tab-delimited, comma-delimited, etc.), you can combine positions to map to one field. For example, the file includes a column for vendor code and a column for part number. You want to combine the two columns to map to the SKU field. To do this you would type the column numbers in the Position field, separating the numbers with a comma.
Label This is the field name that displays on the Item Detail screen when you display an item in the catalog. The label is also used as the column header when displaying catalog items in a grid view. It can be up to 20 characters in length.
Constant This is optional, enter a value that you want to always use for the field that you are mapping. Then leave all other fields in the dialog blank, except for Label. For example, the data file from your vendor does not include a department code. You could edit the data file directly to add the department data, but this is time consuming and some file formats are difficult to edit. So map the Department field and in the Constant field enter a department code to use. All of the SKUs imported to the catalog will use the value (constant) you enter.
Start/End Position (these fields only displays for Fixed Length files) Type the start and end position for the field. For example, if you are mapping the Price field and in the data file the price field spans positions 1 through 6, type 1 for Start and 6 for End.
Decimals? (this field only displays when mapping a price field) Leave this blank if the decimals are already included in the data file. Or type a number to indicate where the decimals should be added to the data. For example, the data is 12359, type 2 to insert a decimal place to make the price 123.59
Multiplier (this field only displays when mapping a price field) Leave this field blank or type the multiplier you want the system to use to mark up or down the price. For example, type .8, to calculate a price that is 20% less than the price data. Type 1.5, to calculate a price that is 50% higher than the price data. You can enter a number with up to four decimal places.
![]()
If the data that you map to a field is larger than the maximum length that the field allows, the system will shorten the data to fit the field.
For alphanumeric data, the data is moved using a left-justified rule. This means that starting from the left, as many characters are allowed will be mapped and any extra characters are dropped. For example, the data file is 3 characters in length and the mapped field is a maximum of 2 characters. If the data in the data file is ABC, it will be mapped as AB.
For numeric data, the data is moved using a right-justified rule. This means that starting from the right, as many characters are allowed will be mapped and any extra characters are dropped. For example, the data file is 5.2 in length (five numbers before the decimal point and two numbers after the decimal point) and the mapped field is a maximum of 4.2 in length. If the data in the data file is 123.45, it will be mapped as 23.45.
Click OK. The dialog closes and the column you mapped displays in the grid area with a column heading.
Click Input to again display all the data file columns. Repeat steps 1 through 4 until you map all fields that you want to include in the catalog.
When you have mapped all fields that you want to import, click Output to review your work. If you made a mistake, re-map a field by completing steps 1 through 4. To remove a field that you've mapped, click the Delete button in the first Map Fields Attributes dialog.
![]()
At a minimum, you must map the following fields: Manufacturer, SKU, Department, Class, and Fineline. If the data file you are working with doesn't include data for these fields, map the field and use the Constant field in the Map Fields Attributes dialog. See step 2 above for more information. If you don't map the Mfg Name field, then the system fills in that field with "Vendor from your catalog name." For example, if you've named the catalog "Joe's Custom Catalog", then the system fills in the Mfg Name field with "Vendor from Joe's Custom Catalog."
In the SKU Options area, click to select any of the following that apply to your data file.
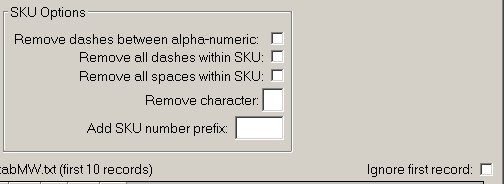
Remove dashes between alpha-numeric SKUs. For example, the SKU number in the data file is 123-AB. Select this option and the system removes the dash and converts it to 123AB.
Remove all dashes within a SKU.
Remove all spaces within a SKU.
Remove character. If there is a character in the SKU data that you want to remove, enter it in this field. The system removes all characters in each SKU which match the character you enter.
Add SKU number prefix. Enter up to three characters to be placed at the beginning of the SKU. When the SKU data is imported, each SKU will have the characters added to it.
If you want the import process to ignore the first record in your data file, click to place a check mark in the box.
(Optional) You can save the mapping and SKU settings for future use. Then if you import other data files that are set up the same as the one you just mapped, you can save time by opening the file and then applying the saved map to the file.
From the Designer toolbar, click Save map.
In the dialog that displays, type a description in the Desc box and click Save.
From the Designer window, click Import to display the Open dialog. Use this dialog to select the file or files that the system will use to create the catalog.
From this dialog, locate the file with the catalog data and click to highlight it. To select additional files, press Ctrl and then click the file to select it. The files display in the File name field. Once you have selected all the files, click Open. The Open dialog closes and the Import window displays.
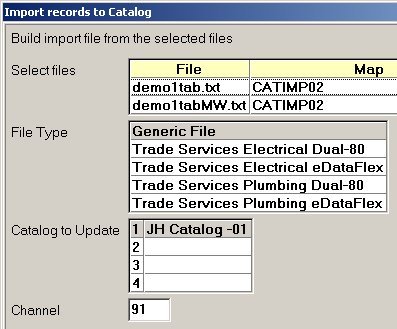

Select or review the information that displays:
Select files This is a list of the data files that you selected in the previous step. These files will be used to create or update the catalog. Next to each file name is the map that will be used. If the message, ***NOT MAPPED***, displays next to a file name, you need to associate a map with the file. Click to highlight the file and then click Set Map. From the Open View dialog, select a map to use and click Open.
File Type Click to select the type of files that are in the Select files list.
Catalog to Update Select one of the catalogs in the list. To add or change a catalog name, click the Catalog Name button. The Eagle system supports a total of five electronic catalogs. This includes vendor catalogs supplied by Epicor and those that you create in the Catalog Import application.
Channel Enter a channel number or leave the default of 91. The system uses this channel when processing and creating the catalog.
Click Import. A progress bar and window displays the status of the import and closes automatically when the import is complete. A message, similar to the following, displays at the bottom of the Import window:
Records: 22, Errors: 0. Catalog import initiated on Eagle.
If the message indicates errors, click View Log to display the log file. Scroll to find the entries for the most recent import and review the error messages. If the message indicates no errors, you can view the log file or click Cancel to close the Import window.
![]()
This log file is used by all the Data Import applications and can get quite large. The system does not automatically delete the oldest entries. You can delete old entries that are no longer needed. Highlight the lines that you want to delete and from the Edit menu, click Delete. Then from the File menu, click Save.
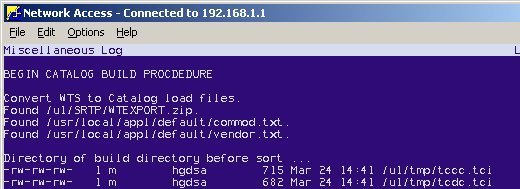
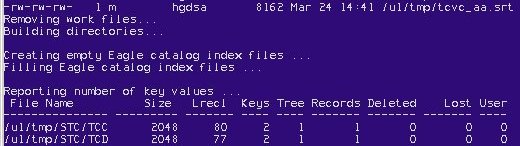
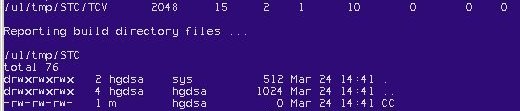
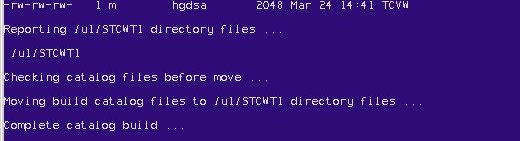
Check the Miscellaneous Log to verify the import completed and the catalog build was successful. You must check the log even if the previous message indicated no errors. From Network Access at the Function prompt, type SHOWLOG and press <Enter>. Press <Down Arrow> until Miscellaneous Log is highlighted and press <Enter> to display the log. Scroll until the most recent entries display. Review the log entries to verify that the Catalog build was successful. The entries start with "BEGIN CATALOG BUILD PROCEDURE" and end with "Complete catalog build… "
The following is an example of the log. Note that some lines of the log have been removed in the example.

From the Eagle Browser, click Applications. From the list that displays, click Catalog (CAT).
The Catalog Find Item window displays. If you have more than one catalog on the system, do the following to switch between catalogs:
From the Tools menu, click Options to display the Catalog Preferences dialog.
From the Catalog drop-down list, select the catalog you want to display.
Click Accept.
For more information about working with electronic catalogs on your Eagle system, refer to the help topics found in the Using Catalog book (under the Catalog book on the Contents tab).