This topic describes the tasks you must complete to set up the Professional Estimating Import application.
![]()
If you want to load SKUs into Professional Estimating (PE), there is a Request procedure available that keeps the prices up to date. For more information, speak to your Professional Estimating trainer.
Epicor must set the options "Professional Estimating on System" (ID# 8299) and "ESTU Electronic Third Party" (ID# 1077) to Yes. Verify that these options are set to Yes. In the Options Configuration window, click ID, type the ID#, and press Enter. Do this for both options. If either option is set to No, contact Epicor Direct at 800-538-8597. For help with the Options Configuration window, click here.
Set up option 8939 "Pass Inventory Type 1 Notes in the Professional Estimating Interface" in Options Configuration. In the Options Configuration window, click ID, type 8939, and press Enter. Enter your selection and click Change. Set this option to Yes if you want the Professional Estimating system interface to look for type 1 notes associated with items. If an item contains a type 1 note, the contents of the note is added to the imported document as descriptor lines. Note: This option does not consider the "Print Repeats" flag in the notes tab of the Inventory Maintenance screen; therefore, the system pastes the type 1 note regardless of how many times the note occurs on a transaction.
(Optional) Set option 3460 "Print Sierra POS Log on the boot log" to No if you are re-pricing items upon import to the Eagle system. During the merge process, transactions can generate a large amount of warning messages for these items, which is normal behavior. These messages are logged in the Sierra Log (which also logs the offline POS refresh from the previous day), which then prints on the bootlog the following day. In some cases, the warning messages will dramatically increase the length of the boot log. However, by changing change option 3460 to No, you prevent the Sierra Log from printing on the bootlog, thus avoiding the increase in bootlog length.
Assign security bit 704, "Ability to import a third party transaction file into POS," to the appropriate clerks in your store. For help with setting security bits for users, click here.
You must create a non-stock SKU in Inventory Maintenance to use for PE. To do this, create a SKU called "PESO" (you can use a different SKU number besides PESO if desired, but PESO is the default used by the PE installers). As you're creating the SKU, make sure to set the fields "Keep Stock Info" and "Keep Prices" to No on the Codes tab.
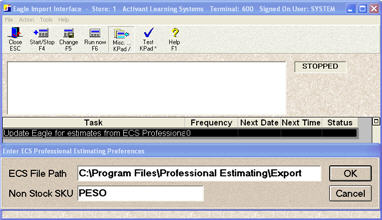
Launch Professional Estimating Import, and complete the following setup:
Set up the PE file path. From the Import Interface screen, click Misc. Notice the default path is C:\Program Files\Professional Estimating\Export. Leave this path, or type a different one if desired.
In the Non Stock SKU field, enter the non-stock SKU you set up for PE in step 3.