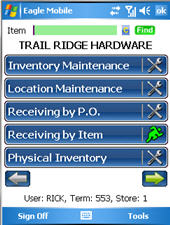
To enable your security for Eagle Mobile, from the Eagle Mobile main menu, tap Signon, and enter your User ID and Password when prompted.
![]()
If the terminal record on the Eagle is set up to use Special Security, you will automatically be prompted to sign on to Eagle Mobile.
(Multistore users only) If you want to change the store in which you'll be working, tap Tools and select Change Store. When the list of stores displays, tap the appropriate store, and then tap OK.
From the Eagle Mobile main menu, tap Receiving by PO.
On the PO Search screen that displays, you can scan an item (or manually enter it), enter a PO number, or enter a Vendor, then tap Find. Alternatively, you can leave all three fields blank, tap Find to display all POs, and tap the appropriate PO from the list.
On the Verify PO screen that displays, tap Receive if the correct PO is displayed. Otherwise, tap PO Search to return to the PO Search screen.
On the Receive Item screen that displays, enter the number of stocking units you received in the Stk field. If desired, you can also enter the cost or the retail. Then click Receive.
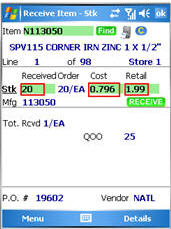
To receive another line item on the same PO, tap the forward or back arrow in the Line field, then repeat step 6.
To receive additional quantities of an item you already received, re-scan the item (or type the SKU), enter the additional quantity in the Stk field, and tap Receive. You can do this as many times as necessary, and all quantities will be added together.
To revise the quantity of an item you already received, enter the revised quantity in the Stk field, tap Details, and select Replace Qty Received. The quantity you just entered replaces the previous quantity entered.
To add an item to the PO, scan the item (or type the SKU), enter the quantity received, and tap Add. Note that there is also a Cancel button in case you change your mind about adding the item to the PO.
To print a label, tap the print icon![]() , or tap Details and select Print Label.
, or tap Details and select Print Label.
To clear the screen, tap ![]() .
.
To return to the PO Search screen, tap Details and select Search PO.
To capture a UPC code for an item:
With the item displayed, tap Details and select Capture UPC.
On the UPC Capture screen that displays,
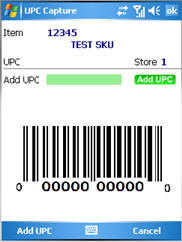
scan the item's UPC code, and tap Add UPC.
When you are finished using Eagle Mobile Receive PO, you can:
Tap OK. This exits the Receive PO application and returns you to the main menu.
Tap Menu. This leaves the Receive PO application running, but returns you to the main menu, where you can open another application. If you go back to the Receive PO application, it displays in whatever state you left it in when you tapped Menu.
To sign off your security from the Eagle Mobile unit, tap Tools from the main menu, and select Sign Off.
Use the Receiving Report (RRP) to print an edit list and then finalize the items being received.