![]() Using Virtual Terminal in Offline Point of Sale
Using Virtual Terminal in Offline Point of Sale
This Job Aid describes the steps required to use Virtual Terminal to obtain approvals for Offline Point of Sale transactions.
1
Log into Core Management System
-
Access the Epicor Payment Exchange Core Management System by typing www.coremanagementsystem.com/epx
-
When the Customer Login screen displays, enter your Username and Password.
-
Click Submit.
![]()
You can create a shortcut to Core Management System on each POS terminal desktop for easy access.

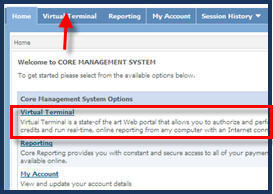
2
Access Virtual Terminal
Click the Virtual Terminal tab, or the link on the Home tab.
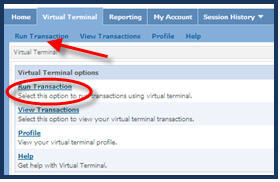
3
Select “Run Transaction”
From the Virtual Terminal tab, click Run Transaction from either location on the screen.
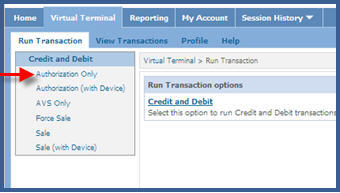
4
Click Authorization Only
From Virtual Terminal’s ‘Run Transaction’ window, click Authorization Only.
Note: You can only process credit card authorizations in Virtual Terminal at this time. Debit cards should be used as credit cards both in Eagle’s Offline Point of Sale and Virtual Terminal.
5
Enter transaction & bankcard information
-
Complete the Transaction Information. The Subtotal field may include merchandise and tax amount, or the tax amount may be entered separately in the Tax field. The Total field will populate with the Subtotal plus Tax amounts. Reference Number is optional, and may contain both alpha and numeric values. Entering any value in the Ticket Number field will help reduce interchange rates; many users simply enter a ‘1’. Customer Code is used rarely, and only for corporate purchase cards.
-
Card Information must include the Card Number, without dashes or spaces, and the Expiration month and year must be completed. The CVV2 field is optional, but is strongly recommended. (Hover over the field label to display information on identifying the card value.)
-
Click Submit to obtain approval, or select the + Show Address link to enter customer address information. Although optional, this step is recommended to help reduce interchange fees. (See section 6 below).
Note: If you clicked Submit without entering address information, proceed to section 7.
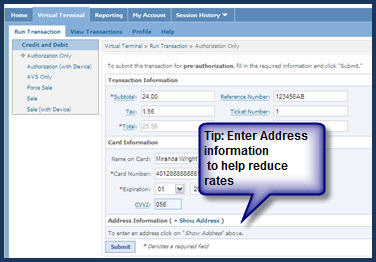
Note: Fields with asterisks * are required fields and must contain a value.
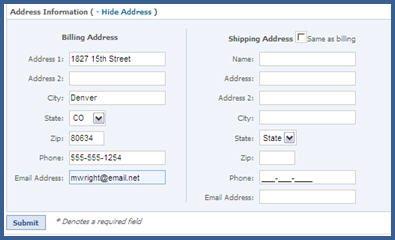
6
Enter Address information
-
Addresses are validated based on the house number (in Address 1) and Zip code on file for the cardholder. Make sure to enter these two key pieces of information. All other information is optional, but it is recommended that you collect and enter as much contact information as possible, since it may help to reduce the potential for fraud and charge-backs.
-
Click Submit.
7
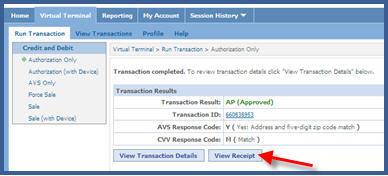
View Transaction Results
-
The Transaction Result field will display ‘AP (Approved)’ in green font if the bankcard has been approved. Note that Transaction ID is populated by the processor, and is not the approval code.
Note: AVS Response Code will indicate a “Y” if both the house number and zip code match, a “Z” if the zip code matched but not the house number, an “A” if the house number matched but not the zip code, and an “N” if neither house number nor zip code matched. The CVV Response code displays an “M” for a match and an “N” for no match.
- Click View Receipt to display a receipt image that contains the approval code.
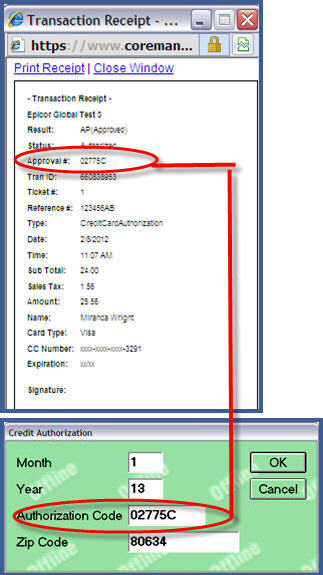
8
Copy approval code from receipt
Locate the number in the Approval # field displayed on the transaction receipt. Enter this number in the Authorization Code field displayed on the Totals screen of Offline Point of sale to complete the transaction.
Tip: With your Transaction Receipt displayed, you may use your mouse to Copy the approval code and then Paste it into the Authorization Code field.