
Return a Credit Balance to a Customer Using Accounts Payable
This job aid describes how to create a refund check for a customer with a credit balance in Accounts Receivable. Use this procedure to bring the running balance from a credit balance to a zero balance (0.00), then print a refund check for the customer using Accounts Payable. Crediting the account and running the A/P check should occur on the same day.
1
Write-off the credit balance
Determine the account(s) that have a credit balance and the amount of the balance to be refunded. Follow these steps to use Open Item Maintenance to create an invoice document using the Amount Tendered field so that sales are not affected.
-
From the Eagle Browser, click Accounts Receivable Menu.
-
From the list that displays, click Customer Maintenance. The Customer Maintenance windows displays.
-
Display the customer.
-
Click GoTo and Select Open Item Maintenance. Verify that the correct customer information displays.
-
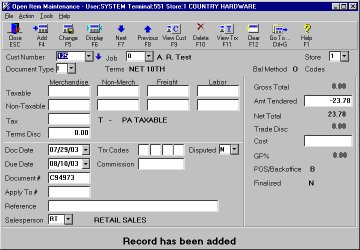
From the Document Type pull-down list, select I - Invoice.
-
In the Amt Tendered box, type the amount of the write off, including the minus sign. For example, if the running balance on the account is – 23.78 (a credit of 23 dollars and 78 cents), enter – 23.78 in this field. Be sure to include the minus sign in front of the amount.
-
Click Add.
-
Check the Bal Method field below the customer name, if the balance method is O (for Open Item), then you must apply this invoice you just created to the unapplied credits or payments that make up the credit balance. Do this in Received on Account (ROA) as you normally would.
If the Bal Method field is B (for Balance Forward), you are done writing-off the transaction, you do not have to apply the invoice.
-
(Optional) Check your work by running a Daily Journal Report (RDJ) with Option B (do not use F) from/to the customer account.
-
Before continuing with the next section, check that the running balance for the account is now zero.
How General Ledger is updated
If you write off a credit balance using the procedure described in section 1, then General Ledger will be updated with a credit to the Cash account and a debit to the Accounts Receivable account.
|
|
DEBIT |
CREDIT |
|
CASH |
|
23.78 |
|
ACCOUNTS RECEIVABLE |
23.78 |
|
2
Creating vouchers for the refund check in A/P
Creating a check in Accounts Payable will credit the Cash account again. To reverse this, the distribution in New A/P Transactions (ATMU) is made to the Cash account. Follow these steps to create the vouchers and print a check on the same day you bring the customer balance from a credit balance to a zero balance.
-
From the Eagle Browser, click Applications, then click Accounts Payable Menu.
-
From the list that displays, under Daily Procedures, click New A/P Transactions.
-
Follow your normal procedures for creating a Regular voucher, or a prepaid voucher (if the check is being written immediately or has already been written). Complete the following:
-
In the Vendor box, type the code that you use to identify this customer as an accounts payable vendor. If this is a new customer (vendor), add a temporary vendor for this customer. Click Go To and select Maintain Vendors.
-
In the Invoice Amount box, type the full amount you will be refunding the customer.
-
(Optional) In the AP Account box, select a different account.
-
In the Voucher Ref box, type a note of explanation about this voucher.
-
In the Terms Code box, select an appropriate terms code. If necessary, manually set the Due Date and Disc Date to today's date, and set the Discount Amount to zero (0.00).
-
On the Distribution tab, use the account number of the Cash account and distribute the entire amount to this account.
-
Repeat this process if you have addition vouchers to enter.
-
(Optional) Run an edit list to review your work.
-
Post the new A/P transactions.
-
Click Add.
How General Ledger is updated
Once the voucher is posted, General Ledger will be updated with a debit to the Cash account and a credit to the Accounts Payable account.
|
|
DEBIT |
CREDIT |
|
CASH |
23.78 |
|
|
ACCOUNTS PAYABLE |
|
23.78 |
3
Printing and posting the check
-
From the Eagle Browser, click Applications, then click Accounts Payable Menu.
-
From the list that displays, under Payment Processing, click Selecting, Paying, and Adjusting Invoices.
-
Follow your normal procedures to select the voucher(s) for payment, print the check(s), and post the check(s).
How General Ledger is updated
Once the check is posted, then General Ledger will be updated with a credit to the Cash account and a debit to the Accounts Payable account.
|
|
DEBIT |
CREDIT |
|
CASH |
|
23.78 |
|
ACCOUNTS PAYABLE |
23.78 |
|
4
Check your work
-
Run the A/P Distribution to General Ledger Report (RAGL) to check for correct general journal entries. If you are using passoff to General Ledger, do not purge (set Purge File? to N).
-
(Optional) If you pass off Accounts Payable distributions to General Ledger, use General Ledger Passoff (GLP) to move these entries to the General Journal.