
Inventory Import Designer
This job aid describes how to use the Inventory Import Designer window and a data file that contains Inventory item change information. Then import the data to your Eagle system, to the Flexible Inventory Load window (FIL).
![]()
Commas do not import via Inventory Import; they are converted to question marks ("?”). If the data you're importing contains commas in the item description field, Epicor recommends you globally change the commas to some other character (such as a space or semi-colon) before importing.
1
Obtain the data file with item change information
Create or obtain (for example, from a vendor) a file that contains item changes. The data in the file can be in a fixed length format or delimited format (tab, comma, or custom). If you aren't creating the file yourself, then ask the provider of the file how the data is arranged in the file. If it is custom delimited, you'll need to know what character is used as the delimiter. Once you have the file, place it in a folder (directory) on your PC. The location and name of the file is up to you. But you will need to know where the file is located to use the Inventory Import Designer window.
2
Open the file and indicate the file type
From the Eagle Browser, click Data Import Menu, then click Inventory Import Designer to display the window.
From the Designer window toolbar, click Open to display the Open dialog. From this dialog, locate the file with the item changes, click to highlight it, and then click Open. The Open dialog closes and you are returned to the Designer window.
From the list under Import File Type, click to select the correct file type for the file you opened in step 2. If you select Custom Delimited, you must also enter the delimiter character in the box that displays. This is the character that divides the data fields.
If the file contains more than one record per SKU, indicate that in the Records per SKU box. The system then concatenates the data to be one record per SKU.
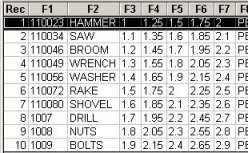
From the Designer window toolbar, click Input to display the first 10 rows of the input data in a grid format.
If the 10 rows that display in the grid are not readable, you may have selected an incorrect Import File Type. Click to select a different type and then click Input.

3
Map the fields to the file data
Including SKU, decide which of the item data in the file you want to import to (FIL). Then map the fields to be selected during the import.
![]()
You must map the SKU "identifier" in the import file to the SKU field, whether the import file identifies the items by SKU, UPC, Manufacture Part Number, or Alternate Part Number.
If you are importing Desired GP% from a data file or entering the value as a Constant, it must be expressed as a decimal ONLY (not a whole number), and there can be up to three decimal places after the decimal. For example, a desired gross profit of 49.9% must be entered as 49.9.
When importing a date (such as Record Added Date, Last Sale Date, Catalog Date, etc.), it must be in the format of mm/dd/yy. The format mm/dd/yyyy will not work.
In the Designer window, click Map Field to display the Map Field Attributes dialog with a list of inventory fields.
From the list, click a field to select it and then click OK. In the next Map Field Attributes dialog, fill in the fields:
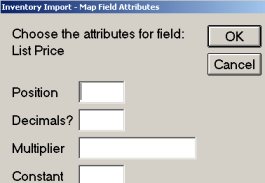
Position (this field only displays for Delimited files), type the column number for this field. For example, if you are mapping List price and that corresponds to column F7 in the 10 row grid, type 7 in this field.
Constant, this is optional, enter a value that you want to always use for the field that you are mapping. Then leave all other fields blank. For example, the data file contains "adds" (items that are not yet in your Inventory file) and does not contain department data (a dept code is required for an add). You could edit the data file directly to add the department data, but some file formats are difficult to edit. So map the Department field and in the Constant field enter a department code to use for adds. All of the add SKUs will use the value you enter.
Start/End Position (this field only displays for Fixed Length files), type the start and end position for the field. For example, if you are mapping the Price field and in the data file the price field spans positions 1 through 6, type 1 for Start and 6 for End.
Decimals? (this field only displays when mapping a price field), leave this blank if the decimals are already included in the data file. Or type a number to indicate where the decimals should be added to the data. For example, the data is 12359, type 2 to insert a decimal place to make the data 123.59
Multiplier (this field only displays when mapping a price field), leave this field blank or type the multiplier you want the system to use to mark up or down the price. For example, type .8, to calculate a price that is 20% less than the price data. Type 1.5, to calculate a price that is 50% higher than the price data.
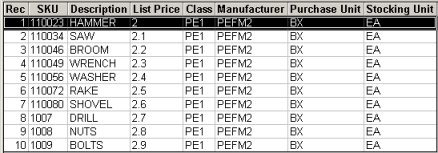
Click OK. The dialog closes and the column you mapped displays in the grid area with a column heading.
Click Input to again display all the data file columns. Repeat steps 1 through 4 until you have mapped all fields that you want to import to FIL.
When you have mapped all fields that you want to import, click Output to review your work. If you made a mistake, re-map a field by completing steps 1 through 4. To remove a field that you've mapped, click the Delete button in the first Map Fields Attributes dialog.
4
Select SKU settings
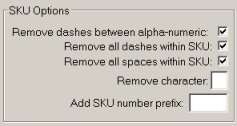
In the SKU Options area, click to select any of the following that apply to your data file:
Remove dashes between alpha-numeric SKUs. For example, the SKU number in the data file is 123-AB. Select this option and the system removes the dash and converts it to 123AB.
Remove all dashes within a SKU.
Remove all spaces within a SKU.
Remove character. If there is a character in the SKU data that you want to remove, enter it in this field. The system removes all characters in each SKU which match the character you enter.
Add SKU number prefix. Enter up to three characters to be placed at the beginning of the SKU. When the SKU data is imported, each SKU will have the characters added to it.
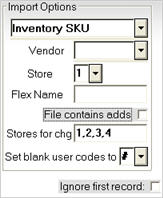
In the Import Options area, enter the options that apply to your data file.
Inventory SKU— Indicate the file against which the import file should be matched. For example, if the items in the import file are identified by UPC, select UPC so the system will look in your UPC file to find a match for each item; if the items in the import file are identified by SKU number, select Inventory SKU, etc.
Vendor— If you selected Manufacturing Part Number or Alternate Part Number as your match criteria, you must select a vendor in this field. Selecting a vendor is optional if you selected Inventory SKU or UPC as your match criteria. If you do select a vendor and your match criteria is Inventory SKU, Price Import will consider the SKU a match when the vendor matches primary, manufacturing, or alternate vendor.
![]()
Inventory Import will consider the Manufacturing Part Number a match only if the Vendor you enter matches the Manufacture Vendor for that part number. The same is true for Alternate Vendor: to be considered a match, the Vendor you enter must match the Alternate Vendor for that part number.
Store— Select the Store for the data import.
Flex Name— Enter the flex name the system should use for this inventory import. You can create your own flex name (up to 8 characters), or you can use one that exists in Flexible Inventory Load.
If you use an existing flex name, your mapping in the designer must correspond exactly to the fields in the existing flex report you selected.
File contains adds— check this box if the data file includes new SKUs what you will be adding to your Inventory file.
Stores for add— if you checked the box for File contains adds, then enter the stores for the new items.
Stores for chg— if you did not check the box for File contains adds, and you want the RFL to finalize the changes automatically, enter the stores/store groups for the modified items (if you only have one store, enter 1 in this field). Multistore users: any store-specific fields will be updated for all stores indicated.
If you leave this blank, the Store field is used to determine which store to modify, and you must run the RFL manually.
If you want the import process to ignore the first record in your data file, click to place a check mark in the box.
5
(Optional) Save the map
You can save the mapping and SKU settings for future use. Then if you import other data files that are set up the same as the one you just mapped, you can save time by opening the file and then applying the saved map to the file.
From the Designer toolbar, click Save map.
In the dialog that displays, type a description in the Desc box and click Save.
6
Import the data to FIL and check the log
Click Import to display the Inventory Import dialog, this dialog includes the Flex Name that will be used.
Click Import. A progress bar displays the status of the import. Then a dialog displays when the import is complete, with the number of records written to FIL and if any errors were found.
If the status message indicates errors, click View Log to display the log file. Scroll to find the entries for the most recent import and review the error messages. If there were no errors, click Cancel to close the dialog.
Check the Miscellaneous Log to verify the import completed successfully. You must check the log even if the previous dialog indicated no errors. From Network Access at the Function prompt, type SHOWLOG and press <Enter>. Press <Down Arrow> until Miscellaneous Log is highlighted and press <Enter> to display the log. Scroll until the most recent entries display. Review the log entries to verify that the import to FIL was successful.
7
Review the data and update the Inventory file
Use Flexible Inventory Load (FIL) and the Flexible Inventory Load Report (RFL) to review the data. Use RFL to print an edit list of the data, do not use Option F. In FIL you can make changes to individual items or delete records.
After reviewing the data, run RFL with Option F to finalize the data and update the Inventory file.
However, if you entered a store(s) in the “Stores for chg” field, the system will queue and run a finalized RFL automatically, one for each individual store you indicated.