The purpose of programming a key (also known as setting up a "macro") is to quickly insert data from a PC file into the Epicor Eagle™ system. Note that if you use a macro, you can not review your work before it takes effect, and your data is immediately and permanently updated. Therefore, Epicor strongly recommends that macros be used ONLY after a good backup has been completed. That way, should any unforeseen problems occur, you can restore your data from the backup tape.
Creating a macro will require testing to make sure it does what you expect. You should always use small files when testing and make sure you have a good backup before you begin. Use extreme caution when using macros, and if you do not fully understand how to use them, call the Eagle Advice Line.
Keyboard Macros are stored on your PC in c:\3apps\catapult\triadcrt.3mc
Create or obtain a file containing the data you wish to add to your system. Such a file is most commonly created in Notepad or Excel. The most common formats for such a file are "comma delimited" and "tab delimited." Other formats which will work are "space delimited" and "vertical bar delimited." If you are not familiar with the process of creating these types of files, you may need to consult a PC specialist for assistance. The file you are going to use can be on a floppy diskette or on the hard drive of the PC where you will be executing the macro process.
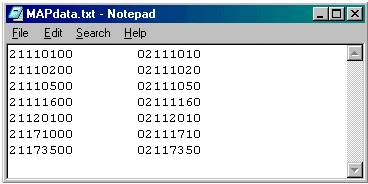
The following example will use a tab-delimited file created in Notepad to add data to the Eagle function MAP. If you display the file in Notepad it will look like this:
The above data will be loaded into MAP. The alternate part numbers are in one column and the associated SKUs are in the other column. In this example, the SKUs must already exist in your Inventory file. However, depending on which screen your macro will affect, an SKU (or other types of data) does not necessarily have to already exist in the system. Be aware that your file can and may have many more columns and be a much longer list than the one in this example. Furthermore, depending on how the data is "delimited," your data may look different than this example. Below is an example of the same data, except in comma-delimited format. Note that the comma only needs to be between the columns and not at the end.
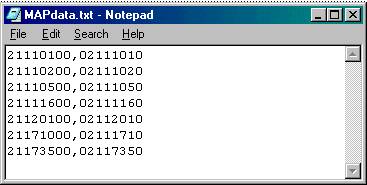
Once you have the file you'll use, it is important to know which column contains what data. In this example the first column is the SKU and the second column is the alternate part number.
The next step is programming the key. At this point you do not need your macro file open. It's easier to create the macro if you are "in" the function you wish to affect, so for this example you would do the following:
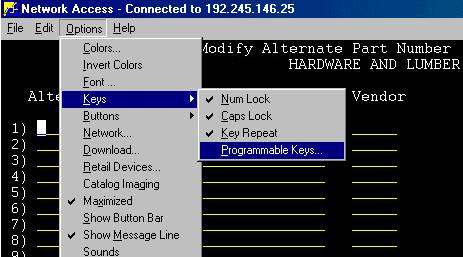
Go into Function MAP (from the Network Access Main Menu). Along the top of Network Access window is the menu bar.
Click on "Options", then "Keys", then "Programmable Keys" (see below).
After clicking on "Programmable Keys" the following pop-up window displays:
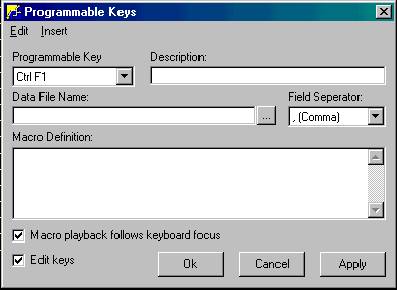
Select the programmable key. In this example, " Crtl F1" is selected. That is to say, once the process of setting up the macro is finished you will press Ctrl F1 to start the macro running.
Type in a description of this macro. For this example we'll use the description " MAPmacro".
In the field "data file name" you can double click in the field area or click once on the box with three dots just to the right of the field. Here you select the file you created in the first step.
In the 'Field Separator" field, select the type of file you have.

The next step is the "Macro Definition". This step can be somewhat tricky and some experimenting may be necessary to make the macro do what you intend. IMPORTANT- Along the top of the Programmable Keys window there is a short menu bar. This menu bar has only two choices, Edit & Insert. In this example, the first keystrokes you would make on the MAP screen would be typing an alternate part number. Since the purpose of this macro is to eliminate keystrokes, this macro will take the data from your file and type it for you. Therefore, the first thing you want the macro to do is to take the data from the file and insert it into the field "alternate part #" of MAP. To program the macro to do this, click Insert on the menu bar, then click Data File Column. See below.
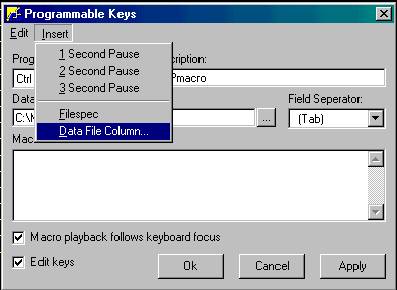
Once you click on data file column, a dialog box displays.
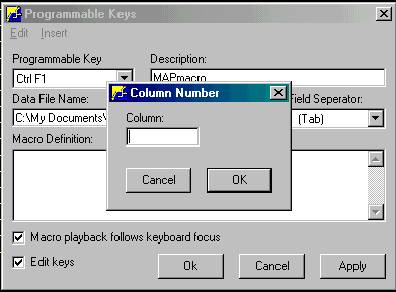
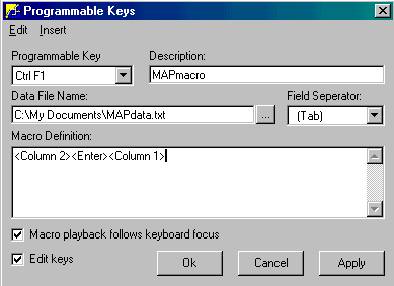
Enter the number of the column with which you want the macro to populate the alternate part # field. In this example we have stated that the first column is the SKU and the second column is the Alternate Part #, so in the column number pop-up window, type 2 and click OK. This will insert <Column 2> into the macro definition. This step is VERY important. You must do this by selecting Insert, Data File Column, then enter the column number into the pop-up window. IF YOU INSTEAD JUST TYPE <Column 2> into the macro definition area IT WILL NOT WORK! If you have followed these steps so far, the screen should look like this.
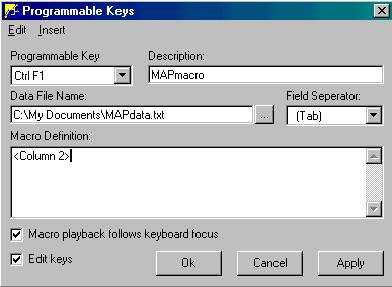
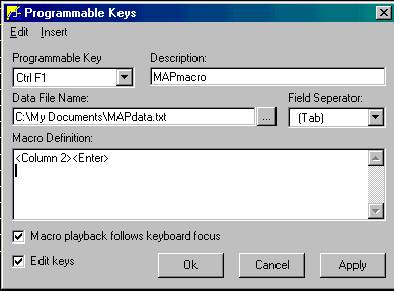
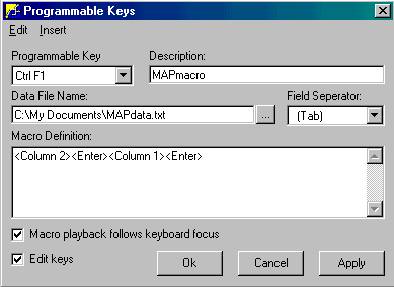
To continue you must visualize the keystroke you would need to enter and add items to MAP. If you were adding an alternate part # in MAP, you would press ENTER after typing the number, so you need to have the macro press ENTER. If you type or press any keys while the cursor is in the macro definition field the macro will record that keystroke. If the screen looks the way it does above, and you press ENTER, it will change the screen to look like the example below. (Notice how <Enter> was added.)
Thinking as if you were adding items to MAP manually, you would have typed the Alternate Part # and pressed ENTER, and now the cursor would be sitting in the SKU field. At this point we want the macro to insert more data from our file. Press Insert (on the menu bar) and select Data File Column. The pop-up window displays.
Enter 1. Remember this must be done using Insert from the menu bar-simply typing <Column 1> in the macro definition area will not work. The screen should look like this:
Again, thinking as if you are entering these fields into MAP manually, after typing the SKU you would press enter to make the cursor move to the vendor field. Therefore, press ENTER. The screen will now look like this:
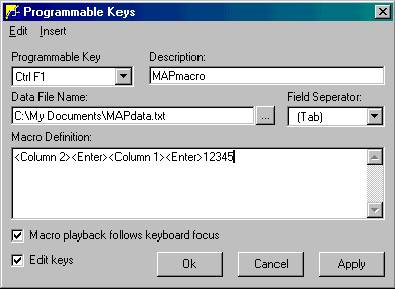
Still thinking as if you are adding the items to MAP manually, the cursor would now be in the Vendor field. Type the vendor code (in the example, the vendor code is 12345). Note: if the vendor code were a column in your Notepad file, the macro could insert the vendor data automatically. However, this example was not set up that way.
The screen should look like this:
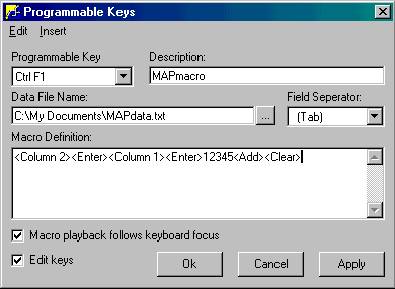
Still thinking as if you are adding the items to MAP manually, you would be ready to press ADD, so press ADD. If this macro works properly it would have entered an alternate part # from the file, then entered the SKU data from the file, then entered 12345 in the vendor field and pressed ADD. The screen should show "record added" at the bottom of the MAP screen. In order to have the macro continue entering the rest of the data from the file properly, press CLEAR so the first record added is cleared from the screen and the macro will continue until all records have been added. The complete macro will look like this:
Click OK to save the completed macro.
You are now ready to run the macro. For this example, you'd go into Function MAP and press the keystroke you programmed (in this case, Ctrl F1) and the macro will run. Once you start the macro running, do not to press any other key on the PC until the process is finished. Also note that the macro will run from any screen, so if you press Ctrl F1 in any other screen it will still run. This could be very dangerous depending on which screens you might be in. Therefore, it is advisable to delete a macro after using it, so that your risk of accidentally running a macro is eliminated.
![]()
If you make a mistake while "recording" the macro and wish to change part of the macro definition, use only the arrow keys and the delete key to correct your mistake. If you press backspace to remove the last letter typed, instead of removing the letter it will place the <Clear Field> command into the macro.
Be aware that macros ONLY record keystrokes; they do not record mouse clicks.
If you wish to use the PC for some other purpose while the macro is running, you should " uncheck" the box labeled "macro playback follows keyboard focus" before clicking OK to save the macro. Note: You can not do anything else in Network Access while the macro is running. Said another way, do not press Esc to go back to the Function Menu while the macro is running, because the macro will continue to run in any other function that you display.