You can set up return reasons so that POS clerks must indicate the reason for the return. For example, you you could set up return reasons such as "wrong color," "wrong size," "customer changed mind," "found item elsewhere," etc.
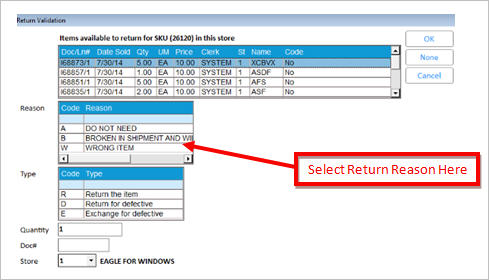
In POS, when an item is returned, a drop-down menu with the list of available reason codes and their descriptions display. The clerk simply selects a code from the list. The first code in the table is the default in POS.
As desired, you can use the Customer Returns Viewer to view/print the return reasons your clerks selected for returned items. If you have Inventory Transaction Register (ITR), the ITR Viewer will display the return reason that was selected at POS for an item.
Click ID. In the dialog that displays, type 8414 in the ID field and click OK. The option " Prompt for return reason" displays. Click in the Current Value column, enter Yes, and click Change.
Click ID. In the dialog that displays, type 8416 in the ID field and click OK. The option "Add/Change user-defined return item reason codes" displays. Click in the Current Value column, enter Yes, and click Change.
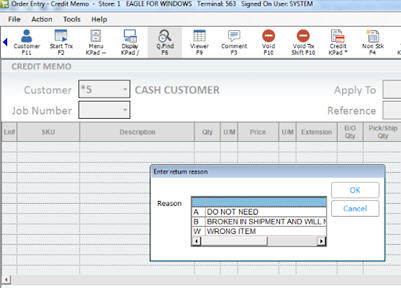
The process of selecting a return reason in POS depends on whether or not you use Returns Validation.
In POS, when ringing up a credit item (either a line-item credit, or an item on a credit memo transaction), the system prompts you to select the type of return (regular return, return for defective, or exchange for defective), as it normally does. Then the system prompts you for a return reason. Select a return reason and press OK.
If you use Returns Validation, you select a return reason on the same screen where you select the transaction to which you want to apply the return.