After you have set up the adjustment accounts in G/L for Advanced Receiving, you must enter their corresponding G/L account numbers in the Setup G/L Passoff window (GLSET), plus you'll designate the A/P Sub Account that you want the system to use for Advanced Receiving. Note that every account and sub-account that you enter in GLSET must exist in the Chart of Accounts. If any G/L accounts are missing in GLSET, the system can’t pass off to them.
In GLSET, you need to track the following by department: Inventory and COGS adjustments, accrued purchases, and freight and miscellaneous charges.
Your Implementation Specialist can assist you with setting up sub accounts to track information down to the departmental level. The steps may include:
Verifying there is no Passoff in Set Up G/L Passoff (GLSET).
Setting the default sub accounts to unique accounts per store.
If you use sub accounts by department, setting up a unique set of COGS adjustment and inventory adjustment sub accounts for each account.
If you are multistore and use department passoff, setting up sub accounts across all stores by department.
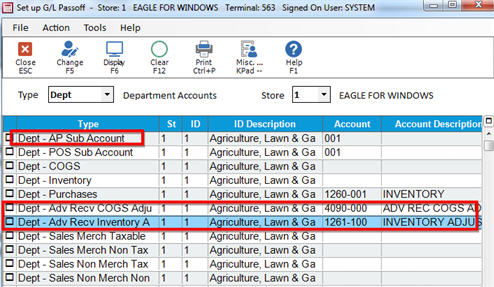
In the Type field, select Department Accounts. If you're multistore, select the store in the Store field. Press Enter to load the grid.
Notice that the ID field indicates the department number. Use the ID field to locate the first department that needs to be set up, and enter the appropriate account number in the following fields:
Dept - AP Sub Account. Enter the sub-account number you use to designate that particular department. For example: If your sub-account number (last 3 digits of an account number) for department 1 is 001, enter 001 in this field.
Dept - Adv Recv COGS Adjust. Enter the COGS Adjustment account for this department that you set up in the Chart of Accounts.
Dept - Adv Recv Inventory Adjust. Enter the Inventory Adjustment account for this department that you set up in the Chart of Accounts.
Scroll down so you can see the next relevant department number in the ID field. Like you did in step 3, enter the appropriate account numbers in the same three fields for this department.
Repeat step 4 for all other relevant departments.
Click Change.
Multistore users: repeat steps 2-6 for your other stores.