Once you have added the desired items to a PO Worksheet and you are ready to have these quantities show as "on order," do the following.
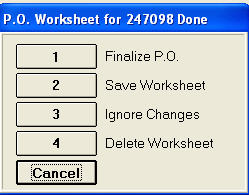
Click the “Header” toolbar button, or use its keyboard shortcut. The dialog shown below displays.
Select the appropriate option, depending upon what you want to do at this point, and then click OK.
1-Finalize P.O. – this changes a status T(temporary) purchase order to an F (final); updates the quantities from the purchase order to on order quantities; and if the purchase order is of a type that needs to be divided into additional purchase orders, this option also performs the task of dividing it. If the order you are working on is already a status F, this option removes previous order detail and replaces it with the details in your worksheet. When selecting this option, an additional dialog displays.
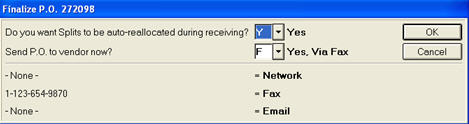

If you are using an integrated warehouse management system (WMS) and the order type is one that should be sent to the WMS, the Eagle automatically marks the order as “Ready to transfer." Once the Eagle receives confirmation that the order has been sent to the WMS, the purchase order is changed to “Transferred.”
2-Save Worksheet – this option does not change the status, but merely saves the work you have done to this point. If you are working on a purchase order that was previously finalized, it will not affect what is currently on order until you finalize.
3-Ignore Changes – if you have a previously saved worksheet that you have been editing and you want to revert back to the previously saved copy, choose this option. If you are working on a brand new order and you select this option, you are prompted if it is OK to delete the worksheet.
4-Delete Worksheet – Choosing this option deletes the current changes, as well as any previous sessions. If the order you have been working on was previously finalized, choosing this option does not change the quantities that are currently on order for this PO.