Use the following procedure to set up a grid "view" for the Purchasing and Receiving window that includes the PO Exception fields, so your purchasing clerk(s) can review these fields before submitting a purchase order to the vendor. If desired, you can make this view the default view for the purchasing clerk(s), so the view will automatically display whenever he/she displays the posting screen in the Purchasing and Receiving window.
Display the Purchasing and Receiving window.
Display an Open PO by clicking the PO Number field, selecting a PO that displays "Open" in the Status field, and clicking Post.
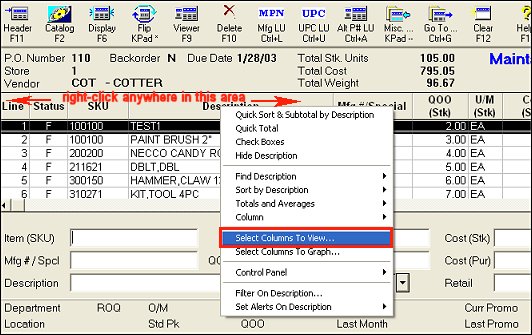
Right-click on any column heading in the grid, and select "Select Columns to View."
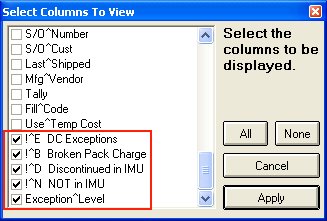
Select the desired PO Exception columns by placing a checkmark by each one. Then click Apply.
![]()
You can select any or all of the five available columns.
(Optional) Drag the PO Exception fields to the desired location in the grid.
![]()
If there are too many columns in the grid and you want to eliminate some, repeat step 3, and un-check any unneeded fields (excluding the PO Exception fields you selected in step 4).
Click File, Save View, and then name the view in the Desc box at the bottom of the Save Grid dialog box that displays.

(Optional) If you want the view you just created to display automatically at a particular terminal(s) (i.e. the purchasing agent's terminal), enter the name of the view in the option "Default PO Maintain Grid View" for the appropriate terminal(s) in Options Configuration.
For more information about Options Configuration, click here.