(Document Management users only)
Use the following procedure to set up your system to print POS invoices on a laser printer. You can choose to use pre-printed forms, or choose to print to plain paper (with the form lines, logos and data printed by the laser printer). You can order pre-printed laser invoice forms from our Business Products department.
This procedure assumes the flag "Allow laser forms" in Options Configuration has already been set to Y. This flag can only be changed by the Eagle Advice Line or Licensing Department.
From the Eagle Browser, click Utilities (in the blue left pane of the window). From the menu that displays, click Device Configuration.
From the Device Configuration menu, double-click "Invoice Printer."
If the invoice printer is currently not configured ("Not Configured" displays in the Description column), the Choose A Style dialog box displays. Click on the appropriate choice, and click OK.
If the device is currently configured (a description of the device displays in the "Description" column), click Device. The Choose A Style dialog box displays. Click on the appropriate choice, and click OK.
From the Choose A Style dialog, click "Windows Printer defined on this system" or "Multiple Windows printer with a default."
![]()
At this time, you cannot set up both laser Invoice printing and serial Invoice printing for the same transaction type, nor can you select multiple serial printers for the same transaction type. However, you can set up multiple windows printers for the same transaction type, and you can set up one transaction type to print to a serial Invoice printer and another type to a Windows printer.
In the Select Windows Invoice Printer dialog, click on the Laser printer you want to use, click in the Print Laser Invoices box so that it shows a checkmark, and click OK.
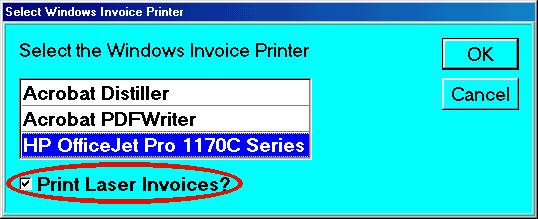
Note: If the "Print Laser Invoices" field does not appear, your system is either not on software level 10.5 or higher, or the "Allow Laser Forms" flag has not been activated. To activate the flag, call the Eagle Advice Line or Licensing Department.
From the Invoice Printer dialog, click Form. The Select Invoice Form Type displays.
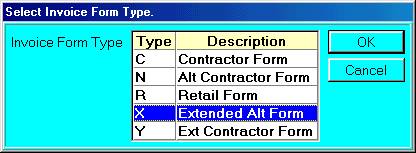
Click on the desired form type, and click OK. The Invoice Printer dialog displays again.
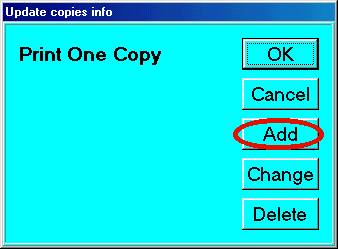
If you want to print more than one copy, or if you have a Laser printer that supports printing to multiple trays or bins, click Copies, and proceed to step 8 below. Otherwise, click OK to complete the setup, and skip the remaining steps of this procedure.
From the Update Copies Info dialog, click Add.
If you want to change the number of copies:
Type in the new number in the Number of Copies box and click OK. Another dialog box displays.
Click OK to accept and save the information. If you need to make a change, click Change and go through the setup again.
From the Invoice Printer dialog, note the change in the copies section.
Click OK to complete the setup.
If you want to set up Laser Invoices to print to multiple trays or bins:
Click Copies.
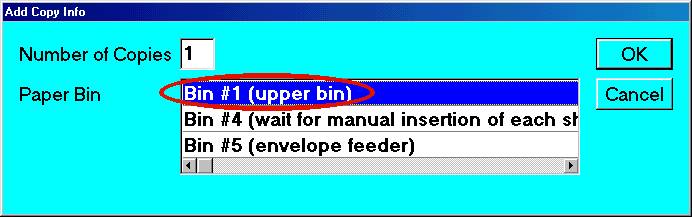
Click ADD.
Select the appropriate bin number. The example shown below is the setup for printing to the upper bin:
Click OK. The Invoice Printer dialog displays again. If everything looks correct, click OK, or to add more bins click ADD again, and repeat step 11.
Once you have completed selecting the number of copies and/or selecting multiple bins for invoice printing, click OK. The setup for POS laser invoices is complete.
NOTE: If you need to make a change or delete anything you've added, click COPIES from the Invoice Printer window.
In POS, send an invoice to the laser printer to confirm the setup you just completed is working properly.