
Use the following procedure to receive File Maintenance (EFM) from Do it Best Corp. This procedure assumes you have completed all EFM setup.
If you have the Do it Best electronic catalog on your system, it is updated by the EFM process. While the transmission to Do it Best to retrieve EFM is brief, it may take many hours for the system to process the catalog updates. Thus, EFM is typically run when the store is closed in a weekly queue.
Multistore: You must receive EFM data for each store on your system. Be sure to lock in to the store for which you want to receive data before continuing with this procedure. You can check or change the "Lockin Store" by clicking the Store button on the toolbar of the Eagle Browser.
This procedure assumes you have already completed telecommunications setup.
From the Eagle Browser, enter EFM in the Launch bar and press Enter.
Alternatively, you can click on the Do it Best Telecommunications Menu, and then select Receive File Maintenance (EFM).
In the Item File Maintenance window, in the Control Stream field, enter the name of your EFM control stream, or leave the default if your control stream name is HWIEFM.
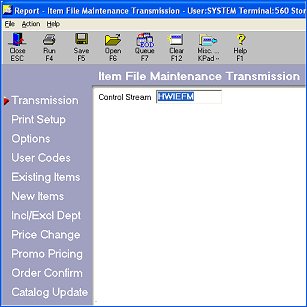
Click ![]() . Review the default entries in the fields and make changes if needed.
. Review the default entries in the fields and make changes if needed.
Click ![]() and select the vendor code you use for Do it Best from the drop-down list.
and select the vendor code you use for Do it Best from the drop-down list.
Click ![]() . Select Yes or No to update user codes. If you select Yes, use the bottom portion of the page to enter the letters of the user codes you want to update. You must use only one User Code group but you can update any position in the group. In the example below, all four user codes (D, U, K, and T) are being updated in the Exp Codes A group.
. Select Yes or No to update user codes. If you select Yes, use the bottom portion of the page to enter the letters of the user codes you want to update. You must use only one User Code group but you can update any position in the group. In the example below, all four user codes (D, U, K, and T) are being updated in the Exp Codes A group.

Click ![]() . Fill in the fields on the screen.
. Fill in the fields on the screen.
Click ![]() . Fill in the fields on the screen.
. Fill in the fields on the screen.
![]()
EFM will not run unless you select Yes to Update Existing items or to Add New Items (or both). You cannot answer No to both.
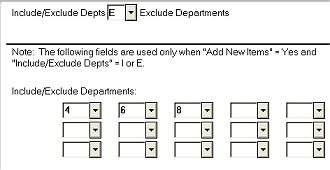
(Optional) Click ![]() . If you selected Yes to Add New Items in the previous step, use this page to include or exclude items from certain departments. For example, if you want to exclude items from departments 4, 6, and 8 from being added to your inventory, set the "Include/Exclude Depts" field to E, then enter 4, 6, and 8 in the fields below.
. If you selected Yes to Add New Items in the previous step, use this page to include or exclude items from certain departments. For example, if you want to exclude items from departments 4, 6, and 8 from being added to your inventory, set the "Include/Exclude Depts" field to E, then enter 4, 6, and 8 in the fields below.
Click ![]() . Fill in the desired options. Do not use the INFOPLUS options unless you have the INFOPLUS software. If you are not set up to receive the INFOPLUS records on Do it Best's system and you use this option, the records that get transmitted will not process on your system.
. Fill in the desired options. Do not use the INFOPLUS options unless you have the INFOPLUS software. If you are not set up to receive the INFOPLUS records on Do it Best's system and you use this option, the records that get transmitted will not process on your system.
Click ![]() . Fill in the desired options. In the Vendor Code field, be sure to select your vendor code for Do it Best.
. Fill in the desired options. In the Vendor Code field, be sure to select your vendor code for Do it Best.
If you use Order Confirmation, click ![]() . Select Option S to save the Order Confirmation file to use for ERP, and select any other desired options on the page.
. Select Option S to save the Order Confirmation file to use for ERP, and select any other desired options on the page.
Click ![]() . The Date Last Updated field is automatically filled in with the date you last ran EFM. You can optionally select a different date.
. The Date Last Updated field is automatically filled in with the date you last ran EFM. You can optionally select a different date.
Click Run to initiate the transmission, or click Queue (F7) to add EFM to an end-of-day queue.
Give the transmission a few minutes to process, and then check the transmission results in ASYMSG.
The transmission reports print when the transmission process completes.