(COM or PPS users with UPS WorldShip Integration)
In this procedure, you will map UPS Online WorldShip (UOWS) fields to their corresponding fields in Eagle for Windows (E4W) so that you can export shipping information from UOWS to Eagle for Windows. This procedure is performed in UOWS.
Start UPS Online Worldship (UOWS) as you normally would.
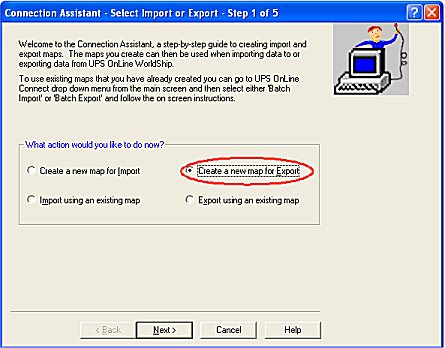
From the UOWS menu, select "UPS OnLine Connect" / "Connection Assistant." The Connection Assistant dialog displays.
Select the "Create a new map for Export" radio button.
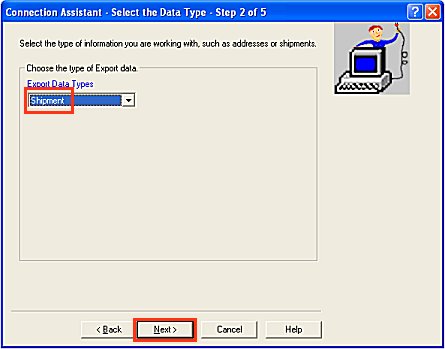
Click the "Next" button. The "Connection Assistant – Select the Data Type – Step 2 of 5" dialog displays.
Select "Shipment" from the "Export Data Types" drop-down list, and click Next.
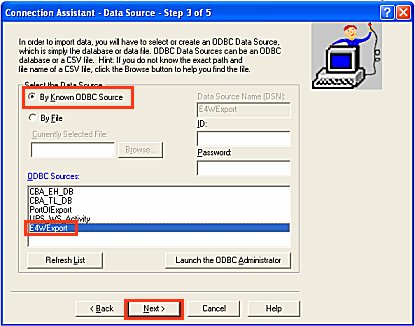
From the "Connection Assistant – Data Source – Step 3 of 5" dialog that displays, select "By Known ODBC Source" in the "Select the Data Source" section, and select "E4WExport" in the "ODBC Sources" section. Then click Next.
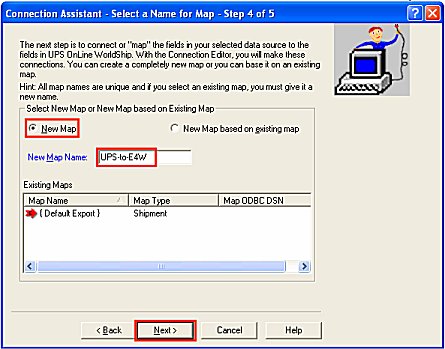
From the "Connection Assistant – Select a Name for Map – Step 4 of 5" dialog that displays, select "New Map" in the "Select New Map or New Map based on Existing Map" section, and type "UPS-to-E4W" in the "New Map Name" field. Then click Next.
In the "Connection Assistant – Prepare the Map - Step 5 of 5" dialog, simply click Finish.
In the "Edit UPS to E4W Import Map" dialog that displays, the fields in the left column represent the UPS Online WorldShip (UOWS) fields, while the fields in the right column represent the Eagle for Windows (E4W) fields. Follow the steps below to map the Eagle for Windows fields to the corresponding UOWS fields.
In the Worldship Fields box, select "Package" from the drop-down list.
In the left column, under Field, click "Reference 2" to select it.
In the ODBC Tables box, select "upsows.txt" from the drop-down list.
In the right column, under Column Name, click "Order Number" to select it.
Click "Connect" to establish the mapping between the Reference 2 and ORDERNUMBER fields.
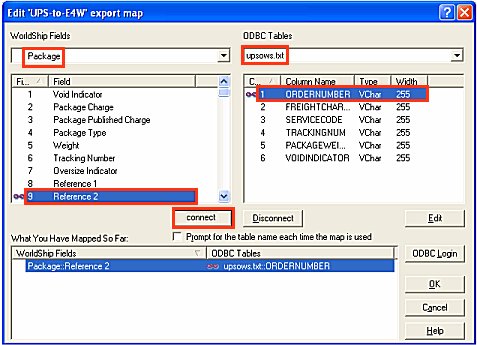
Notice after you press Connect that both of the mapped items now have visual indicator (the chain link) to signify that they are mapped to each other. The mapping also shows at the bottom of the screen in the "What you have mapped so far" section.
Map the remaining fields on the screen by using the following table. For example, to map the first row in the table, select Shipment Information in the Worldship Fields List, click Total Shipment Charge in the Field column (on the left), leave "upsows.txt" in the ODBC Tables field, click Freight Charge in the Column Name column (on the right), and click Connect.
|
WorldShip Fields List |
Field |
ODBC Tables |
Column Name |
|
Shipment Information |
Total Shipment Published Charge |
upsows.txt |
FreightCharge |
|
Shipment Information |
Service Type |
upsows.txt |
ServiceCode |
|
Package |
Tracking Number |
upsows.txt |
TrackingNum |
|
Package |
Weight |
upsows.txt |
PackageWeight |
|
Shipment Information |
Number Of Packages |
upsows.txt |
NumPackages |
|
Package |
Void Indicator |
upsows.txt |
VoidIndicator |
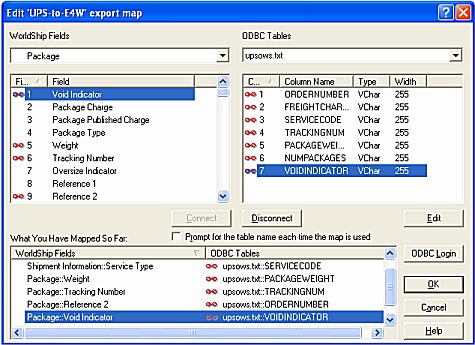
When finished mapping all items in the table, scroll to the top of the list in the left column, click "Order Number" to select it, and click "Define Key."
![]()
You must click Define Key before proceeding!
Your screen should now look similar to the following:
If you made any mistakes mapping the fields, locate the mistake in the list at the bottom of the screen, click it, and click the "Disconnect" button. Then remap the item. Press OK when you are certain you’ve mapped all the fields correctly. When asked if you want to import data now, choose "NO."
Proceed to the topic "Verify Integration When You Open UPS WorldShip."