Before you begin, option 79 "Enhanced Forms on System" in Options Configuration must be set to Y.
For each type of Enhanced Form, you must set up the following in Options Configuration. Available domains are System, Store, and Terminal.
Form type— Select from the many pre-defined formats.
Sort order— Determines the order that the details lines print on the document. Select Location, Line Number, SKU, or Use Code.
Location option— Determines if the column on the form is assigned to Location Code or Suggested Price. Other invoicing options will then apply to this column. For example, if you select Suggested Price, then the invoicing option (MIV) "Suggested Price to Print?" determines the price that prints in this column.
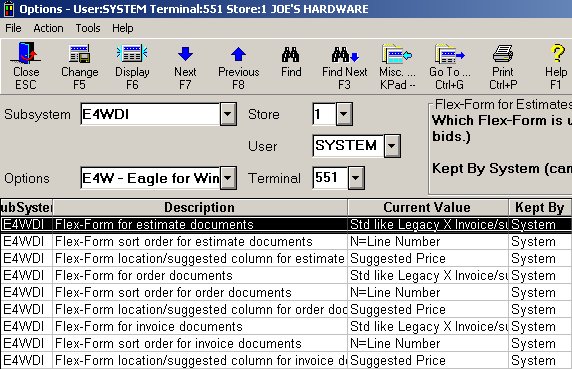
From the Eagle Browser, click System Management Menu. From the list that displays, click Options Configuration Menu and then click Document Imaging Options. Locate the Enhanced Forms options. The following is an example of the window.
Notice that for each form type (estimate, order, etc.) there are three options— form type, sort order, and location/suggested column ("loading ticket" only has the first option: form type)— plus there is one additional option as to whether or not a barcode prints. For each of the form types, you will set these three options (only one option for "loading ticket"), plus the "barcode prints" option, if desired.
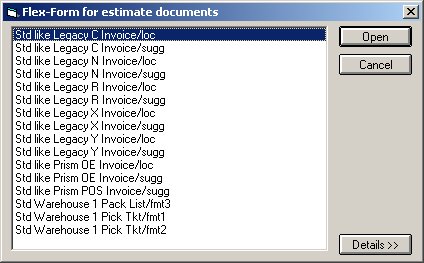
Select the form type for the first Enhanced Form, estimates. Click the Current Value to display an arrow, click the arrow to display the following selection dialog. Click to select one of the form types and then click Open. The dialog closes.
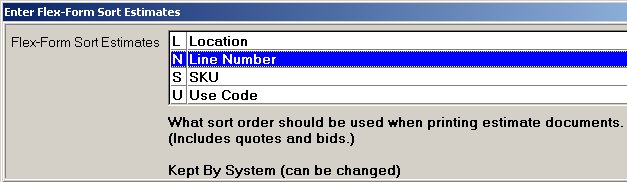
Select the sort order for estimates. Click the Current Value to display an arrow, click the arrow to display the following selection dialog. Click to select one of the sort orders and then click OK.
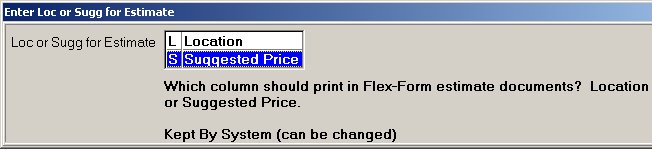
Select the location/suggested column option for estimates. Click the Current Value to display an arrow, click the arrow to display the following selection dialog. Click to select one of the options and then click OK.
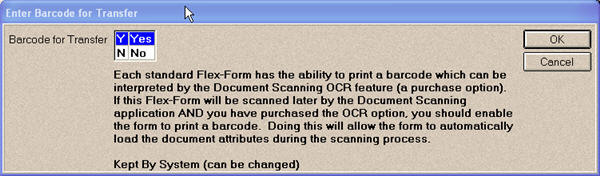
Select the barcode prints column option for estimates. Click the Current Value to display an arrow, and click the arrow to display the following selection dialog. Select Y or N, and then click OK.
Repeat steps 2-5 to select the options for the remaining form types.
![]()
The options for Warehouse Pick Ticket are can only be set if the "Pick/Pack/Ship" option is enabled on your system.
(Optional) If you want to print Loading Tickets on an invoice printer using Enhanced Forms (rather than printing them on a receipt printer), set up the option "Print loading ticket to invoice printer," as follows:
Click ID, type 3119, and press Enter. The option displays.
Click in the Current Value Column, click the arrow that displays, and select Y or L.
![]()
To print Loading Tickets on the receipt printer, set option 160 "Print Loading Receipt" to Y or L. This option is mutually exclusive from option 3119 to print Loading Tickets on an invoice printer. You can use either option, or you can even use both if you want to print a receipt version AND an invoice version of the Loading Ticket.
After setting the options for each of the 9 form types, click Change to save your setup selections.