 Set up Compatibility Settings for Eagle N
Series
Set up Compatibility Settings for Eagle N
Series
This job aid will guide you through setting up Compatibility Settings
so that you can begin using Eagle N Series.
1.
Install Release 27 and Activate Eagle N Series
- Install Eagle
Release 27/server level 38. The installation guide for Eagle
OS (the same guide is for both Eagle OS 2 and Eagle OS 3) is available
at the following web address: http://www.epicor.com/eaglerelease/.
- Your Epicor Account Manager or Licensing must
activate option 8888 “Eagle N Series on System” for you.
2.
Set up Security
- Set the following security bits to “YES” for
store managers, as well as employees that need access to Chat, Community,
Analytics, and Custom Fields.
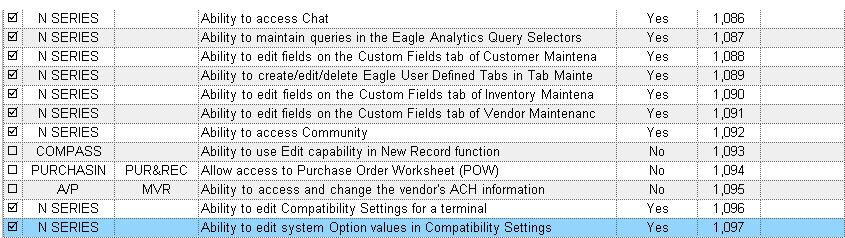
- Restart the Eagle client.
3.
Set up Compatibility Settings
As described in the following steps, use the Compatibility Settings
window to configure your Eagle to run in the new user interface.
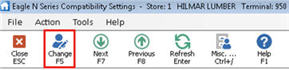
- From Eagle Browser, click File, and select Compatibility
Settings. (Note:
Once you begin using Eagle N Series, you launch Compatibility Settings
by clicking File-->Configure-->Compatibility Settings.)
- Move
the desired applications to indicate that you want to launch Eagle
N Series for this terminal. Be sure to repeat this process for all
terminals in the store.
- To move all applications to Eagle N Series at
once for this terminal, click
 .
.
- To move selected applications to Eagle N Series,
do the following:
- Select
the desired Terminal in the Terminal field.
- Click the desired application so that it is highlighted.
- Click
 to
move the application to the Eagle N Series box.
to
move the application to the Eagle N Series box.
- Repeat this process as needed.
- To move an application back to Eagle for Windows,
click the desired application so that it is highlighted, then click
the green right-arrow button to move it back.
- Click
Change on the toolbar to save your changes.
4.
Enable Compass Features
If you use Compass, you can enable Compass features in Inventory Maintenance,
Customer Maintenance, and Vendor Maintenance. The Compass features include
Compass tabs, tab maintenance, New Record, and Market Basket (Market Basket
is in Inventory Maintenance only).
- If
you use Compass, install the newest version, 14.0.0.2420 or higher.
If you use Eagle N Series, you MUST install the latest Compass software
so that you can use the Compass-based features. Go to http://www.activant.com/eagle-customer-support/compass/
to download and type in 38.800 to get the correct version. You should
also download the Compass Installation Guide located at the following
web address: http://www.activant.com/eagle-customer-support/education/documentation/CompassInstallationGuide.pdf.
Once you have downloaded the software and the installation guide,
install the Compass software.
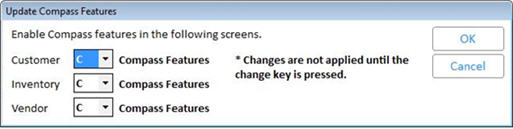
- To
enable Compass features, from Eagle Browser, click File à
Compatibility Settings.
- Click
Compass Features.
- Set all three fields to C, and click OK.
5.
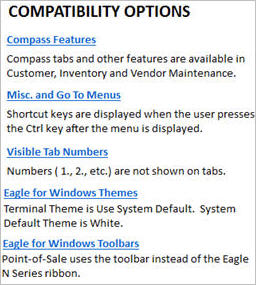
Set up Other Compatibility Options
If
needed, you can use the other Compatibility Options to set applications
to retain Eagle for Windows behavior, such as displaying shortcut keys
on Misc and Go To Menus, displaying numbers on tabs in applications, and
displaying toolbars with F-keys instead of the Eagle N Series “ribbon.”
You can also select an alternate color theme by terminal for Eagle applications.
6. Complete the Installation
- Restart the Eagle client from Start-->All
Programs-->Eagle -->Eagle Browser to get to the new Eagle N
Series.
- Go to Options Configuration, click “change lookup”
and select “N Series” in the Subsystem box. This shows how your options
are set for displaying “F keys” or not, and shows your system defaults
as to whether your system launches Eagle N Series or Eagle for Windows
in various applications.

- Delete all desktop, taskbar, and start menu
shortcuts and re-add them from the All Programs menu to get to Eagle
N Series.
- Start Inventory Maintenance or Customer Maintenance
and enter an item or customer. Verify that the User Defined Fields
tab and the Analytics tab display. If the Analytics tab does not display,
you must install the most current version of Compass. For more
information, see section 4, step 1, above.