
Role-Based Security: Create Roles
This is one of a series of job aids for implementing role-based security. If you are first implementing role-based security, start with the Add Users job aid, then proceed to this job aid to Create Roles, and then to the Assign Roles to Users job aid.
This job aid assumes that the system options and required security access has been enabled for role-based security.
More information about role-based security is found in the online help topics. Open the System Management book, then the Security book, and then the Role-Based Security book.
1
Select the role template
Pre-defined templates for roles are included with your system. Use these templates to assign roles to your users. You can use the templates as they are, or modify them to meet your store needs.
-
From the Browser window, do either of the following to display the Role-Based Security Assignments by User viewer (RBS) window:
-
In the Launch bar, type RBS and press Enter.
-
Use the mouse to click through the menu entries:
-
-
(Eagle SSE) System Management > Security > Set Role-Based Security
-
(Eagle E4W) System Management Menu > Security Maintenance Menu > Role-Based Security
-
-
From this window, click Misc.
-
From the Miscellaneous Menu, click 4-Maintain Roles.
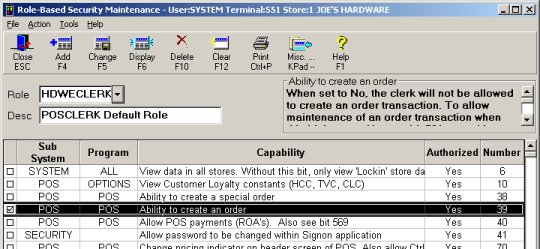
The Role-Based Security Maintenance window displays. This is a list of all the capabilities available for the system. Capabilities are also known as "security bits." Each security bit has a unique "bit number."
-
From this window, click Misc.
-
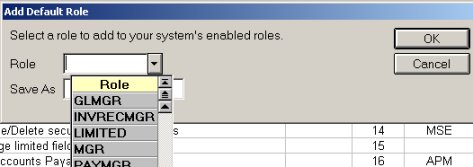
From the Misc menu, click 7-Create Role from Standard Role. The Add Default Role dialog displays.
-
From the drop-down list at Role, select a Role to use. For example, select POSCLERK to set up a role for POS clerks.
-
At Save As, type the name you want to assign this role. Use a unique name, do not use the same name that the system uses for the role.
-
Click OK. A message displays that the role was added. Click Cancel to close the dialog.
2
Review the role
After creating a role using one of the pre-defined templates, review the capabilities of that role to gain an understanding of that role.
-
From the Role-Based Security Maintenance window, from the drop-down list at Role, select the Role you just created.
-
Click Display. The window displays the capabilities of that role.
-
To easily review this role, double-click the Authorized column header. Then double-click the Authorized column header again. This groups all the Yes capabilities at the top of the grid.
-
Scroll to review Yes capabilities of this role. To view the definition of a bit, click to highlight that line. The definition displays in the upper-right section of the window.
3
Modify the role
After reviewing the role, modify the role, if necessary, to meet your store needs. You can use any of the following methods to modify the role:
-
Add/Subtract bits directly in the grid
-
Add/Subtract bits using a dialog
-
Add/Subtract based on another user
-
Set all bits to Yes/No
The methods are defined below.
Add/Subtract bits in the grid
-
In the Authorized column, click the bit you want to change. If you click a "Yes" it changes to a "No." If you click a "No" it changes to a "Yes."
-
Click Change to update.
Add/Subtract bits using a dialog
To use this method, you must know the bit number associated with the capability.
-
Click Misc.
-
From the Misc menu:
-
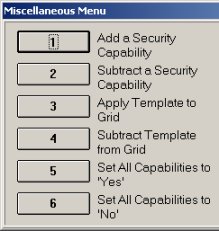
To add a security bit (set the Authorized column to Yes), click 1- Add a Security Capability. In the Add dialog that displays, type the bit number. Click OK.
-
To subtract a security bit (set the Authorized column to No), click 2- Subtract a Security Capability. In the Subtract dialog that displays, type the bit number. Click OK.
-
Click Change to update.
Add/Subtract based on another user
-
Click Misc.
-
From the Misc menu:
-
To apply a template, click 3- Apply Template to Grid. The Apply dialog displays. From the Template drop-down list, select the template. Click OK.
-
To apply a template, click 4- Subtract Template from Grid. The Subtract dialog displays. From the Template drop-down list, select the template. Click OK.
-
In the window, the bits that were changed are indicated by check marks in the check boxes. Click Change to update.
Set all to Yes/No
-
Click Misc.
-
From the Misc menu:
-
To set all bits to Yes, click 5-Set All Capabilities to 'Yes'
-
To set all bits to No, click 6-Set All Capabilities to 'No'
-
Click Change to update.