You can quickly add customer accounts or jobs from the POS Header screen by using the Customer Add dialog box. This method of adding accounts saves you time because:
Set option 9140 "Where to place e-mail address from POS Customer QuickAdd" which allows you to tell the system to add the contact's email address as the email recipient for emailed A/R statements (note type 10) and/or POS invoices/orders (note type 11).You must also set bit 896 “Ability to make changes on the Notes tab of Customer Maintenance” to Yes for any clerk who will have this capability.
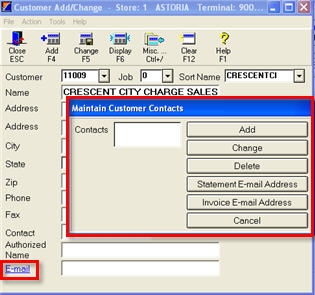
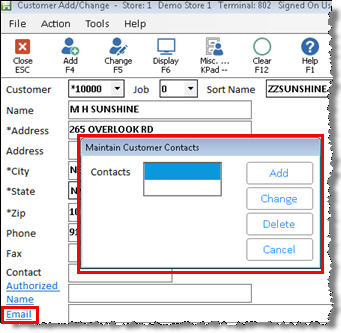
Have access to the Email hyperlink, which allows you to add/change/delete customer contacts, as well as add/change/delete the email addresses for A/R statements and Invoices/Orders. You must also set bit 733 “Ability to add/change/delete customer contacts (names)” to Yes for any clerks who will have this capability. If bit 733 is set to No for a clerk, the Email field label will not be a hyperlink.
From the POS Posting screen, with your cursor in the Customer field, click Menu (or press the - on the keypad), and click Add/Change Customer or Job. The Customer Add/Change window displays.
If the system is set up to automatically assign an account number, the window displays with a "skeleton customer" already displayed. Simply change the fields if necessary.
Note: You don't need to change the account number. The system assigns one automatically by adding the amount in the "Increment # Use For Auto Add" field to the skeleton customer. If the number is already used, the system will keep incrementing until it finds an available number.
If the system is not set up to automatically assign an account number, fill in the fields in the window, including the Customer field.
Note: The definitions for the fields in the Customer Add window can be found in Customer Maintenance Field Help. If you set up option 9129 to designate required fields, you will be required to fill out those fields.
(Optional) If you set option 3509 "Allow access to customer contact fields in Customer Maintenance" to Yes, then you can click the Email hyperlink to add/change/delete customer contacts.customer contacts or email addresses for A/R statements and Invoices/Orders.
Click Add. The new account is added, and your screen is ready for you to proceed with ringing up items for the new account.
![]()
If you want to make changes to any fields that are not included in the Customer Add window, use the Customer Maintenance window.
If you want to change accounts in POS, then In addition to the Options and Security you set up above, you must also set option 9107 "Allow change of customers/jobs in POS" to Yes, and security bit 135 “Change customers” set to Yes for the appropriate clerks. Note: security bit 707 “Allow adding/changing main accounts in POS Customer Quick Add” can be used to control if the clerk can change both customers and jobs, or only jobs.
Display the POS Header screen.
Press Menu, and select Add Customer or Job. The Customer Add window displays.
Display the account you want to change (if you already displayed the account in POS, it will be automatically carried into the Customer Add window), and make the desired changes.
Press Change.