Customer Activity Notes: Setup (Security, Options, Note Types)
(A/R Pro users only)
Before using Customer Notes, complete the setup tasks for the following:
MSY Option Enabled
In order to use the Customer Activity Notes application, an MSY Option must be enabled. The option is ID#3600 Eagle for Windows Customer Activity Notes on system. Enabling this option requires a password.
Security
The Customer Activity Notes feature requires security bit #728— Allow access to Eagle for Windows Customer Activity Notes. For more information about enabling security, refer to the online help topics. Click here to go to the Security Overview topic.
Note Types
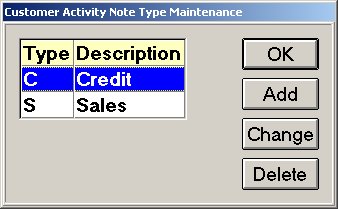
Two note types are pre-defined when you first enable Customer Activity Notes, C (Credit) and S (Sales). You can add other note types and descriptions. Also, you can change or delete the two pre-defined note types. A note type must be assigned when entering a note. Up to 35 note types can be defined (A through Z, and 0 through 9). Note types can be added or modified at any time. To maintain note types, complete the following:
- Customer note types are maintained from the Miscellaneous Menu of the Customer Activity Notes viewer. Display the viewer from either of the following:
- From the Eagle Browser, click Accounts Receivable, and then click Customer Activity Notes Viewer.
- From the Customer Maintenance window (MCR), click Go To. From the Go To menu, click Z-Customer Activity Notes Viewer.
- With the viewer displayed, click Misc. From the Miscellaneous Menu, click Maintain Note Types. A dialog similar to the following displays:

- To Add a note type, click Add to display the Add dialog. From the drop-down list at Available types, select the code you want to use for the note type you are adding. In the Description box, type a description for the note type. Click OK. The dialog closes and the note type is added.
- To Change the description of a note type, click to select the note type you want to change. Click Change to display the dialog with the current description. Type a new description and click OK. The dialog closes and the new description displays.
- To Delete a note type, click to select the note type you want to delete. Click Delete. The note type is deleted.
Options Configuration
Complete the following steps to review and set the configuration options that apply to Customer Activity Notes.
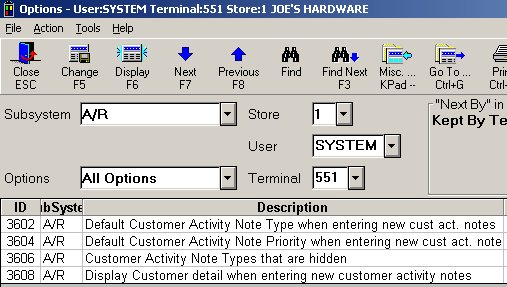
- From the Eagle Browser, click System Management, Options Configuration, Options Configuration. The Options window displays.
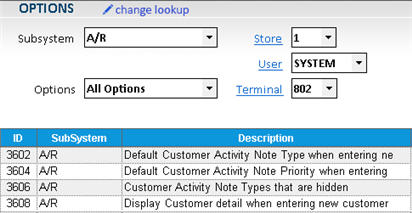
- Click Change Lookup. At Subsystem, select A/R Accounts Receivable. At Options, select All Options. Press Enter. All available A/R options display in the grid. The following are the Customer Notes options.
- (3602) Default Customer Activity Note Type when entering new cust act. note. From the list, select the note type that you want to use as the default. The default can be changed when adding a note. If you haven't already done so, set up the note types you want to use in your business. Click here to go the procedure in the previous section.
- (3604) Default Customer Activity Note Priority when entering new cust act. note. From the list, select a number from 1 to 9 to be the default priority. The default can be changed when adding a note. How you use the priority numbering system is up to you. You can use #1 as the highest priority number or use #9 as the highest priority number. Priority numbers display in the Priority column in the Customer Activity Notes viewer.
- (3606) Customer Activity Note Types that are hidden. Use this option to enter a list of note types that should be hidden when adding or viewing Customer Notes. This option can be set for a User or Terminal, but not both. Enter the list of codes in any order, no spaces or punctuation between the codes. For example, if the note types you want to exclude are type L (Legal) and type C (Credit), then type LC or CL in the option box. Refer to option ID#3602 for more information about note types.
- (3608) Display Customer detail when entering new customer activity notes. Select Yes or No for this option. If you select No, then only the Customer Number and Name display when adding or modifying a customer note. If you set this option to Yes, then expanded customer information displays, which includes customer number, name, address, contact, phone/fax, salesperson, and last purchase date.
- To display the settings available for an option and to view a definition of the option, click the Current Value field for an option. A down-arrow displays in the field, click the arrow to display a dialog that defines the option. For each of the Customer Notes options (those listed in step #2), review the definition and available settings. Review all the options before you make any changes to the settings.
- Once you have reviewed the Customer Activity Notes options, then go back and set each option to the setting you want to use for your business. After setting the options, click Change.
After completing all the setup tasks in this topic, Customer Activity Notes are ready to use. Click here to go to the procedures overview topic.
Text Messaging Notes
Setup Note: If you do not see choice T (Text Msg) in the Note Type dropdown and are seeing Undefined Type in the Note Type Description column for text messages do the following:
With the CANV viewer displayed, click Misc. From the Miscellaneous Menu, click 6-Maintain Note Types. A dialog similar to the following displays:
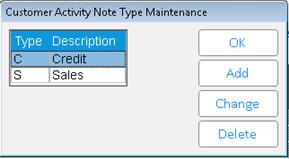
To Add note type T, click <Add> to display the Add dialog. From the drop-down list of Available Types, select T. In the Description box, type Text Msg. Click OK. The dialog closes and the note type is added.