(COM or PPS users with UPS WorldShip Integration)
Use the following procedure to create the file layout that will update your Eagle for Windows system with actual shipment information from UPS Online WorldShip (UOWS).
You should have already completed the steps in the topic "Create the Layout for Data from Eagle for Windows to UPS."
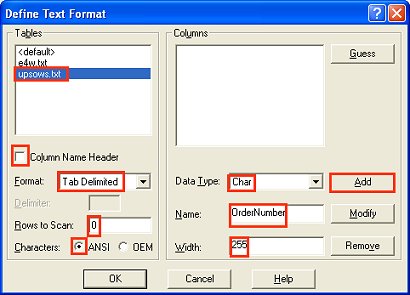
Still working in the "ODBC Text Setup" dialog from the previous procedure, click the "Define Format" button, and do the following in the Define Text Format dialog that displays:
Click "upsows.txt" in the Tables list.
If checked, un-check the "Column Name Header" checkbox.
Change the "Format" by selecting Tab Delimited from the drop down list.
Ensure "Rows to Scan" is set to 0 (zero).
Set the Characters to "ANSI" by selecting the corresponding radio button.
Select Char from the "Data Type" drop-down list.
Enter "255" in the Width text box.
Enter "OrderNumber" in the Name field.
Press Add. "OrderNumber" is added to the list of columns.
Continue adding the names listed below by simply typing over the previous entry, and pressing Add. For example, to add "FreightCharge," place your cursor in the Name field and type FreightCharge over OrderNumber and click Add. To add "ServiceCode," place your cursor in the Name field and type ServiceCode over FreightCharge (the previous entry). It is crucial that the columns be added in the order specified below. If you make a mistake, click a column name to select it and use the "Modify" or "Remove" buttons as needed. Integration will not function correctly if these mappings differ from the definition in this topic.
FreightCharge
ServiceCode
TrackingNum
PackageWeight
NumPackages
VoidIndicator
When you are finished entering all of the names above, your screen should look similar to the following illustration. Do Not Press OK Yet.
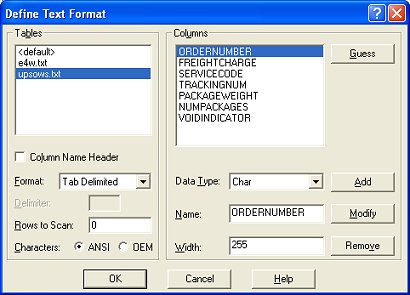
Verify that the names in the Columns list are set up correctly. If you made a mistake, click a name in the Columns list to select it, and use the "Modify" or "Remove" buttons as needed. When all names are correct, click OK.
![]()
You may get an error message at this point similar to this: "failed to save table attributes of (null) into (null)" Please ignore this error and click "Ok" on the error box. This is a confirmed bug in Microsoft ODBC. It is documented in Microsoft Knowledge Base article # 235889. This error message does not indicate a failure in saving column names.
Your column names may or may not be capitalized. The ODBC manager will sometimes force all column names to upper-case. If this happens, it is not indicative that something is wrong.
Proceed to the topic "Create Map for Importing to UPS"