Great Plains Integration
Accounting Integration Overview
Retailer’s will maintain all financial information in Microsoft® Dynamics GP (Dynamics). Any financial information that is typically generated in Eagle will pass to Dynamics, specifically: General Ledger, Accounts Payable and Accounts Receivable transactions.
Assumptions
The following assumptions are in regards to the setup and implementation of Eagle accounting:
- Dynamics allows for a GL account number greater than 7 digits. Eagle only allows for a 7 digit GL account number. The Retailer will be required to maintain a cross-reference table to link the Eagle GL account number to the Dynamic GL account number.
- Eagle will be setup with a full chart of accounts
- Eagle can be setup for automated passoff for GL ledger items and AP transactions.
- If there is no cross reference setup for an Eagle GL account number, the Eagle GL account number will be used when passing the transaction to Dynamics.
- The Dynamics vendor code will be mapped in the Assigned Customer # field in Eagle Vendor Maintenance.
Required Options
MSY Option 1313 – “Export A/P and G/L transactions to Great Plains Accounting?”
MSY Option 1314 – “G/L Account Number translation table on system?”
Data Flow
The following is an overview of the intended data flow from Eagle to Dynamics.
General Ledger
When transactions are passed off or manually entered to General Journal Transactions (GGMU), The ‘Post G/L Transactions’ (RGGG) report is required in order to post the transactions. When the RGGG posts the transactions, the system will generate a file with the required information needed for Dynamics.
The ‘Third Party Data Integrator’ (Integrator) will have a specific task for Eagle GL transactions that when ran, will look for this file at a specified time interval to extract from Eagle and place on Retailer’s internal network. Dynamics will then process the file based on pre-mapped guidelines.
Accounts Payable
Once an AP transaction has been processed through the ‘Print Checks’ function (APCM), the system will generate a file with the required information needed for Dynamics. This means that an AP transaction will need to flow through Eagle Accounts Payable to check printing before the data can pass to Dynamics.
The Integrator will have a specific task for Eagle AP transactions that when ran, will look for this file at a specified time interval to extract from Eagle and place on Retailer’s internal network. Dynamics will then process the file based on pre-mapped guidelines.
3rd Party Import Setup
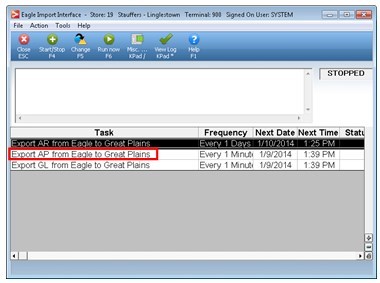
Integrator Setup
A PC running Eagle for Windows ® should be setup as the designated ‘Integrator PC’. The Integrator PC will run the 3rd Party Import Integrator (Integrator). The Integrator will have a specific set of tasks running designed for Retailer’s.
The Integrator can be accessed by executing the 3spImp.exe located in the 3apps/Catapult folder.
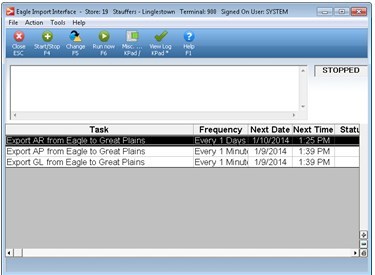
To begin the setup, start by clicking on the Misc Menu button:
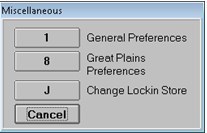
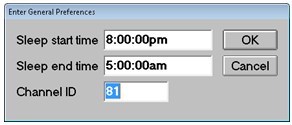
Select 1 – General Preferences and enter a ‘Sleep’ start and end time. The ‘Sleep’ time should be consistent when the Eagle shuts down for backup and is up after System Maintenance:
Once the times have been set, press OK, then go back into the Misc Menu and select Option 8 – Great Plains Preferences:

Enter the location where the file will be placed in ‘Export from Eagle File Path’ for files coming from Eagle to Dynamics.
General Ledger Integration
3rd Party GL Account Number Maintenance
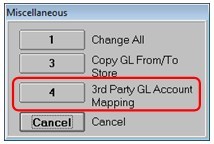
As the GL account number may differ between Eagle and the 3rd party accounting system, the two GL account numbers must be mapped prior to exporting the data.
In the GLSET Misc Menu, option 4 – “3rd Party GL Account Mapping” has been added to allow maintaining the GL account number mapping:

Adding a New GL Account Map
To add a new GL account number map, press the Add button:
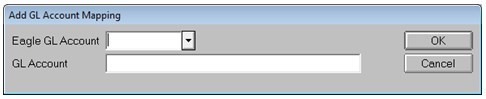
Select the Eagle GL account number from the Eagle GL Account dropdown, then enter the 3rd Party GL Account number in the GL Account field.
Press OK when finished.
Changing a GL Account Map
To change an existing GL account number map, select the GL Account number you wish to change from the drop down, and then press the Change button:
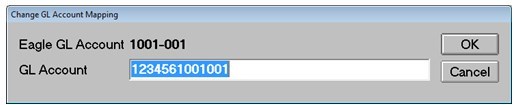
Enter a new 3rd Party GL account number in the GL Account number field, and then press OK.
Delete a GL Account Map
To delete an existing GL account number map, select the GL Account number you wish to delete from the drop down, and then press the Delete button:
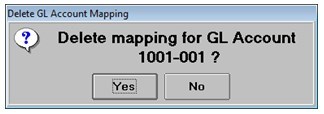
Press Yes to confirm the deletion, otherwise, press No to return to the 3rd Party GL Account Mapping dialog.
Data Flow for GL Transactions
General Ledger transactions from the following areas will require setup for automated passoff to the General Journal Transaction file (GGMU):
- POS
- Accounts Receivable
- Inventory Adjustments
- Purchases/Purchase Adjustments
- Cash Drawer Balancing
- Inter-store transfers
- Write Offs/Store Use
- In Store Gift Card Maintenance
GL Transactions can also be manually entered in GGMU.
All GL transactions in Eagle will be by the Eagle GL Account Number, whether it be by automated passoff or manual entry.
The ‘Post GL Transactions’ Report (RGGG) will need to run, not only to post the GL transactions in to the Eagle ledger, but to also generate the file that will export through the Integrator.
If the Eagle GL Account Number is mapped to a 3rd Party GL Account Number, 3rd Party GL Account Number will be used in the 3rd party transaction file.
If the Eagle GL Account Number is not mapped to a 3rd Party GL Account Number, the Eagle GL Account Number will be used in the 3rd party transaction file.
3rd Party Transaction File Validation
Once the RGGG runs, the system will generate a file that the Integrator will export when the specific Integrator task is executed.
.
The Integrator will export 2 copies of the file. One file name will begin with ‘SGLx’ and end with the date the file was created (the ‘x’ is the Eagle GL Directory). For example: if a file was created on 10/21/2013 from GL Directory 3, the name would be ‘SGL320131021.txt’ and the other file name will be SGL.txt. The content in each file will be identical.
GL File Layout Specification
The file format used to export the GL transactions will be a comma-separated (csv) text file. Below defines each field within the export file:
| Field Name |
Format |
Comments |
| Transaction Date |
MM/DD/YYYY |
|
| GL Account Number |
Text |
Use GLSET Cross Reference for GL Account Number. If no cross reference, use Eagle GL Account Number |
| Debit Amount |
99999999.99 |
|
| Credit Amount |
99999999.99 |
|
| Reference |
Text |
Up to 30 chars |
| Voucher Number |
Numeric |
|
Export GL from Eagle – Integrator
The Eagle Import Interface (Integrator) will export the file generated above to the path designated as the ‘Export from Eagle File Path’ within the Great Plains Preferences in the Integrator.
The ‘Export GL from Eagle’ task is required to run to export the GL file.
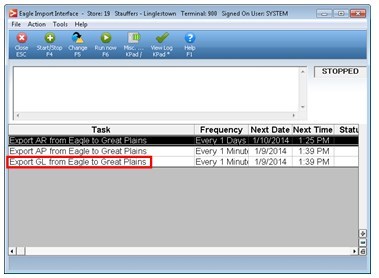

This task should be setup to run frequently throughout the day as well as coordinate with the 3rd party accounting system.
Once the file has exported from Eagle, it should be immediately processed to the 3rd party accounting system. Doing so will avoid any potential of the file being overwritten due to potential multiple GL posting throughout the day.
To schedule the task frequency, highlight the desired task and either double-click with the mouse or press ‘Change’ while the Integrator is ‘STOPPED’. (Hint: STOPPED will be in the upper right hand corner of the Integrator. If ‘STARTED’, press the Start/Stop (F4) button).
In the ‘Change Task – Export GL from Eagle’ dialog, enter the following information:
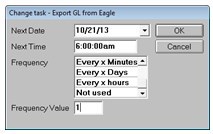
- Next Date – The Date the Integrator should begin to process GL files to export. Defaults to today’s date.
- Next Time – The time the Integrator should begin to process GL files to export.
- Frequency – Select one of the following choices:
-
- On Demand – Select this if you do not want the Integrator to process GL Export files automatically
- Every x Minutes – Select this if you want the Integrator to look for GL export files based on the number of minutes specified.
- Every x Days - Select this if you want the Integrator to look for GL export files based on the number of days specified.
- Every x Hours - Select this if you want the Integrator to look for GL export files based on the number of hours specified.
- Not Used – Select this if there is no intention of using this specific task.
- Frequency Value – Enter the number that coincides with the Frequency selected above.
The GL Export needs to coordinate with the 3rd party accounting system if multiple GL postings are to be done throughout the day. The file name will be the same each time the RGGG runs. If an export file has been generated, it will be overwritten if the RGGG posts again both on Eagle prior to the Integrator running as well as after the Integrator has exported the file.
Accounts Payable Integration
Data Flow for AP Transactions
Eagle AP Transactions will largely consist of invoices created for purchase order receipts. It is assumed that Eagle will be setup to do automated AP passoff from Purchasing and Advanced Receiving.
A purchase order received on Eagle will passoff a temporary voucher to accrue the payables and purchases for this receipt. Once the invoice is received, the invoice information will be entered into Advanced Receiving (MRV) and thus reversing the accruals while posting the regular voucher into the AP transaction file.
The invoice should then be processed through ‘Print Checks’ (APCM), then posted by ‘Post Checks and Print Check Register’ (APPC).
Once the APCM has finished processing, the system will generate a file in preparation for the Integrator to export as well as post the invoices as paid in Eagle. Manual payments are not included in the AP export.
3rd Party Transaction File Validation
Once the APCM runs, the system will generate a file the Integrator will export when the specific Integrator task is executed.
The Integrator will export 2 copies of the file. One file name will begin with ‘SAP’ and end with the date the file was created. For example, if a file was created on 10/21/2013, the name would be ‘SAP20131021.txt’ and the other file name will be SAP.txt. The content within the two files will be identical.
AP File Layout Specification
The file format used to export the AP transactions will be a comma-separated (csv) text file. Below defines each field within the export file:
| Field Name |
Format |
Comments |
| Vendor |
Text(12) |
Numeric – Right justified zero filled
Alpha – Left justified |
| Remit To Vendor |
Text(12) |
Numeric – Right justified zero filled
Alpha – Left justified |
| Voucher Number |
Numeric(6) |
Right justified zero filled |
| Check Date |
MM/DD/YYYY |
|
| Invoice Date |
MM/DD/YYYY |
|
| Invoice Number |
Text(20) |
Numeric – Right justified
Alpha – Left justified |
| Invoice Amount |
99999999.99 |
|
| Net Amount |
99999999.99 |
|
| Discount Amount |
99999999.99 |
|
Export AP from Eagle – Integrator
The Eagle Import Interface (Integrator) will export the file generated above to the path designated as the ‘Export from Eagle File Path’ within the Great Plains Preferences in the Integrator.
The ‘Export AP from Eagle’ task is required to run to export the AP file.
This task should be setup to run frequently throughout the day as well as coordinate with the 3rd party accounting system.
Once the file has exported from Eagle, it should be immediately processed to the 3rd party accounting system. Doing so will avoid any potential of the file being overwritten due to potential multiple AP posting throughout the day.
To schedule the task frequency, highlight the desired task and either double-click with the mouse or press ‘Change’ while the Integrator is ‘STOPPED’. (Hint: STOPPED will be in the upper right hand corner of the Integrator. If ‘STARTED’, press the Start/Stop (F4) button).
In the ‘Change Task – Export AP from Eagle’ dialog, enter the following information:
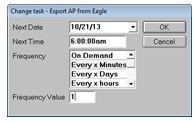
- Next Date – The Date the Integrator should begin to process AP files to export. Defaults to today’s date.
- Next Time – The time the Integrator should begin to process AP files to export.
- Frequency – Select one of the following choices:
-
- On Demand – Select this if you do not want the Integrator to process AP Export files automatically
- Every x Minutes – Select this if you want the Integrator to look for AP export files based on the number of minutes specified.
- Every x Days - Select this if you want the Integrator to look for AP export files based on the number of days specified.
- Every x Hours - Select this if you want the Integrator to look for AP export files based on the number of hours specified.
- Not Used – Select this if there is no intention of using this specific task.
- Frequency Value – Enter the number that coincides with the Frequency selected above.