PartSource Plus Setup
System Option Setup
The PartSource Plus feature is enabled through system option 8451 “PartSource Plus on System” in Options Configuration. Only an Epicor representative can set up this option for you.
Application Option Setup
Set up the following options in Options Configuration.
- Set option 8566 “Load only mapped vendor lines into PartSource” to Yes if you want to include only entries in PartSource Plus where there is line code mapping defined in the Vendor record assigned in the PartSource Management Viewer for the PartSource ID. This setup is useful when you want only a portion of the source file, such as when parts included in the source file are not stocked or sourced from the source file provider.
- Set up option 2768 “LaserCat PartExpert & Interchange PartSource Plus search list” to define which PartSource files to use for PartSource information in LaserCat (i.e., NIF pricing, warehouse status, etc.).
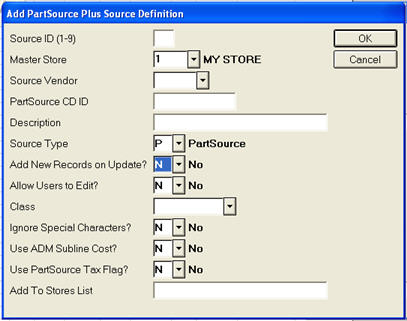
Set Up Configuration in the PartSource Management Viewer
Use the PartSource Management Viewer (PSPM) to create a PartSource ID and to specify the configuration settings the system uses when creating a PartSource Plus file.
- From the Eagle Browser, type PSPM in the Launch bar, and press Enter.
- Set up the various fields on the screen.
Note: The Source ID # is required when loading PartSource files through the Osprey Application Utilities. If loading from an Epicor CD, the PartSource CD ID must match the ID on the CD. For example, if the CD is labeled as “PS160,” the PartSource CD ID is “160.”
Importing PartSource Plus Source Files
There are three types of Osprey utilities for importing source files to create PartSource Plus files:
- PARTSRC, PartSource file import utility. Use PARTSRC to:
-
- Load a PartSource source file from an Epicor PartSource CD to the Eagle server for PartSource Plus creation during nightly maintenance.
- Disable the creation of PartSource Plus using the Epicor file during nightly maintenance.
- Enable the creation of PartSource Plus using the Epicor file during nightly maintenance.
- CPARTSRC, Custom PartSource file import utility. Use CPARTSRC to:
-
- Create a PartSource Plus file from a custom source file on the local PC.
- List the current PartSource Plus files.
- UPARTSRC, Ultimate PartSource file import utility. Use UPARTSRC to::
-
- Create a PartSource Plus file from a source file (from Ultimate or Vision) already copied to the Eagle server.
- List the current PartSource Plus files
- List the current source files on Eagle server.
Use the following procedure to execute any of the Osprey utilities listed above.
- From the Eagle Browser menu, click Network Access.
- In Network Access at the Function prompt, type OSPREY and press Enter.
- At Password, type AVATAR and press Enter. The Osprey Main Menu displays.
- Either navigate to the Application Utilities to find the desired PartSource utility, or enter the abbreviation for the utility (PARTSRC, CPARTSRC, UPARTSRC) and press Enter.
- Follow the prompts to run the utility.
- When finished, select End to backup through the Osprey utility structure until returned to Network Access.
- Enter Exit and press <Enter> to close Network Access.
Mapping Vendor Line Codes
Do the following to map Vendor Line Codes to the line codes used on Eagle in the PartSource Plus file.
- From the Eagle Browser, select Vendor Maintenance and press Enter, or type MVR in the Launch bar and press Enter.
- Select the vendor assigned to the PartSource Plus file in PartSource Management Viewer (PSPM). Display the Lines tab for that vendor.
- Use Add, Change, or Delete, as needed, to maintain vendor line code mapping. Consult you PartSource Plus source file provider for their line codes and pricing definitions.