
ReQuest: Import an RQ Procedure
Use this job aid to copy an RQ procedure from a diskette to your Eagle system. See the export job aid for the procedure steps for copying an RQ procedure to a diskette.
General information
-
It is very important that you remove the diskette from the drive of the Eagle server after you complete the import steps. If you forget to remove the floppy, the system will not reboot after the nightly system maintenance routine completes.
-
RQ procedures created on and exported from an Eagle system on one software level and imported to an Eagle system on a different software level may not work as expected. To test an imported RQ procedure on a small sample of data, use the LIMIT Utility function.
-
For more information about using ReQuest, refer to the ReQuest User's Guide (part number 1075210) or the ReQuest Quick Reference (part number 1075215).
1
Access the import utility
-
In Network Access at the Function prompt, type OSPREY and press <Enter>. At Password, type AVATAR and press <Enter>. The Osprey Main Menu displays.
-
Insert the diskette into the drive. This is the disk drive on the Eagle server (and not a drive on an Eagle for Windows PC).
-
At Selection, type IMPORTRQ and press <Enter>. The Import RQ Procedures screen displays.
-
At Action, type E (for Execute) and press <Enter>. Continue with the next section to select the data dictionary.
2
Select and import the procedures
-
A screen displays with the list of available RQ data dictionary categories. From the list, highlight the dictionary in which to copy the procedure and then press <Enter>.
-
The screen changes and a prompt displays asking if a floppy is in the drive. If you haven't yet inserted the diskette into the drive, do that now. Type Y and press <Enter>.
-
If the software level of the RQ procedure you are importing doesn't match the current software level installed on the Eagle system, a warning message displays. You can proceed with the import, but you should test the RQ procedure after the import is complete.
-
The procedures are copied from the diskette to a temporary file and after a few minutes a prompt displays. Press <Enter> to select the procedures to import.
-
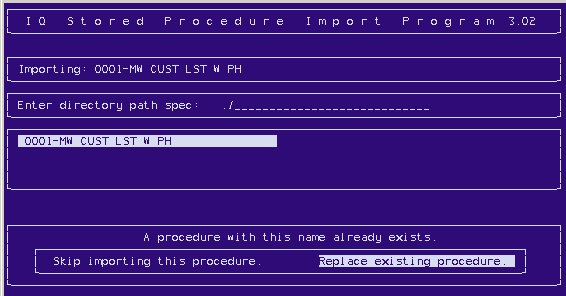
A screen displays asking for the directory path name. Type a period ( ● ) and press <Enter>. The screen changes to display a list of procedures. The path name displays a period and a forward slash.
-
From the list, select the procedure(s) you want to import. You can select more than one.
-
Press <End>. If a procedure already exists with the same name as the procedure you copied from the diskette, a message displays. Select the option to either skip the import or replace the procedure. The selected procedures are imported.
-
Press <Enter> to continue. The list of data dictionary categories displays again. If you have other procedures to import, repeat steps1 through 7.
-
Press <End>. The screen changes and a prompt displays to remove the diskette. Remove the diskette from the drive and then press <Enter>. Continue with the next section to verify the import.
3
Verify the import
-
The Osprey Main Menu displays. Press <End> to exit Osprey.
-
At the Function prompt, type RQR and press <Enter>. The Triad Stored Procedures screen displays.
-
From the list, highlight the data dictionary for the procedure you imported and press <Enter>.
-
A list of stored procedures displays, verify that the procedure you imported is included in the list.
-
Press <End>.