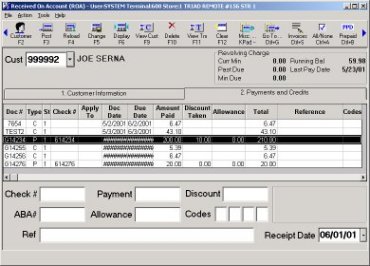
Receive a Payment on Account
Field definitions for entering a Received on Account Payment (ROA):
Allowance— Use this field to:
-
Enter an overpayment amount.
-
Enter an underpayment amount.
-
Write off a bad debt for balance forward and open item accounts.
The amount you enter does not affect cash, sales, or tax liability. It affects only the customer balance. If you enter a positive amount (for example, to write off a bad debt or record an underpayment), the running balance decreases. If you enter a negative amount (for example, to record an overpayment), the running balance increases.
Reference— Use this field to enter a note about the payment. For example, if you are writing off a bad debt, you could enter Bad debt write-off in this field.
For open item accounts, this field applies to all payments made from a single check. The system automatically updates this field when you enter information in POS. If you enter information in the Reference field on the ROA Posting Screen, the system updates the Reference field in the Received On Account window. If you do not enter information on the Posting Screen, but you enter information in the Reference field on the ROA Header Screen, the system updates the Reference field in the Received On Account window.
The information you enter in this field prints on statements.
Receipt Date— This is the date you received the payment. The default is the current date.
Codes— Use this field to identify specific transactions. You may include or exclude these codes on reports, such as the A/R Flexible report – RFR. Note that the system uses the fourth position to indicate the tender type on POS transactions, with the following codes: A = charge, B = bankcard, C = cash, K = check, S = split tender.
Each position of the field is independent of the other positions. For example, _P__ is not the same as P___. If you enter your own code, you must decide what each code means and keep a list for future reference.
1
Enter a payment
-
From the Eagle Browser, click Accounts Receivable, then click Received on Account.
-
Enter the customer account number.
-
Enter the following information:·
-
Check#
-
Payment
-
Discount
-
Reference
-
Receipt Date
-
Click Post.
-
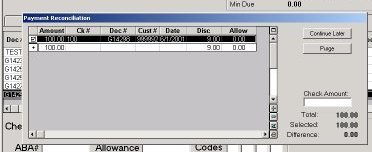
If this account is an open item account, select the invoices to apply the payment to, and click Post.
-
Repeat steps 2 through 5 for additional payments.