Payroll Direct Deposit


This job aid describes how to set up your system for payroll direct deposit transactions. The setup includes entering information in the Payroll Control File (PCON) and banking information in the employee record (PEMU)

To use this feature, an Epicor representative must change option 3092 "Standard Direct Deposit Format" to Yes in Options Configuration.


1

Payroll control file setup

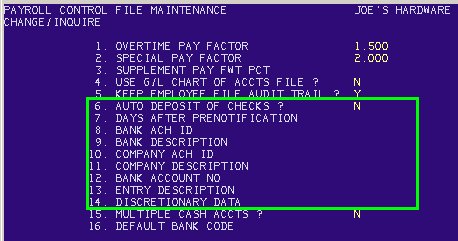
  1. In Network Access at the Function prompt, type PCON and press <Enter>. The Payroll Control File Maintenance screen displays.

  2. At Item Number to Change, press <Enter>. At the prompt for further changes, type Y and press <Enter>. The second screen for Change/Inquire displays.

  1. At Item Number to Change, type 6 and press <Enter>. The cursor is now at the Auto Deposit of Checks field. Type Y and press <Enter>. Continue to fill in the fields that apply to direct deposit as follows:

  2. Days after Prenotification— Type the number of days and press <Enter>. This is the number of days after the bank has been pre-notified that an employee will be using direct deposit that the direct deposits will begin.

  3. Bank ACH ID— Type the ID number and press <Enter>. This is the ACH ID number of the bank where you have your payroll checking account. The bank where the funds are drawn to cover the payments to the employees.

  4. Bank Description— Type the name of bank where you have your payroll checking account and press <Enter>.

  5. Company ACH ID-Type the ID for your company and press <Enter>.

  6. Company Description— Type a description of your company and press <Enter>. This will go into the direct deposit transaction file.

  7. Bank Account No— Type the account number and press <Enter>. This is the account number printed at the bottom of checks and deposit slips for your payroll checking account.

  8. Entry Description— Type PAYROLL and press <Enter>.

  9. Discretionary Data— Type any data or leave it blank. Press <Enter>.

  1. At Item Number to Change, press <Enter>. At the prompt to make further changes, type N and press <Enter>. The screen closes.


2

Employee setup for direct deposit

  1. In Network Access at the Function prompt, type PEMU and press <Enter>. The Employee File Maintenance screen displays.

  2. At Please Select, type 2 (for Change/Inquire Employees) and press <Enter>. The Change / Inquire screen displays.

  3. At Employee NO, type the employee number and press <Enter>. The employee name and payroll information displays.

  4. Press <Enter> to display the second screen of employee information.

  1. At Item Number to Change, type 42 and press <Enter>. The cursor is now in the Auto Deposit field. Type Y and press <Enter>.

  2. At Check/Saving, type C or S and press <Enter>. For checking account, type C. For savings account, type S.

  3. At Bank ID, type the bank ID code for the employee's bank.

  4. At Bank Account, type the account number for the employee's bank account.

  5. Verify that the information has been entered correctly.

  6. At Item Number to Change, press <Enter>. At the prompt for tax code record, type N and press <Enter>. At the prompt for Ded/Earn code record, type N and press <Enter>. At the prompt for employee totals, type N and press <Enter>.

  7. Repeat steps 2 through 10 for each employee that you want to set up for payroll direct deposit.

  8. After entering employee information, press <End> to exit the Change/Inquire screen. Press <End> again to exit the Employee File Maintenance screen.


3

Pre-notification process

The Eagle system requires that you complete a pre-notification process for employees that want to start direct deposit of payroll checks.

The process consists of:

  • creating a file that includes pre-notification records.

  • updating the records of employees that want to start direct deposit with the date that the initial pre-notification process was completed.

  • Note: the pre-notification date does not display in the employee record in PEMU, but rather is held internally and is available to the payroll application.

Once the pre-notification process is complete, then when you run payroll, direct deposit transactions are created for any employee that has been setup for direct deposit, and whose pre-notification date plus the Days After Prenotification field in PCON is equal to or greater than the date of the payroll run.

Follow these steps to complete the pre-notification process.

  1. In Network Access at the Function prompt, type PPTU and press <Enter>. The Payment Processing screen displays.

  2. At Please Select, type 3 (for Create Direct Deposit ACH Tape) and press <Enter>. The following screen displays:

  1. At the prompt to create a tape, type Y and press <Enter>. The screen changes to display the following:DO YOU WISH TO UPDATE EMPLOYEE PRENOTIFICATION DATES?

  2. To answer this question, type Y and press <Enter>.

  3. The file is created and is available to transmit to your bank.

In the future, if you add more employees to payroll direct deposit, the system will set the internal pre-notification date when you run PPTU #3. Then the employee waits until the number of days after pre-notification has passed (as set in PCON) before direct deposit can begin.

Note: If you change the Auto Deposit field in the employee record (PEMU) from Y to N, it will clear the internal pre-notification date. If you change it back to Y, the date would be set again when you run PPTU #3. Then the employee would have to wait until the number of days after pre-notification has passed (as set in PCON) before direct deposit can begin again.


4

Print direct deposit notification forms

Once you have set up an employee for direct deposit, the pre-notification date has been set internally in the employee record, and the minimum number of "days after prenotification" has passed, direct deposit of payroll checks can start for an employee.

The Eagle Payroll application requires that you print direct deposit notification forms before you create the direct deposit payroll transactions. Complete the following steps to print the forms.

  1. In Network Access at the Function prompt, type PPTU and press <Enter>. The Payment Processing screen displays.

  2. At Please Select, type 2 (for Print Direct Deposit Notification Forms) and press <Enter>. The Print Forms screen displays.

  3. At Printer, type the printer number and press <Run>. A message displays that the Printer Is Ready.

  4. If you haven't already done so, load the forms in the printer.

  5. Press <Enter>.

  6. Enter the number of alignment copies you want to print.

  7. Fill in the requested information on the Direct Deposit Notification Forms screen.

The forms print.


5

Create direct deposit transactions

After printing the notification forms, create the direct deposit payroll transactions.

  1. In Network Access at the Function prompt, type PPTU and press <Enter>. The Payment Processing screen displays.

  2. At Please Select, type 3 (for Create Direct Deposit ACH Tape) and press <Enter>. The following screen displays:

  1. At the prompt to create a new tape file, type Y and press <Enter>.

  2. The system creates a file with direct deposit transactions. The file is now available for you to transmit to your bank.


6

Post checks and review payroll register

  1. In Network Access at the Function prompt, type PPTU and press <Enter>. The Payment Processing screen displays.

  2. At Please Select, type 4 (for Post Checks and Direct Deposits) and press <Enter>. The checks post.

  3. Review the payroll register and verify that all direct deposits have posted. Delete or correct any transactions that did not post correctly.