
Price Import
This job aid describes how to use the Price Import window to import a data file with price change information to your Eagle system, the Item Price Change window (IPC). Once the price changes are in IPC, you can work with them as you would any other price change records (add, change, or delete records, and print labels).
1
The Price Import window
There are two ways to display the Price Import window: 1) from the Price Import Designer window click the Import button, and 2) display the window directly from the Eagle Browser menu. The window is basically the same, except Method 2 includes two additional buttons, Get Map and Get File.
Select Method 2 if you already have a map file saved that you can use with the data file. If you do not have a map file saved, you must use Method 1 to first map the data file. Refer to online help or the Price Import Designer job aid for more information.
An example of the window, opened from the Browser menu.
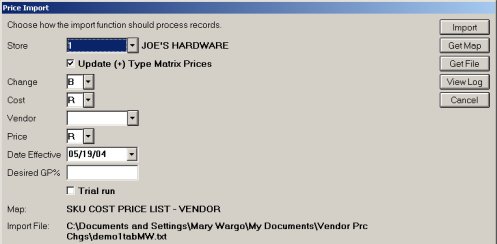
2
Method 1: Display window from the Designer window
-
From the Price Import Designer window, map the data file and set the SKU options. Refer to online help or the Price Import Designer job aid for the procedure steps.
-
From the Designer window toolbar, click Import to display the Price Import window.
-
Go to section 4 Enter price change options.
3
Method 2: Display window from the Eagle Browser
Only use this method if you have a map file saved that you can use with the data file. If you do not have a map file saved, first refer to online help or the Price Import Designer job aid.
-
From the Eagle Browser, click Applications. Click Data Import Menu,, then click Price Import to display the window. The Item Price Changes window also opens in the background.
-
Click Get Map to display the Load Mapping dialog. Click to highlight the map that you will use with the data file. Click Open. The dialog closes and you are returned to the Price Import window.
-
The Import File field is automatically filled in with the file (and location) used when the map was first created and saved. If this is not the file you want to use, click Get File to display the Open dialog. From this dialog, locate the data file with the price changes, click to highlight it, and then click Open. The Open dialog closes and you are returned to the Price Import window.
-
Continue with section 4 Enter price change options.
4
Enter price change options
Fill in the fields on the screen to determine how the data file is processed. If you process price changes with IPC (or the Price Change Report - RPC), then you are familiar with these options.
-
Store: Select a specific store.
-
Update (+) Type Matrix Prices: Click this box to enter a checkmark if you want to update matrix prices that are calculated as a percentage above cost.
-
Change: Indicate the type of price change to calculate.
B = Both cost and price are imported from the data file.
C = Cost only is imported from the data file.
M = For L-type SKUs, cost imported is the market cost. The system calculates a new replacement cost (cost per stocking unit) from the market cost (cost per purchasing unit). The system then calculates a new retail price based on the new replacement cost and the desired GP% for the item (from Inventory Maintenance). Market cost, replacement cost, and retail price change. If you use this option, the Cost field option must be K and the Price field option must be R.
P = Price only is imported from the data file. The new price is not rounded using the Price Rounding Table (PRO).
R = Cost only is imported from the data file. The new cost and the desired gross profit percent for the item (from Inventory Maintenance) are used to calculate a new price. Only the price changes; the cost does NOT change.
S = Cost only is imported from the data file. The new cost and the desired gross profit percent for the item (from Inventory Maintenance) are used to calculate a new price. Both the cost and price changes.
-
Cost: If your selection in the Change field includes changing the cost, select the cost to use (replacement, average, etc).
-
Vendor: If you entered V in the Cost field (alternate vendor cost), enter the appropriate vendor code in this field. Otherwise, leave this field blank.
-
Price: If the Change code you selected includes changing the price of an item, select Retail or List.
-
Date Effective: Defaults to today's date, or enter a future date.
-
Desired GP%: If the Change Code you selected includes Desired GP%, enter the new Desired GP in this field.
-
Trial Run: To generate an error report but NOT enter price changes into IPC, click this box. Click the View Log button to display the report after running the Import.
After filling in the fields, continue with the next section to import.

5
Import the data and check the log
-
Click Import. A progress bar displays the status of the import. Then a status message displays when the import is complete, with the number of records written to IPC and if any errors were found.
-
If the status message indicates errors, click View Log to display the log file. Scroll to find the entries for the most recent import and review the error messages.