
iNet: Receiving Invoices (ERP)
Use this job aid to receive invoices (also called electronic receipt posting or ERP) from a vendor using iNet Vendor Direct.
This job aid assumes you have completed all the set up steps required to use iNet Vendor Direct to transmit EDI docments. For more information, refer the iNet Vendor Direct Setup Guide. Additional information about iNet is available on the Epicor web site at www.activant.com.
1
Receive invoices
From Network Access, at the Function prompt, type EDIBTC and press <Enter> to display the EDI Transmission Screen (EDIBTC).
At Transmission Control Stream, type one of the following:
If you use async to transmit, type EDIERPA
If you use FTP to transmit, type EDIERPF
Press <Run>. The message, Request Has Been Queued, displays. Your system will initiate a call to a data network and request the electronic invoice.
Press <End> to exit the screen. After a few minutes, continue with the next section to check the transmission status.
2
Check transmission status
From Network Access, at the Function prompt, type ASYMSG and press <Enter> to display the Async Transmission Log.
You may need to press <Next Item> to view the correct section of the log. Look for an entry that starts with EDIERPA or EDIERPF. Review the log to verify a successful transmission.
The following message indicates a successful transmission:
EDIPARSE : mm/dd/yy hh:mm:ss :END EDI TO TRIAD TRANSLATION
Press <End> to exit the screen.
Troubleshooting
Review the Async Transmission Log. Correct any of the error conditions and retry the tansmission. For example, "PO on invoice not in PO file" or "Member number does not match."
If the log indicates that only one (1) record was received, then no invoices were received. The record number must be greater than one (1) to indicate that invoices were received.
If the PO is not on file, create the PO in MPO (using the information from the Async Log) and then retry the transmission.
Make note of any error messages that display on the screen.
Check the transmission status in ASYMSG for error messages.
Call the Eagle Advice Line at 1(800) 322-3077 to help you solve the problem.
3
Reconcile an invoice to a PO
From Network Access, at the Function prompt, type EDIRP and press <Enter> to display the EDI Receipt Posting (EDIRP) screen.
Multistore: Press <Home> and type the store number in the Store field or leave it blank to display all POs. Press <Enter>.
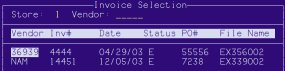
Press <Query> to display the Invoice Selection box. The invoices you received (see the previous section, using EDIBTC) display in this box. Invoices continue to display in this box until you either process them or the system purges them after 30 days.
Press <Up/Down Arrow> to highlight the invoice you want to select and then press <Enter>. The selection box closes. The Vendor Code field and the Selected PO# to Reconcile field are automatically filled in.
Fill in the remaining fields on the screen. For field information, refer to the next section.
Press <Run>, the invoice is reconciled to the PO and the Exception Report processes.
Review the Exception Report. Process exceptions as you normally do using Function RP (Receipt Posting).
Finalize the receipt posting as you normally do using Function RRP (Receiving Report).
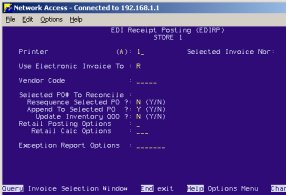
Field information
Selected Invoice Nbr – This is the invoice you selected to reconcile to the PO.
Use Electronic Invoice To – Type R to reconcile the invoice to the PO and report any exceptions. The merchandise information is posted in Function RP Receipt Posting. Type O if you do not want to reconcile the invoice to the PO (merchandise information is not posted in Function RP Receipt Posting). Only an exception report is generated to report any exceptions between the invoice and the PO.
Vendor Code – Vendor code for the PO, automatically filled in based on selection from the Invoice Selection box.
Select PO# to Reconcile – The PO#, automatically filled in based on selection from the Invoice Selection box.
Resequence Selected PO – Type Y if you want to resequence the selected PO in invoice / line # order. You can also resequence the PO using Function POR.
Append to Selected PO – Determines if you want the system to automatically add items to the PO that were shipped, but are not found on the selected PO.
Update Inventory QOO – If Append to Selected PO is Y (yes), this field determines if the Qty on Order field is updated in Inventory Maintenance for any items that the system adds to the PO.
Retail Posting Options – Enter your option for posting retail prices.
Retail Calc Options – If Retail Posting Options is 1, use this field to specify how the system calculates retail prices. The system always updates the PO with the invoice cost. Use the Receiving Report (RRP) options to determine if you update the Inventory file with the invoice cost.
Exception Report Options – Indicate you options for the exception report.