iNet: Setting Up Additional Vendors


Follow the procedures in this job aid to set up additional vendors to use when transmitting EDI documents using iNet Vendor Direct.

This job aid assumes you have completed all the set up steps required to use iNet Vendor Direct to transmit EDI documents. For more information, refer the iNet Vendor Direct Setup Guide. Additional information about iNet is available on the Epicor web site at www.activant.com.


1

Download the EDI Vendor List

The List includes the specific vendor information you'll need to enter a vendor record. The document is available from the Epicor web site.

  1. Go to http://www.activant.com/eaglecustomers/dms/index.cfm

The Eagle Documentation index displays.

  1. Click the link for Telecommunication documents. In the list of documents that displays, select Certified EDI Suppliers.

If a vendor you want to transmit with is not found in the List, you can request that the vendor be added. Contact the Advice Line at 1(800) 322-3077 to do this. It may also be possible to transmit EDI documents to a vendor that is not on the list, check with the Advice Line.


2

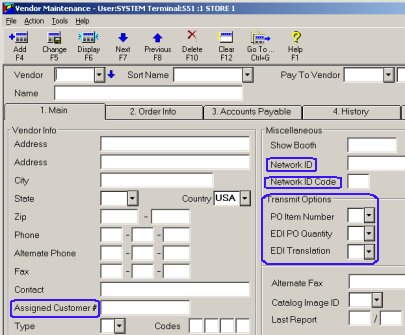
Required vendor information

To transmit EDI documents, a vendor record must exist in Vendor Maintenance (MVR) and specific fields filled in for EDI document transmission. Those fields are:

  • Assigned Customer #

  • Network ID

  • Network ID Code

  • (Optional) Transmit Options – PO Item Number, EDI PO Quantity, and EDI Translation

This information is specific to each vendor and can be found in the List (refer to Section 1).

This job aid assumes that a vendor record exists in Vendor Maintenance (MVR) for the vendor. If not, add the vendor record and then continue with the next section. Refer to online help for more information about adding a vendor record.


3

Enter vendor information

Complete the following to setup an additional EDI vendor.

  1. At the Main Menu, or from Network Access at the Function prompt, type MVR and press <Enter>. Or, from the Eagle Browser, click Applications, click Inventory Menu, then click Vendor Maintenance (MVR).

  2. Display the first EDI vendor that you want to set up.

  3. Using the Epicor iNet Vendor Direct Vendor List, enter the required EDI specific information. Refer to the screen in the previous section for the location of these fields on the MVR screen..

  4. Network ID – refer to the list, the Network ID column, enter the numeric code for the vendor, exactly as it displays in the list.

  5. Network ID Code – refer to the list, the Network ID Code column, enter the two-character code for the vendor in this field.

  1. (Optional) Fill in the Transmit Options fields if required by the vendor you are setting up.

  • PO Item Number (Transmit Options, first position) – Determines the item number transmitted with the PO. The system default is to transmit the mfg part number. Fill in this field if the vendor requires something other than the mfg part number to be transmitted. Type S for SKU/Alt part #. Type B for SKU/Alt part #, unless Keep Stock Info is No, then use Mfg#/Spcl.

  • EDI PO Quantity (Transmit Options, second position) – Type S to transmit purchase order quantities in Stocking units of measure. Type P to transmit quantities in Purchasing units of measure (this is the usual choice for most vendors).

  • EDI Translation (Transmit Options, third position) – refer to the list, the EDI Translation column. The system default is XMG (M). Fill in this field if the vendor requires something other than XMG. If the code is XVN, type V in this field (for vendor part number). If the code is XUP, type U in this field (for UPC number).

  1. Enter your assigned customer number.

If a vendor does not assign a customer number, create your own numbering scheme. Epicor recommends that you use your store number and make it a four-digit code (0001 for Store 1, 0002 for Store 2, etc.). For a specific vendor, the assigned customer number must be different for each store. For example, the assigned customer number for Store 1 for Wrangler and Hillman can both be 0001, and the assigned customer number for Store 2 for Wrangler and Hillman can be both 0002. But the assigned customer number for Wrangler for both Store 1 and Store 2 can't be 0001.

  1. Click Change or press <Change> to save the information you entered.

  2. Multistore: Repeat steps 2 through 6 for each store.

  3. Repeat steps 2 through 7 for each additional EDI vendor you are adding.