Create and Complete a Finished Goods Order


This job aid explains the process for creating an order for finished goods items. It assumes the following:

  • you are familiar with the Bill of Materials application (modifying components, etc.)

  • you know POS basics (creating and recalling an order, etc.)

  • you have completed the required setup for the Finished Goods application

For more information about the Finished Goods application, refer to the online help topics. From the Contents tab, click to open the Inventory book and then the Finished Goods book.

The finished goods process consists of the following: 1) create the finished goods order, 2) mark the finished goods item as built, and 3) print and purge the finished goods order.


1

Create the finished goods order and print

On a POS order, designate the raw materials used to create the finished item. You have the option to repeatedly use the same order transaction for  finished goods, rather than creating a new order each time you generate a finished item. If you use this method, you could use the same order for a speicific time period (for example, one month). Then you'll have an historical picture of all finished goods for the month.

  1. At POS, create an order transaction.

  2. If it exists, use the finished goods account as the customer number.

  3. At Item (SKU), enter the Bill of Materials SKU, from which you'll select components.

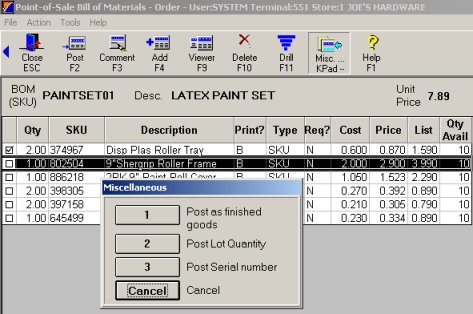
  4. At Quantity, type 1 or the quantity of finished items you're creating. Press Enter. The Bill of Materials Posting window displays.

  1. Make any needed changes to the components, then click Misc. From the menu, click 1 - Post as finished goods.

  2. In the dialog that displays, enter the SKU to use to track the finished item. This is the same SKU you'll later use to sell the finished item. The dialog closes and the posting screen displays with the details for the finished goods order.

  3. Click Total and save the document. The finished item is now on order and the shop can begin building it. If a shop order printer is set up on your system, the document prints to that printer.


2

Mark the finished goods item as built

When the shop has built the finished item and it is ready to go into inventory, retrieve the finished goods order and mark the item as "built." For the components, this will reduce the QOH and update the sales history. For the finished item, the QOH is increased.

  1. At POS, recall the order that contains the finished item.

  2. Click Change. Type the line number of the finished goods item to be marked as built and press Enter. This is the line number that includes the quantity and price information.

  3. Click Menu and from the Posting Menu select B-Post Finished Goods.

  4. In the dialog box that displays, click Yes to confirm the posting. The letter "f" (lower-case "f") displays in the Codes column to indicate that the item has been marked as built.

  5. Total and save the order. The updates are made to the items in the inventory file. The letter "f" in the Codes column changes to an "F" (upper-case "F"). If you repeatedly use the same order for finished goods items, this indicator reminds you that the item is already finished.

3

Track financial values of finished goods orders

The Open Orders/Pick Tickets Report (ROO) includes an option to help you track the financial information of finished goods orders. Use Option F, Print Finished Goods changes to inventory values, to print cost and retail value changes associated with assembling a finished product (finished goods) from a list of raw materials. Because finished items may have a different cost/retail value (such as due to labor costs) as compared with the raw materials used to create them, this report provides the necessary figures to post to G/L the cost/retail value changes associated with finished items.

With ROO Option F, the ROO prints a shop order, but only includes items marked as finished goods (lower-case "f" in the Codes column), not items marked as posted (indicated by an upper-case "F" in the Codes column).

With ROO Option F, the following information prints in the Totals section of the report:

  • Current on-hand cost value— the current quantity on hand times current cost (replacement cost or average cost, depending on how the "Cost Used in Calculations"option is set in Options Configuration). This figure is comprised of 1) the sum the current on-hand cost value of all BOM components on the report, and 2) the sum of all Finished Goods SKUs current on hand cost values.

  • Current on-hand retail value— the current quantity on hand times retail price. This figure is comprised of 1) the sum of all BOM components on hand retail values, and 2) the sum of all Finished Goods SKUs current on hand retail values.

  • New on-hand cost value— the new quantity on hand (the quantities that items will be adjusted to after the Finished Goods posting occurs) times the new cost. The new cost value reflects the updated item cost after the finished item has been posted. This figure is comprised of 1) the sum of all BOM components new on-hand cost values, and 2) the sum of all Finished Goods SKUs new on-hand cost values. The new quantity on hand and costs are based on the changes that will occur to the current inventory records based on the yet to occur posting of finished items.

  • New on-hand retail value— the new quantity on hand (the quantities that items will be adjusted to after the Finished Goods posting occurs) times retail price. This figure is comprised of 1) the sum of all BOM components new on-hand retail values, and 2) the sum of all Finished Goods SKUs new on-hand retail values. The new quantity on hand and retail prices are based on the changes that will occur (but haven't yet) to the current inventory records.

4

Print and purge the finished goods order

A finished goods order is never invoiced, so the orders will accumulate in your Eagle system. Monitor these orders by printing, deleting, and then purging them on a regular basis (such as monthly).

  1. Print an edit list of  the finished goods orders using the Open Orders/Pick Tickets Report (ROO).

  2. In POS, recall and delete the finished goods orders that you no longer want to be able to recall in POS.

  3. Run the Open Order File Report (ROO) again. Use Option X  to purge the completed (the orders you deleted in step 2) finished goods orders.