
Price Checker: Procedures, Troubleshooting, and Printer Setup
The Eagle Price Checker is a hardware/software solution that allows your customers to verify or "check" the price of inventory items. This job aid explains how to log in and out of the price checker, scan items and print labels, troubleshoot problems, and set up a printer.
More information about Price Checker (including setup steps) can be found in the online help topics. From the Contents tab, open the Price Checker book located in the Inventory book.
1
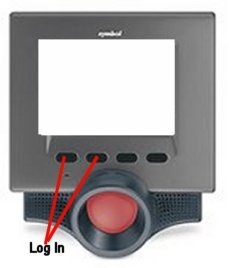
Procedures: Logging in
Each morning, log in to the Price Checker by pressing the two buttons on the far left simultaneously.
2
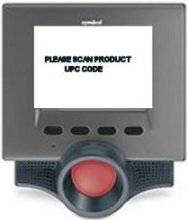
Procedures: Scanning items and printing labels
-
Once you have logged on, the Price Checker is ready for customer use. The Lookup Screen displays the message "PLEASE SCAN PRODUCT UPC CODE."
-
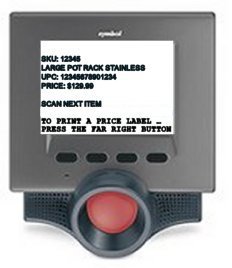
When a customer scans an item, the system searches the UPC file, and then the Inventory file, for the scanned item. If the item is found, its pricing information displays on the Price Checker screen. The information displays for 20 seconds, unless another lookup is initiated first.
-
If you have a printer set up for the Price Checker, the screen displays the last line
TO PRINT A PRICE LABEL...PRESS THE FAR RIGHT BUTTON
The customer simply presses button 4 (far right bottom) to print a label. They can press this button more than once to print multiple labels.
-
If the scanned item is not found in either the UPC file or the Inventory file, the screen displays a message similar to the following:
PRODUCT UPC CODE
12345678901234 NOT FOUND!
The message displays for five seconds, at which time the Price Checker returns to the Lookup Screen.
3
Troubleshooting
The following are a few troubleshooting tips you can use if you experience a problem with your Price Checker device.
-
Problem: The Price Checker won't log in to the server.
Solution: Verify that you have completed all of the installation steps. These are described in the topic "Price Checker: Setting Up" in online help. In addition, verify that the Price Checker's network settings are set up correctly for the local network. A simple "ping" test can be run to determine network connectivity between the Price Checker and the Eagle server.
-
Problem: The Price Checker becomes disconnected from the server due to power loss or failure.
Solution: Perform a "QUITCRT" for the Price Checker's terminal number, as follows:
-
From Eagle Browser, select Network Access. At the login prompt, type "OSPREY" and press <Enter>. When prompted for a password, type "AVATAR" and press <Enter>.
-
From the Osprey main menu at the Selection prompt, type "QUITCRT" and press <Enter>.
-
At "Terminals to Quit," type STXX (with XX being the actual terminal number for the Price Checker), and press <Enter>.
-
At "Action," type E and press <Enter>. After a few moments, press <Enter> again when prompted.
-
Press buttons 1 & 2 (two left side buttons) on the Price Checker to retry the login.
-
Press <Esc> to exit Osprey.
4
Printer Setup
If you have a printer for the Price Checker device, set up the printer following the same procedure as setting up a network printer. Then enter the printer number in Options Configuration.
-
Follow the procedure steps in the job aid titled "Set Up Network Report Printing." This job aid is found in online help, in the Job Aids book, in the System Management Job Aids book.
-
Open the Eagle Browser and display the Options Configuration window.
-
Set Subsystem to Inventory. Set Options to E4W - Eagle for Windows. Click Display. Double-click the Description column heading to sort the descriptions alphabetically.
-
Locate the description titled Network printer number for Price Checker (ID# 3086). In the Current Value column, enter the printer number you set up in MPS. Click Change.
